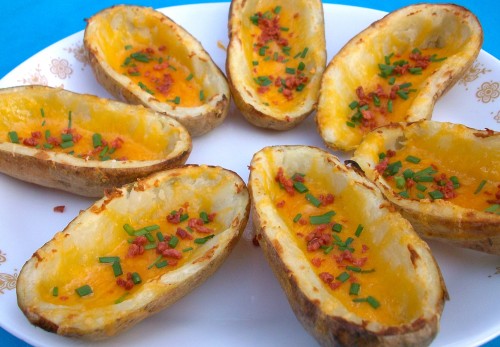
Cheesy Potato Skins

I apologize for the lack of posts last week. It was one of those off weeks for me, with a lot going on and not enough time in the kitchen. To top off my busy week, I end up breaking my camera on Saturday. I will apologize in advance for the photos that will be coming in the near future. Until I get a new camera, I am stuck with my droid camera.

Enough about my crazy life, how about a recipe? Potato skins are super easy and the perfect thing to eat while watching football. They also go great with Buffalo Wings. I’m posting a pretty basic recipe for the skins, you can tweak this anyway you like. You can add a mixture of different cheeses, herbs, meats, etc… So many fun things to create, having a basic platform is what you need and this is it.

Cheesy Potato Skins:

  • 4 Idaho Russet Potatoes, scrubbed
  • 2 cups shredded cheddar cheese
  • 2 tbs melted butter
  • 2-3 tbs chopped chives
  • 2-3 tbs bacon or bacon bits.
  • Salt and Pepper
  • Sour cream for serving
  1. Preheat oven to 375 degrees. Wrap scrubbed potatoes in tin foil and bake in oven for 1 1/2 hours, or until tender. You can test by inserting a knife into the potato, if it goes through with no resistance, it’s done. Let cool for 20 minutes.
  2. If using real bacon, cook the bacon till crisp and crumble, set aside.
  3. Preheat the broiler and put the on the upper middle part of the oven.
  4. Take the potatoes and slice them in half, lengthwise. Scoop out the pulp with a spoon, leaving a little of the pulp near the skin. Be careful not to go through the skin. Place on a baking sheet.
  5. Brush the skins with the melted butter and season with salt and pepper. Broil the skins till they start to crisp up and get a light brown color.
  6. Add the cheese to each skin and put back under the broiler, till the cheese is melted. (Do NOT walk away, cheese will melt fast).
  7. Top each skin with bacon and chives, serve with sour cream.
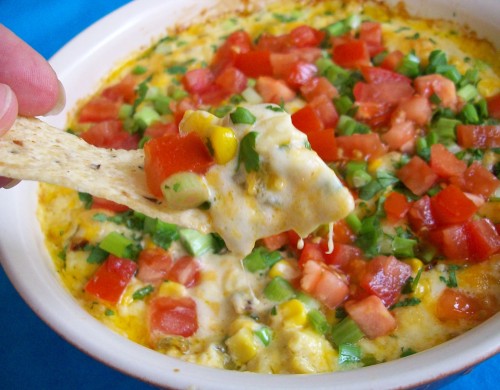
Hot Corn Dip

*If visiting from Pinterest, thank you! Please make sure to check out the rest of my blog as I have many other great recipes on here. Look for me on Pinterest and Instagram – user name @cook1864 I am also on Facebook*

One of my favorite dips to make during football season is this corn dip. I got the recipe a few years ago and it’s become a staple in our house. When someone tries it for the first time, they can’t leave without getting the recipe; it’s that addicting. The key ingredients are corn, cheese and chipotle peppers. You can adjust the heat level by adding or subtracting the amount of chipotle peppers. Personally, I love a lot of chipotle peppers, it gives it a great zing. You can also change up the amount of cheese. I’ve made it with more of the montery jack than the chedder and it’s worked out great. The addition of fresh ingredients at the end of baking, rounds out a perfect party dip.

Hot Corn Dip:

  • 2 cups shredded chedder cheese
  • 1 cup shredded Montery Jack
  • 2 tbs chipotle peppers in adobo sauce, diced small
  • 1 small can (4oz) diced green chilies, undrained
  • 1/2 cup Mayo
  • 1/4 tsp garlic powder
  • 1 11oz can of corn, drained
  • 1 small tomato
  • 2 tbs cilantro, chopped
  • 2 tbs green onions, sliced thin
  1. Preheat oven to 350 degrees.
  2. Mix the cheeses, chiptole and green peppers, mayo, garlic powder and corn together. Pour into an oven safe dish.
  3. Bake 20 minutes or until golden brown and bubbly
  4. Top with diced tomatoes, green onions, and cilantro. Serve immediately with tortilla chips.

Italian Sausage Peppers and Onions

One of my favorite foods is sausage, peppers and onions. Most people grill the sausages and saute peppers and onions together. But I like taking it a few steps further. The Italian way of making this dish is to make it into a yummy tomato sauce. The sausages and veggies get flavor from the tomatoes, herbs and marsala wine. It’s to die for! One thing I would recommend is not to buy that cheap marsala cooking wine you see in the grocery store. It’s not the real thing and the taste is horrible. Go to the liquor store or wine store and get the real stuff, which is only around $5-$6.

If you aren’t in the mood to make the sausages into sandwiches, this recipe would be awesome over some pasta or just as is. Enjoy!

Italian Sausage Peppers and Onions:

  • 1/4 cup extra-virgin olive oil
  • 1 1/2- 2 pounds sweet Italian sausage
  • 2 red bell peppers, sliced
  • 2 yellow onions, sliced
  • 1 teaspoon kosher salt
  • 1 teaspoon freshly ground black pepper
  • 1/2 teaspoon dried oregano
  • 1/2 cup chopped fresh basil leaves
  • 4 garlic cloves, chopped
  • 2 tablespoons tomato paste
  • 1 cup Marsala wine
  • 1 (15-ounce) can diced tomatoes
  • 1/4 teaspoon red pepper flakes, optional
  1. Heat the oil in a heavy large skillet over medium heat. Add the sausages and cook until brown on both sides, about 7 to 10 minutes. Remove from the pan and drain.
  2. Keeping the pan over medium heat, add the peppers, onions, salt, and pepper and cook until golden brown, about 5 minutes. Add the oregano, basil, and garlic and cook 2 more minutes.
  3. Add the tomato paste and stir. Add the Marsala wine, tomatoes, and chili flakes, if using. Stir to combine, scraping the bottom of the pan with a wooden spoon to release all the browned bits. Bring to a simmer.
  4. Cut the sausages into 4 to 6 pieces each, about 1-inch cubes. Add the sausage back to the pan and stir to combine. Cook until the sauce has thickened, about 20 minutes.

Source: Giada De Laurentiis via Food Network

Buffalo Chicken Wings

Wings are a staple during football season. I’ve made them several different ways and found Ina’s way to be the easiest. I am not a big fan of fried chicken wings and have always baked them. But I found with baking them they don’t crisp up like you would get with fried. Ina’s recipe calls for broiling the wings which gives it a nice crispy outside. When it came time to flipping the wings, I decided to put them on a new baking sheet due to all the fat that was on the first sheet. That helped with really crisping them up. I suggest putting on more sauce then you think it needs. I didn’t get a huge amount of the hot sauce flavor and ended up making some extra to dip them into. Overall they turned out great. Serve them with celery and blue cheese dressing (or ranch).

Buffalo Chicken Wings:

    • 16 chicken wings (about 3 pounds)

    • 1/4 pound (1 stick) unsalted butter

    • 4 teaspoons Frank’s Hot Sauce

    • 1 teaspoon kosher salt

  1. Preheat the broiler.
  2. Cut the chicken wings in thirds, cutting between the bones. Discard the wing tips.
  3. Melt the butter, hot sauce, and salt. Put the wings on a sheet pan and brush them with the melted butter.
  4. Broil them about 3 inches below the heat for 8 minutes. Turn the wings, brush them again with the butter, and broil for 4 more minutes or until cooked.

Source: Ina Garten via Food Network


Football Sandwiches aka Ham and Cheese Yumminess

A few years ago one of my best friends, Kali, was telling me about these sandwiches her mother makes for football season, Christmas Eve and just about any other time of the year. Her mother, Patty, has been making them for as long as Kali can remember. They sounded interesting and I asked her to please get the recipe from her mom. I’m so happy that Patty gave me the recipe. These sandwiches are sooooooo good (yes I used more than one o cause that’s how good they are).

The sauce is what takes the sandwiches from plain ole’ ham and cheese to ham and cheese yumminess! It’s made with butter, horseradish mustard, grated onion and poppy seeds. Doesn’t get any better than that! The other great thing about these sandwiches is that you can make them ahead of time and pop them in the oven when you are ready. Kali says they can be put in the freezer. I have yet to try that because they are gone before I need to think about freezing. The sandwiches are great to take to tailgates parties. They are individually wrapped in foil so they stay nice and warm in an insulated bag.

Patty, my family and I thank you for this recipe. It’s become a staple on game days. And when Penn State starts playing Nebraska again after they join the Big Ten; we will be thinking of you as we are eating the sandwiches and watching the Lions run all over the Huskers. 🙂 GO STATE!

Note: I doubled the sauce recipe because I love slathering on a lot of sauce. Also, when using Kaiser rolls, they tend to be a bit bigger than regular hamburger buns and need the extra sauce.

Football Sandwiches:

  • 12 Kaiser rolls or regular buns
  • 1 1/2 – 2lbs sliced ham
  • 1 lb swiss cheese

Sauce:

  • 2 sticks of butter, softened
  • 6 tbs horseradish mustard
  • 2 tbs grated onion
  • 2 tbs poppy seeds
  1. Preheat oven to 300 degrees.
  2. Combine all the ingredients for the sauce. Split the rolls and spread the sauce on the inside of both sides of the buns.
  3. Place a slice or two of ham and a slice of cheese on the buns and replace the top of the bun.
  4. Individually wrap each sandwich in tin foil. At this point you can refrigerate the sandwiches till you need them.
  5. Bake for 20-25 minutes or until the cheese is nice and melted. Serve hot.

Source: Patty and Kali Johnson

Gina Marie’s Potato Salad

Potato salad is one of those fixtures that screams BBQ’s and family gatherings. Throughout the years I’ve learned a few tricks to make a great potato salad. First, there is no need to add tons of ingredients to a potato salad, it’s all about the potatoes. If you add too many things to it you will lose the potatoes and what’s a potato salad without tasting the potatoes? Second, the way you cook them and mix them up are a huge part of making a terrific potato salad. I’ll go through some key steps…

1. Do not bother washing or cutting the potatoes. Drop them in a huge pot of cold water and get boiling. Once they boil, turn it back a bit and cook them till they start splitting.

2. Mix your mayonnaise and spices together BEFORE adding to the potatoes. This will make a difference. The more you mix your salad the more your potatoes will break down and become mush. Mixing up the mayo before hand helps you not overmix.

3. Use a secret ingredient. My secret ingredient is what I use in my ribs, Tony Chachere’s Creole Seasoning.

Follow these steps and your potato salad will be a huge success.

Gina Marie’s Potato Salad

  • 5 lbs Russet potatoes
  • 1 medium onion, chopped
  • 2 cups mayonnaise
  • 1 tbs mustard
  • 1 tbs Tony Chachere’s Creole Seasoning
  • salt and pepper
  • 1 bunch flat leaf parsley, chopped finely
  1. Put uncut and unwashed potatoes into a large pot filled with cold water on high heat. When water starts to boil turn down to medium-high heat and cook until the potatoes start to split.
  2. Drain and let cool till they are easy to handle. (you want the potatoes to be a little warm)
  3. With a pairing knife, remove the skin from the potatoes and dice into 1/2 inch pieces and add to a big bowl along with the onions.
  4. In a separate small mixing bowl mix together the mayo, mustard, creole seasoning, salt and pepper to taste. Adjust the seasonings to your likeness. (If you like it really saucy, add more mayo and adjust the seasonings accordingly)
  5. Add the mayonnaise mixture and parsley to the potatoes and stir till combined. Chill for at least 4-5 hours and serve.

Source: Gina Marie Original

Sugar Cookies – WE ARE…PENN STATE

While shopping in State College a few weeks ago, I saw a lion paw cookie cutter and had to have it. It’s amazing how many cookie cutters are out there right now. Iced cookies are becoming very popular and I’ve been searching for that perfect sugar cookie. I’ve made several different recipes and they were all good in their own way. But they never did “wow” me. Most of the recipes I found were a bit time consuming since you would have to chill the dough before you rolled it out. One day I stumbled on Bake at 350 and saw she makes her cookies with chilled butter and rolls them out as soon as it comes together. I knew I had to try it and I’m so happy I did. These made me say, “WOW”! I had the cookies done within 1 hour after I started. I will give you one tip. When you put the cold butter into the bowl, turn on the mixer and start the process of breaking down the butter BEFORE you add the sugar. I didn’t do that and when I turned the mixer on sugar went flying. Live and learn.

If you want a great tutorial of how to do the royal icing, Bake at 350 has it broken down for you. She really does an outstanding job explaining how to thin the icing and do outlines on the cookies.

Sugar Cookies:

  • 3 c unbleached, all-purpose flour
  • 2 tsp baking powder
  • 1 c sugar
  • 2 sticks cold butter
  • 1 egg
  • 1 tsp tsp pure vanilla extract
  • 1/2 tsp pure almond extract
  1. Preheat oven to 350.
  2. Combine the flour and baking powder, set aside. Cream the sugar and butter. Add the egg and extracts and mix. Gradually add the flour mixture and beat just until combined, scraping down the bowl, especially the bottom.
  3. Roll onto a floured surface and cut into shapes. Place on parchment lined baking sheets and bake for 10-12 minutes. Let sit a few minutes on the sheet, then transfer to a cooling rack.

Royal Icing:

  • 4 TBSP meringue powder
  • scant 1/2 c. water
  • 1 lb. powdered sugar
  • 1/2 tsp light corn syrup
  • few drops clear extract
  1. Combine the meringue powder and water. With the paddle attachment of an electric mixer, beat until combined and foamy.
  2. Sift in the powdered sugar and beat on low to combine. (Do NOT skip the sifting!)
  3. Add in the corn syrup and extract.
  4. Increase speed to med-high/high and beat for about 5 minutes, just until the icing is glossy and stiff peaks form.
  5. Cover with plastic wrap touching the icing or divide and color using gel paste food colorings.

Source: Bake at 350