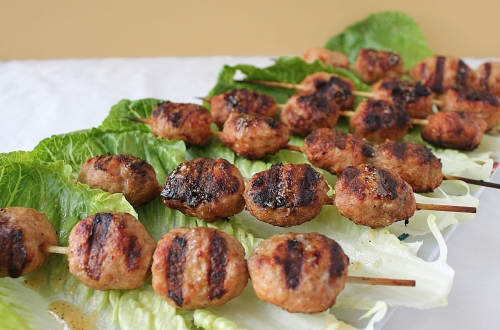
Chicken Caesar Salad Kabobs

I am still around, I promise. Real life has really gotten me busy. My parents are moving to town, my husband has had some medical issues, and the kids last day of school was yesterday. Whew, I am ready to put my focus back on this blog.

So, let me begin with this yummy kabob. We are beginning grilling season and I love finding new things to grill. I was trying to get inspiration for kabobs. I’m kind of sick of doing the same kind over and over. I found this recipe on Foodnetwork’s website and right away I knew I must make it. It’s very easy to put together and my daughter loved to help make it. Mixing the ingredients by hand is always fun for kids to do. We really enjoyed this recipe and I can say that it will appear on our menu again.

Chicken Caesar Salad Kabobs:

Serves 4-6

  • 2lb ground chicken
  • 4 tbs Caesar Salad Dressing, plus extra for serving
  • 1 cup Parmesan Cheese
  • 1/2 cup Bread Crumbs
  • 2 tsp lemon zest
  • 2 heads Romaine lettuce
  1. Mix all ingredients together in a large bowl. Form meat mixture into ovals. (You can measure out a large spoonful, being careful to not go too big or the meat will be too heavy on the skewers). Place the meat ovals on skewers (if using wooden skewers, make sure to have them soaked in water for at least 30 minutes). 
  2. Place chicken on grill and cook about 6 minutes per side, or until cooked through. (I like to always check one for doneness) Serve over Romaine lettuce leaves and drizzle extra dressing over the chicken. 
Source: Food Network

Homemade Vegetable Fried Rice

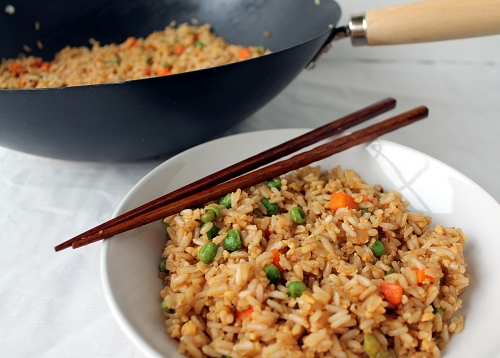
My family loves Chinese food and we do a good amount of take-out. I know we could lessen that and so I decided to begin to make my own version of our favorite things. The first step was fried rice. A long time ago we went to one place that put ginger in their fried rice. I loved it and haven’t found anyone else that does that. I knew that was a must ingredient to my homemade fried rice. I also love hoisin sauce and thought that might work in the rice too. I’m so glad I decided to add these two ingredients into the dish, the rice turned out to be some of the best I’ve ever had.

Making your own fried rice is really easy, but you do have to plan in advance. From what I’ve read, using cold cooked rice is the best way to get the right texture. I made the rice in the morning and put it in the fridge when it was done. If you don’t have time to do it in the morning, make it the night before. Either way, you must make your rice in advance.

Homemade Vegetable Fried Rice:

  • 3 cups cooked long grain rice, white or brown, cold
  • 3 tbs vegetable oil
  • 1 small white onion, diced small
  • 4 garlic cloves, finely minced
  • 3 tsp finely minced fresh ginger or freshly grated ginger (using microplane)
  • 4 green onions, thinly sliced (white and green parts)
  • 2 cups frozen peas and carrots
  • 2 eggs, lightly beaten
  • 3 tbs low-sodium soy sauce (you can add more to taste)
  • 2 tbs Hoisin Sauce
  1. Heat 1 tbs of the oil in a wok or 12 inch skillet set over medium-high heat. Add the onion and cook 2 minutes, until softened. Add the garlic and 2 tbs of the ginger, cook until fragrant. Add half of the green onions, peas and carrots and cook until they are warmed, about 3 minutes. 
  2. Push the vegetables to the side of the pan; making a hole in the center and add the remaining 2 tbs oil. Add the eggs to the center of the pan and whisk constantly till the eggs are just about cooked. Mix into the rest of the vegetables. 
  3. Add the rice and break up the clumps stir everything together then flatten the rice out. Let sit untouched for about 2 minutes. Stir the rice and add the soy sauce, remaining 1 tbs of ginger, and hoisin sauce, continuing to break up any rice clumps. Add the remaining green onions and adjust seasonings, to taste. Enjoy!
Source: Gina Marie Original


Restaurant-Style Queso Blanco Dip

If you are like my family when you go to a Mexican restaurant, you must order cheese dip with your chips. My kids are addicted to it. With Cinco de Mayo just a few days away, you can celebrate it by making a homemade version of the addicting cheese dip.

I’ve been seeing recipes popping up all over the blogosphere and decided to finally try it. The surprising ingredient is white American cheese. It melts wonderfully and gives it the taste that you get in the restaurants. When I went to the deli to get the cheese, I asked for a block of 3/4lb White American, un-sliced You can play around with the jalapenos and tomatoes and put in as little or as much as you would like. The recipe makes a large amount of dip, so this would be great to make with family and friends. Put it in a crock pot to keep it warm and enjoy!

Queso Blanco Dip:

  • 1 Tbs Vegetable or Canola oil
  • 1/4 cup white onion, diced
  • 1 large jalapeno or serrano, seeds and stem removed; diced
  • 12 oz white American cheese (I have the deli give 3/4lb block), shredded
  • 4 oz Monterrey Jack cheese, shredded
  • 1/4 cup-2/3 cup cream, half-and-half, or whole milk
  • 1 roma tomato, seeds removed and diced
  • 1 small bunch cilantro, roughly chopped
  1. Heat the oil in a saute pan. Cook the onion and pepper until softened and reduce heat to medium-low.
  2. Add the shredded cheese and 1/4 cup of the cream. Stir until mostly melted.
  3. Add the tomatoes, cilantro, and additional cream a little at a time until you reach desired consistency. (I needed to add a lot of cream to get it the right consistency, the cheese will thicken as it sits) Serve with chips

Source: Confections of a Foodie Bride

Peanut Butter and Jelly Cookies

To me, peanut butter and jelly is comfort food. It takes me back to being a child and eating them for lunches. Even though my pallet has evolved and grown as I have grown, I still enjoy eating a peanut butter and jelly sandwich for lunch. I love desserts that will incorporate the two ingredients that are meant to always be together. I’ve made peanut butter and jelly bars that everyone loves, so I figured these cookies have to be good. Not only were they good, they were fantastic!

The cookies are easy to make and quick to whip up. I’m not a fan of cooking with shortening and the recipe called for butter flavored shortening. I was able to substitute that with real butter and the results were great. It’s up to you and your preference which one you would like to use. Either way, you are going to have a fantastic cookie that everyone is going to love.

Peanut Butter and Jelly Cookies:

  • 1 1/2 cups all-purpose flour
  • 1 tsp baking soda
  • 1 tsp salt
  • 1/2 cup unsalted butter, softened or 1/2 cup butter-flavored shortening
  • 1 cup creamy peanut butter
  • 1 cup dark brown sugar
  • 1/3 cup granulated sugar
  • 3 tbs milk
  • 1 tsp vanilla extract
  • 1 large egg
  • 1/2 cup grape jelly
  • 1/2 cup creamy peanut butter
  1. Preheat oven to 375 degrees F.
  2. In a medium bowl, combine flour, baking soda and salt; set aside. In a large bowl, combine butter (or shortening if using), peanut butter, both sugars, milk and vanilla.
  3. With a hand-held mixer, beat on medium speed until just combined. Add egg and beat until incorporated. Gradually add flour mixture and mix until combined.
  4. Roll heaping tablespoons of dough into balls with hands. Place on parchment lined baking sheets and press into the centers with thumbs to form divots. In each divot, place 1/2 teaspoon of jelly and 1/2 teaspoon of peanut butter. Bake in the preheated oven for 10-12 minutes. Let cool.

Source: slightly adapted by Pip and Ebby 

Homemade BBQ Sauce

Grilling season is right around the corner. I’m more than ready to be enjoying the warmer weather and grilling on the back porch. We had a beautiful weekend so I decided to smoke a rack of ribs. I’m so glad I had the chance to be outside because this coming weekend we are expecting some snow. Blech!

Normally, I cook my ribs low and slow in the oven and then finish it off on the grill. But this time I wanted to do the entire cooking process in the smoker. I wanted to make a BBQ Sauce that would compliment the long time it takes to smoke ribs. Normally, it takes hours to make a really good BBQ Sauce. I wanted to find something that would be a little easier for everyone who wants homemade but doesn’t have hours to spare. This is it! It’s tangy and sweet, exactly what I was looking for.

Quick and Easy BBQ Sauce:

  • 1 medium onion, peeled and quartered
  • 1/4 cup water
  • 1 cup ketchup
  • 2 tbs cider vinegar
  • 2 tbs Worcestershire sauce
  • 2 tbs Dijon mustard
  • 5 tbs molasses (I forgot to get some used a sugar free syrup)
  • 1 tsp hot pepper sauce
  • 1/4 tsp ground black pepper
  • 1 1/2 tsp liquid smoke (optional)
  • 2 tbs vegetable oil
  • 1 medium garlic clove, minced or pressed through a garlic press
  • 1 tsp chili powder
  • 1/4 tsp cayenne pepper
  1. In a food processor or a blender, process the onion and the water until pureed and the mixture resembles slush, about 30 seconds. Strain the mixture through a fine-mesh strainer into a liquid measuring cup, pressing on the solids with a rubber spatula to obtain 1/2 cup juice. Discard the solids. 
  2. Whisk the onion juice, ketchup, vinegar, Worcestershire, mustard, molasses, hot pepper sauce, black pepper, and liquid smoke (if using) together in a medium bowl. 
  3. Heat the oil in a large nonreactive saucepan over medium heat until shimmering but not smoking. Add the garlic, chili powder, and cayenne; cook until fragrant, about 30 seconds. Whisk in the ketchup mixture and bring to a boil; reduce the heat to medium-low and simmer gently, uncovered, until the flavors meld and the sauce is thickened, about 25 minutes. Cool the sauce to room temperature before using. 
Note – The sauce can be refrigerated in an airtight container for 1 week.
Source: slightly adapted from The New Best Recipe by Cooks Illustrated

Green Jello

In my family, no Easter dinner table would be complete without Green Jello. Everyone seems to have a favorite recipe when it comes to Jello salads. This one is ours. We usually decorate the jello by putting a small glass bowl in the middle and filling it up with black olives. I know my parents will wonder why I didn’t take a picture with the olives in the middle of the Jello, I must admit that I did not have olives. I will fix that on Easter, I promise.

When you ready to un-mold your Jello, make sure you submerge the mold in warm water for a minute or so. I was way to quick with the submerge part that it tore my jello as I begun un-molding it. It still tasted great and that is all that matters sometimes.

Green Jello:

Serves: 8-10

  • 1 lg package (8oz) cream cheese, softened
  • 1 20oz can Crushed Pineapple
  • 1 large box Lime Jello or 2 small boxes Sugar Free Lime Jello
  • 1 cup milk, at room temperature
  1. Using a fine mesh strainer, strain the crushed pineapple into a 4 cup measuring cup. Using the back of a wooden spoon, press down on pineapple to release all the juice. Set pineapple aside. Add enough water to the measuring cup to equal 3 cups of liquid. (this will include the pineapple juice)
  2. In a medium-size sauce pan set over medium-high heat, add the liquid and bring to a boil. Add the jello to the liquid and stir around till Jello is dissolved. Set aside to cool. 
  3. Meanwhile, place cream cheese and milk in a large mixing bowl. Using a hand mixer, mix until creamy. Add the drained crushed pineapple to cream cheese mixture. Stir till combined. 
  4. Once the Jello is cooled down, add to the cream cheese/pineapple mixture and whisk to combine. Pour into desired mold and refrigerate for at least 6 hours, preferably overnight. Un-Mold and serve. 
Note: I use a vintage Tupperware Jello Mold but you can find a similar one here
Source: Gina Marie Family Original

Asparagus and Cheese Tart

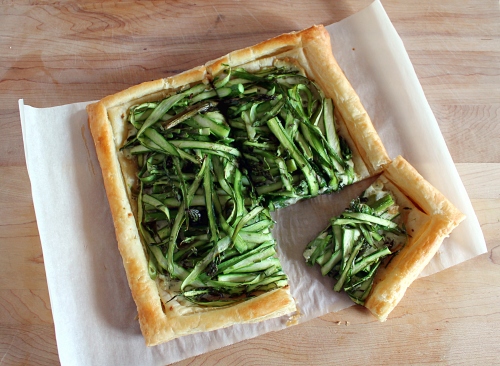
This week I will be posting some recipes that will be great to have on Easter. This recipe would be great for an Easter Brunch. I was brainstorming to come up with something that included shaved asparagus and Boursin Cheese since I had both in my refrigerator. I decided to make a tart using puff pastry. This is really easy to make and has only a few ingredients. I was getting very odd looks from my family, as I was explaining what I was doing. But after they tasted it, they knew that mommy knows what she is doing. I hope you enjoy too!

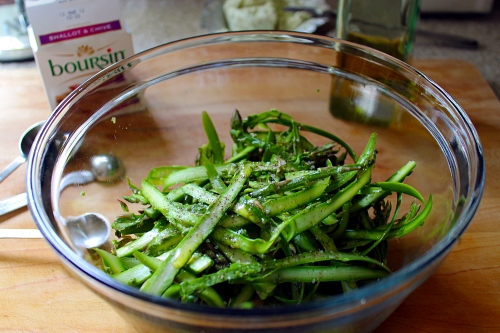
First you will shave the asparagus spears by using a vegetable peeler. Place in a bowl and add the olive oil, salt and pepper to taste. Stir to combine and set aside.

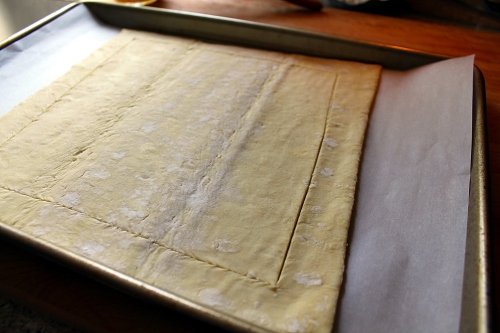
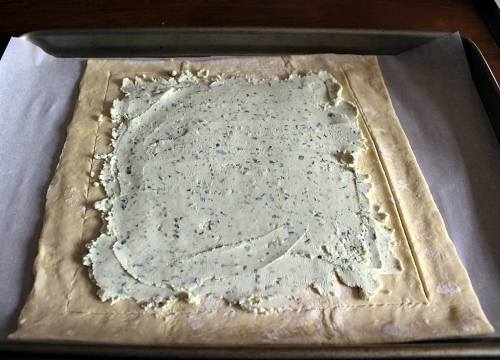
Lay out a sheet of puff pastry dough on a parchment lined baking sheet. With a pairing knife, lightly score the puff pastry about a 1/2 inch in from the edges.

Carefully spread the cheese in the center of the puff pastry dough. Spread to the edges of where you cut the dough. (Do not go to dough edge)

Add the asparagus to the center. Brush the edges of the dough using the egg wash and a pastry brush. Place in oven and bake.

Enjoy!

Asparagus and Cheese Tart:

  • 1 sheet frozen puff pastry dough, thawed in refrigerator
  • 1lb asparagus, shaved
  • 2 tbs olive oil
  • Salt and Pepper
  • 1 5oz Boursin cheese, room temperature (I used shallot and chives)
  • egg wash (whisk one egg with 1tbs of water)
  1. Preheat oven to 375 degrees. Line a baking sheet with parchment paper.
  2. Carefully shave the asparagus spears using a vegetable peeler. Place in a medium bowl. Add the olive oil and salt and pepper to taste. Mix together and set aside.
  3. Lay the puff pastry on the parchment lined baking sheet. Using a sharp paring knife, score a 1/2-inch-wide border around the dough. (make sure to not push the knife all the way through) Spread the cheese from the center of the dough to the edges of where you scored the dough. (it’s ok if you don’t use all the cheese) Lay asparagus on top of cheese.
  4. Brush the edges of the dough using the egg wash and a pastry brush. Bake in the oven for 20-25 minutes, or until dough is light browned and puff and the asparagus is tender. Remove from oven and let cool a couple of minutes before cutting. Slice tart however you would like to serve it and enjoy.

Source: Gina Marie Original