Panera Mac-n-Cheese


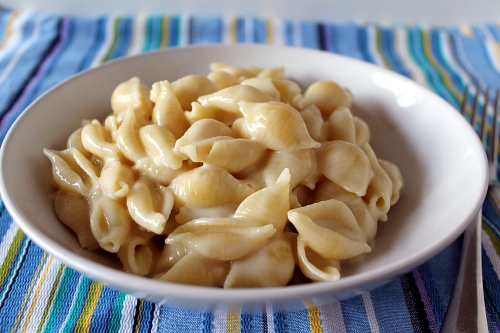
Every Friday my kids have a half day of school and one of our favorite things to do is go to Panera for lunch. 9 times out of 10 all of us order the mac-n-cheese. It’s seriously one of the best we have ever had. When I learned that they have the recipe on their website, I jumped for joy. Not only is this one of our favorites to make at home, it’s super easy. It’s just as creamy and full of cheesy goodness like the one you can buy. I’m so happy to be able to make this at home when we have cravings but can’t get out of the house. I know you’ll enjoy as much as we do.

Panera Mac-N-Cheese:

  • 1 (16-ounce) package of rigati pasta (or other small pasta shells)
  • 1/4 cup butter
  • 1/2 cup all-purpose flour
  • 2 1/2 cups 2% reduced fat milk
  • 6 slices white American cheese, chopped
  • 1 cup (8 ounces) shredded extra-sharp white Vermont cheddar
  • 1 tablespoon Dijon mustard
  • 1 teaspoon kosher salt
  • 1/4 teaspoon hot sauce
  1. Prepare pasta according to package directions.
  2. Melt butter over low heat. Whisk in flour and cook 1 minute, whisking constantly.
  3. Gradually whisk in milk (or cream); cook over medium heat, whisking until mixture thickens and bubbles. Remove from heat.
  4. Add cheeses, mustard, salt, and hot sauce, stirring until cheese melts and sauce is smooth.
  5. Stir in pasta and cook over medium heat for 1 minute and serve.

Source: Panera
Herb Dip and a Sweet 16 birthday party


This is what I’ve been busy with the past couple weeks. My daughter will be turning 16 this week and we wanted to give her a party she won’t ever forget. As you can see, it was a Mad Hatter Tea Party theme. It turned out exactly how I had imagined (despite the rain). Our menu consisted of the chicken salad sliders, spirals (Sam’s Club), salmon and cream cheese tea sandwiches, caprese skewers, fruit and cheese platter, and herb dip served in individual bread cups.


This was the closest shot I got of the herb dip in bread cups. The rain finally stopped after the party was getting started and I was rushing to get the food out while I had a crowd around me cheering me on. The herb dip was a huge hit and went fast. It’s perfect to serve a crowd and with football starting, perfect for your game watching. I took baguettes and cut the ends off, then sliced the bread into 4-5 inch pieces. With those pieces, I sliced them at a diagonal in the middle of the slices, to create the angled bread cups. Hollowed out the inside (leaving enough bread so the dip won’t fall out) then piped the dip in the holes. It looked so beautiful, definitely my favorite part of the food table.

We put drink me tags on all the water bottles. They looked so cute!

The table settings were beautiful even after the rain hit.

My parents were kind enough to get her birthday cake for us. I was planning on making it but was quickly realizing I would have no time to do exactly what I wanted.

I did however make cookies for everyone to take home. I realized the day after the party that I had not taken any pictures of the cookies. I quickly gathered the leftover cookies so I could take a quick photo.

I can’t believe she’s going to be 16!

Happy Birthday to cutest Mad Hatter ever!

Herb Dip:

  • 8 ounces cream cheese, at room temperature
  • 1/2 cup sour cream
  • 1/2 cup mayonnaise
  • 4 scallions, white and green parts, minced
  • 2 tablespoons fresh parsley leaves, minced
  • 1 tablespoon fresh dill, minced
  • 1 teaspoon kosher salt
  • 3/4 teaspoon freshly ground black pepper

Place the cream cheese, sour cream, mayonnaise, scallions, parsley, dill, salt, and pepper in the bowl of an electric mixer fitted with the paddle attachment and blend. Refrigerate overnight or for up to at least 6 hours.


Source: Ina Garten via Food Network


Corn Salsa

This is the time of year for corn and we eat it at least once a week during the summer. Sometimes it’s nice to have corn in different ways other than right off the cob. This salsa tastes like the one from chiptole and you can pair it with the cilantro-lime rice I already posted about. You could also use this salsa to go with any grilled meats. It would be great with steak. I cooked the poblano chile pepper on the grill while I grilled chicken. But if you aren’t making this when you were planning to grill, you could easily put the pepper under the broiler. Just be to sure to turn the pepper every couple minutes and watch it closely so it does not burn.

Corn Salsa:

  • 1/2 small poblano chile pepper, seeded
  • 3 teaspoons extra-virgin olive oil
  • Kosher salt
  • 1 cup fresh corn kernels (from 2 ears), or 1 cup frozen corn, thawed
  • 1 small jalapeno pepper, seeded and chopped
  • 2 tablespoons chopped fresh cilantro
  • 2 tablespoons chopped red onion
  • 2 tablespoons fresh lime juice
  • 1/2 teaspoon sugar
  1. Preheat a grill to medium high. Brush the poblano with 1 teaspoon olive oil and grill, skin-side down, until charred but still firm, about 5 minutes. Cool slightly; peel and finely chop.
  2. If using fresh corn, bring a small pot of salted water to a boil. Add the corn and cook until tender, 2 to 3 minutes; drain. (You can use leftover corn and just cut it off the cob without having to re-heat it)
  3. Mix the corn (if using frozen, add it here), poblano, jalapeno, cilantro and red onion in a bowl. Stir in the remaining 2 teaspoons olive oil, the lime juice, sugar and 1/2 teaspoon salt. Serve and enjoy

Source: Food Network

Cilantro-Lime Rice

If you have ever eaten at Chipotle’s you know all about their cilantro-lime rice. Awhile back I decided to attempt making homemade versions of these yummy burritos. In the next couple posts, I’ll be posting 3 of the main ingredients you need to make burritos like theirs.

I am going to start with my favorite ingredient, the cilantro-lime rice. It was very easy to put together and would go great as a side dish to any grilled/roasted meat. I always cook the rice with 1/4 cup less water than what is normally recommended. I find it helps the rice not get too clumpy. I’ve included the difference in my recipe below.

Cilantro-Lime Rice:

Serves 4

  • 1 cup Basmati white or brown rice
  • 1 3/4 cup water
  • 2 limes
  • 3-4 tbs chopped cilantro
  • 2 tbs vegetable oil
  • Salt
  1. In a medium saucepan heat water to boiling. Stir in rice, juice of 1 lime, and pinch of salt. Cover and turn the heat to low and let simmer till rice is tender, about 15-18 minutes. (Can be cooked in a rice cooker)
  2. Remove from heat and transfer rice to bowl. Add the cilantro (as much as you like to taste), juice of second lime, (I recommend tasting after putting in half of the lime to see if it’s enough for you), vegetable oil, and salt to taste. Stir till combined and serve. 

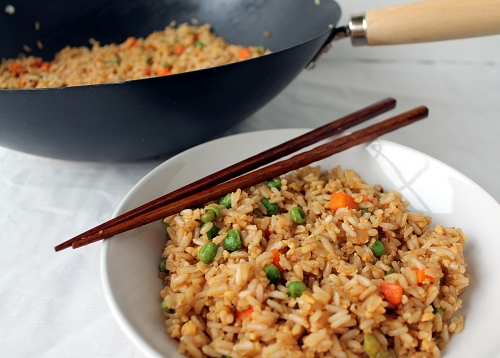
Homemade Vegetable Fried Rice

My family loves Chinese food and we do a good amount of take-out. I know we could lessen that and so I decided to begin to make my own version of our favorite things. The first step was fried rice. A long time ago we went to one place that put ginger in their fried rice. I loved it and haven’t found anyone else that does that. I knew that was a must ingredient to my homemade fried rice. I also love hoisin sauce and thought that might work in the rice too. I’m so glad I decided to add these two ingredients into the dish, the rice turned out to be some of the best I’ve ever had.

Making your own fried rice is really easy, but you do have to plan in advance. From what I’ve read, using cold cooked rice is the best way to get the right texture. I made the rice in the morning and put it in the fridge when it was done. If you don’t have time to do it in the morning, make it the night before. Either way, you must make your rice in advance.

Homemade Vegetable Fried Rice:

  • 3 cups cooked long grain rice, white or brown, cold
  • 3 tbs vegetable oil
  • 1 small white onion, diced small
  • 4 garlic cloves, finely minced
  • 3 tsp finely minced fresh ginger or freshly grated ginger (using microplane)
  • 4 green onions, thinly sliced (white and green parts)
  • 2 cups frozen peas and carrots
  • 2 eggs, lightly beaten
  • 3 tbs low-sodium soy sauce (you can add more to taste)
  • 2 tbs Hoisin Sauce
  1. Heat 1 tbs of the oil in a wok or 12 inch skillet set over medium-high heat. Add the onion and cook 2 minutes, until softened. Add the garlic and 2 tbs of the ginger, cook until fragrant. Add half of the green onions, peas and carrots and cook until they are warmed, about 3 minutes. 
  2. Push the vegetables to the side of the pan; making a hole in the center and add the remaining 2 tbs oil. Add the eggs to the center of the pan and whisk constantly till the eggs are just about cooked. Mix into the rest of the vegetables. 
  3. Add the rice and break up the clumps stir everything together then flatten the rice out. Let sit untouched for about 2 minutes. Stir the rice and add the soy sauce, remaining 1 tbs of ginger, and hoisin sauce, continuing to break up any rice clumps. Add the remaining green onions and adjust seasonings, to taste. Enjoy!
Source: Gina Marie Original


Homemade BBQ Sauce

Grilling season is right around the corner. I’m more than ready to be enjoying the warmer weather and grilling on the back porch. We had a beautiful weekend so I decided to smoke a rack of ribs. I’m so glad I had the chance to be outside because this coming weekend we are expecting some snow. Blech!

Normally, I cook my ribs low and slow in the oven and then finish it off on the grill. But this time I wanted to do the entire cooking process in the smoker. I wanted to make a BBQ Sauce that would compliment the long time it takes to smoke ribs. Normally, it takes hours to make a really good BBQ Sauce. I wanted to find something that would be a little easier for everyone who wants homemade but doesn’t have hours to spare. This is it! It’s tangy and sweet, exactly what I was looking for.

Quick and Easy BBQ Sauce:

  • 1 medium onion, peeled and quartered
  • 1/4 cup water
  • 1 cup ketchup
  • 2 tbs cider vinegar
  • 2 tbs Worcestershire sauce
  • 2 tbs Dijon mustard
  • 5 tbs molasses (I forgot to get some used a sugar free syrup)
  • 1 tsp hot pepper sauce
  • 1/4 tsp ground black pepper
  • 1 1/2 tsp liquid smoke (optional)
  • 2 tbs vegetable oil
  • 1 medium garlic clove, minced or pressed through a garlic press
  • 1 tsp chili powder
  • 1/4 tsp cayenne pepper
  1. In a food processor or a blender, process the onion and the water until pureed and the mixture resembles slush, about 30 seconds. Strain the mixture through a fine-mesh strainer into a liquid measuring cup, pressing on the solids with a rubber spatula to obtain 1/2 cup juice. Discard the solids. 
  2. Whisk the onion juice, ketchup, vinegar, Worcestershire, mustard, molasses, hot pepper sauce, black pepper, and liquid smoke (if using) together in a medium bowl. 
  3. Heat the oil in a large nonreactive saucepan over medium heat until shimmering but not smoking. Add the garlic, chili powder, and cayenne; cook until fragrant, about 30 seconds. Whisk in the ketchup mixture and bring to a boil; reduce the heat to medium-low and simmer gently, uncovered, until the flavors meld and the sauce is thickened, about 25 minutes. Cool the sauce to room temperature before using. 
Note – The sauce can be refrigerated in an airtight container for 1 week.
Source: slightly adapted from The New Best Recipe by Cooks Illustrated

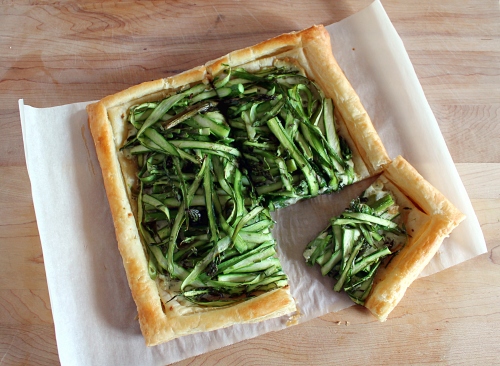
Asparagus and Cheese Tart

This week I will be posting some recipes that will be great to have on Easter. This recipe would be great for an Easter Brunch. I was brainstorming to come up with something that included shaved asparagus and Boursin Cheese since I had both in my refrigerator. I decided to make a tart using puff pastry. This is really easy to make and has only a few ingredients. I was getting very odd looks from my family, as I was explaining what I was doing. But after they tasted it, they knew that mommy knows what she is doing. I hope you enjoy too!

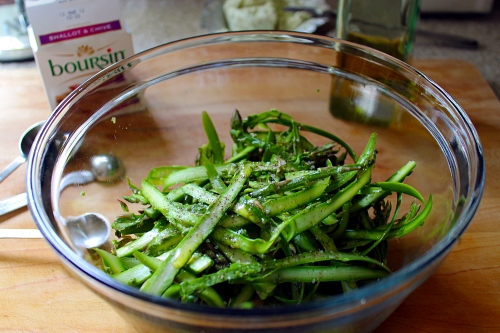
First you will shave the asparagus spears by using a vegetable peeler. Place in a bowl and add the olive oil, salt and pepper to taste. Stir to combine and set aside.

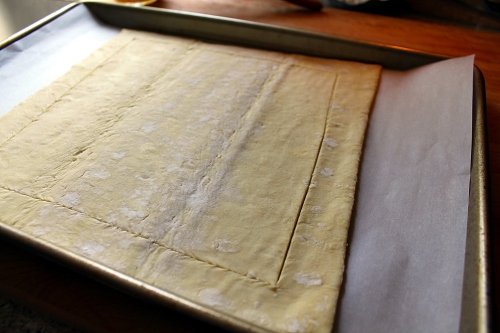
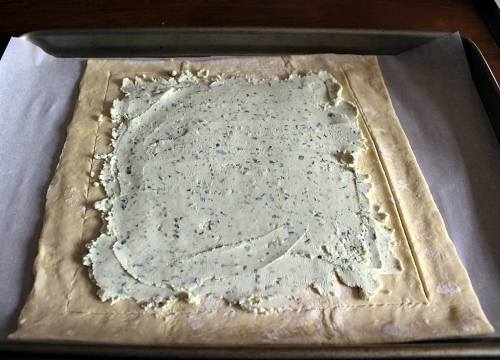
Lay out a sheet of puff pastry dough on a parchment lined baking sheet. With a pairing knife, lightly score the puff pastry about a 1/2 inch in from the edges.

Carefully spread the cheese in the center of the puff pastry dough. Spread to the edges of where you cut the dough. (Do not go to dough edge)

Add the asparagus to the center. Brush the edges of the dough using the egg wash and a pastry brush. Place in oven and bake.

Enjoy!

Asparagus and Cheese Tart:

  • 1 sheet frozen puff pastry dough, thawed in refrigerator
  • 1lb asparagus, shaved
  • 2 tbs olive oil
  • Salt and Pepper
  • 1 5oz Boursin cheese, room temperature (I used shallot and chives)
  • egg wash (whisk one egg with 1tbs of water)
  1. Preheat oven to 375 degrees. Line a baking sheet with parchment paper.
  2. Carefully shave the asparagus spears using a vegetable peeler. Place in a medium bowl. Add the olive oil and salt and pepper to taste. Mix together and set aside.
  3. Lay the puff pastry on the parchment lined baking sheet. Using a sharp paring knife, score a 1/2-inch-wide border around the dough. (make sure to not push the knife all the way through) Spread the cheese from the center of the dough to the edges of where you scored the dough. (it’s ok if you don’t use all the cheese) Lay asparagus on top of cheese.
  4. Brush the edges of the dough using the egg wash and a pastry brush. Bake in the oven for 20-25 minutes, or until dough is light browned and puff and the asparagus is tender. Remove from oven and let cool a couple of minutes before cutting. Slice tart however you would like to serve it and enjoy.

Source: Gina Marie Original