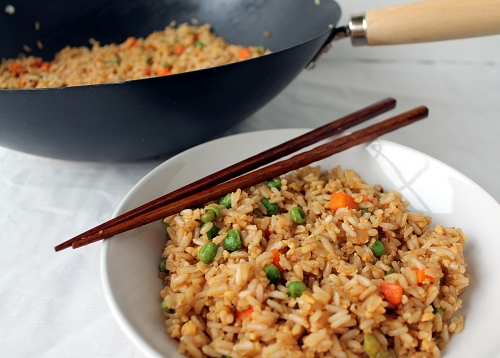
Homemade Vegetable Fried Rice

My family loves Chinese food and we do a good amount of take-out. I know we could lessen that and so I decided to begin to make my own version of our favorite things. The first step was fried rice. A long time ago we went to one place that put ginger in their fried rice. I loved it and haven’t found anyone else that does that. I knew that was a must ingredient to my homemade fried rice. I also love hoisin sauce and thought that might work in the rice too. I’m so glad I decided to add these two ingredients into the dish, the rice turned out to be some of the best I’ve ever had.

Making your own fried rice is really easy, but you do have to plan in advance. From what I’ve read, using cold cooked rice is the best way to get the right texture. I made the rice in the morning and put it in the fridge when it was done. If you don’t have time to do it in the morning, make it the night before. Either way, you must make your rice in advance.

Homemade Vegetable Fried Rice:

  • 3 cups cooked long grain rice, white or brown, cold
  • 3 tbs vegetable oil
  • 1 small white onion, diced small
  • 4 garlic cloves, finely minced
  • 3 tsp finely minced fresh ginger or freshly grated ginger (using microplane)
  • 4 green onions, thinly sliced (white and green parts)
  • 2 cups frozen peas and carrots
  • 2 eggs, lightly beaten
  • 3 tbs low-sodium soy sauce (you can add more to taste)
  • 2 tbs Hoisin Sauce
  1. Heat 1 tbs of the oil in a wok or 12 inch skillet set over medium-high heat. Add the onion and cook 2 minutes, until softened. Add the garlic and 2 tbs of the ginger, cook until fragrant. Add half of the green onions, peas and carrots and cook until they are warmed, about 3 minutes. 
  2. Push the vegetables to the side of the pan; making a hole in the center and add the remaining 2 tbs oil. Add the eggs to the center of the pan and whisk constantly till the eggs are just about cooked. Mix into the rest of the vegetables. 
  3. Add the rice and break up the clumps stir everything together then flatten the rice out. Let sit untouched for about 2 minutes. Stir the rice and add the soy sauce, remaining 1 tbs of ginger, and hoisin sauce, continuing to break up any rice clumps. Add the remaining green onions and adjust seasonings, to taste. Enjoy!
Source: Gina Marie Original


Asparagus and Cheese Tart

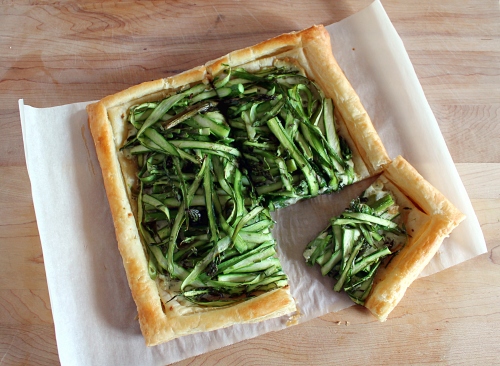
This week I will be posting some recipes that will be great to have on Easter. This recipe would be great for an Easter Brunch. I was brainstorming to come up with something that included shaved asparagus and Boursin Cheese since I had both in my refrigerator. I decided to make a tart using puff pastry. This is really easy to make and has only a few ingredients. I was getting very odd looks from my family, as I was explaining what I was doing. But after they tasted it, they knew that mommy knows what she is doing. I hope you enjoy too!

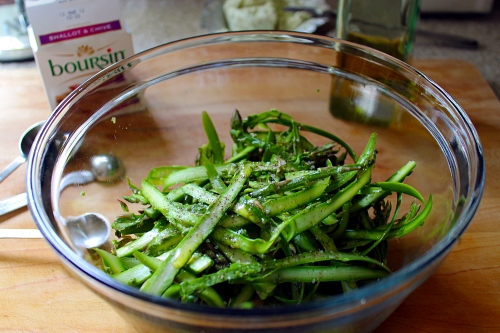
First you will shave the asparagus spears by using a vegetable peeler. Place in a bowl and add the olive oil, salt and pepper to taste. Stir to combine and set aside.

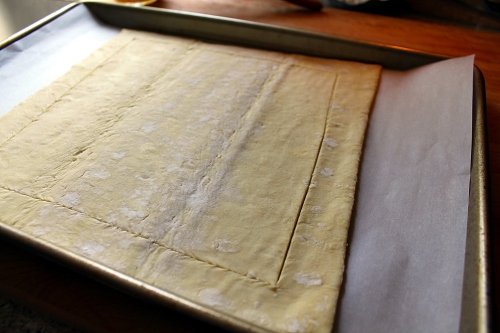
Lay out a sheet of puff pastry dough on a parchment lined baking sheet. With a pairing knife, lightly score the puff pastry about a 1/2 inch in from the edges.

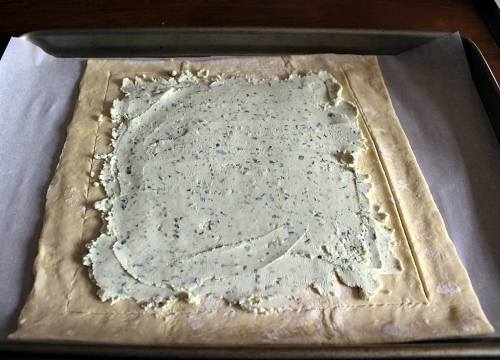
Carefully spread the cheese in the center of the puff pastry dough. Spread to the edges of where you cut the dough. (Do not go to dough edge)

Add the asparagus to the center. Brush the edges of the dough using the egg wash and a pastry brush. Place in oven and bake.

Enjoy!

Asparagus and Cheese Tart:

  • 1 sheet frozen puff pastry dough, thawed in refrigerator
  • 1lb asparagus, shaved
  • 2 tbs olive oil
  • Salt and Pepper
  • 1 5oz Boursin cheese, room temperature (I used shallot and chives)
  • egg wash (whisk one egg with 1tbs of water)
  1. Preheat oven to 375 degrees. Line a baking sheet with parchment paper.
  2. Carefully shave the asparagus spears using a vegetable peeler. Place in a medium bowl. Add the olive oil and salt and pepper to taste. Mix together and set aside.
  3. Lay the puff pastry on the parchment lined baking sheet. Using a sharp paring knife, score a 1/2-inch-wide border around the dough. (make sure to not push the knife all the way through) Spread the cheese from the center of the dough to the edges of where you scored the dough. (it’s ok if you don’t use all the cheese) Lay asparagus on top of cheese.
  4. Brush the edges of the dough using the egg wash and a pastry brush. Bake in the oven for 20-25 minutes, or until dough is light browned and puff and the asparagus is tender. Remove from oven and let cool a couple of minutes before cutting. Slice tart however you would like to serve it and enjoy.

Source: Gina Marie Original

Beef and Barley Soup

I love making soup because it’s so versatile. You can adjust any of the ingredients to your own personal liking or add things as you wish. Beef and Barley is one of my families favorites. When I make soup I usually just throw it together. But I wanted to share with you our favorite soup so I made sure to write down everything I did so I could pass it on to you. Please feel free to adjust this to your taste.

Beef and Barley Soup:

Serves 4-6 people.

  • 1 1/2 – 2lbs cubed stew meat
  • 4 tbs Olive Oil
  • Salt and Pepper
  • 2 carrots, diced small
  • 1 onion, diced small
  • 1 garlic clove chopped finely
  • 1/2lb-3/4lb fresh green beans, ends cut off and cut into small pieces
  • 1 (15oz) canned corn, drained
  • 1 bay leaf
  • 1/2 tsp fresh thyme, chopped
  • 1 (14oz) can diced tomatoes
  • 1/4 cup red wine (or beef broth to deglaze)
  • 2 (32oz) Beef Broth
  • 1 (32oz) Chicken Broth
  • 3/4 cup instant barley
  1. Heat a large pot over medium-high heat, add 2tbs olive oil. Salt and Pepper the cubed beef. Once the oil is hot, add the cubed beef in batches and brown on all sides, about 2 minutes per side. Remove from pan and continue browning the meat till all the meat is browned.
  2. Lower the heat to medium and add the remaining 2tbs of olive oil and the carrots and onion; saute till softened, about 7-8 minutes. Add the garlic and cook till fragrant, about 30 seconds. Add the wine (or beef broth) to deglaze the pan. Let simmer for about 2 minutes.
  3. Add the beef and chicken broth,(If you need to add more broth, use chicken broth) bay leaf, fresh thyme, canned corn, green beans, and diced tomatoes. Let simmer on low for about 1 1/2 hours. Add the barley for the last 20 minutes of cooking. Remove the bay leaf before serving. Enjoy!

Source: Gina Marie Original

Easter Lamb Cake

I want to share with you what one of my families Easter traditions are. We have several, but my favorite one is this Lamb Cake. Sadly, this year will be the first year I will not be making one. We are heading to where we will be moving soon, to be with my husband. He’s already started working and the kids and I are waiting for school to end before we are permanently there. Anyway, this picture comes from last years cake so please ignore the lack of decorations around the lamb. I have no idea why I took a picture of the cake before it was completed, but this was before I decided to start doing a blog. The one thing I would like to point out is the platter the lamb is on. This was my Great Grandmother’s and she used it to put her Lamb Cake on. One thing I wished I had of hers was the cast iron lamb mold. I have a very flimsy one, which desperately needs replaced. If you want to make a Lamb cake I highly recommend a good mold, so the cake batter doesn’t flow out the sides (like mine).

Let’s talk about the cake… It’s basically a spice cake and in order for the cake to stand up it has to be firm and dense. The cake has an ingredient in it called ground mace. The only time I ever use ground mace is when I make this cake. I honestly think this is what makes this cake taste wonderful. Whenever I smell the ground mace, it reminds me of my childhood. I can’t tell you how long this recipe has been in my family, but I know that at least my Great Grandmother used it. You don’t have to make this in a lamb cake mold. It would be great as a layered cake too. The recipe makes 2 lamb cakes. If you wanted to make it as a layered cake I would use 2 or 3 9 inch round cake pans. I’ve never made it as a round cake before so I’m unsure exactly how  many pans you would need. But, the cakes really puff up so I am thinking 3 might be good.

Either way you make this, I am just so thrilled to share my family recipe with you. I really hope you make this and enjoy it with your family. Happy Easter!

Lamb Cake Spice Cake:

makes 2 lamb cakes or 2-3 9inch round cakes

  • 4 1/2 cups Sifted Cake Flour
  • 1/2 tsp salt
  • 1/2 tsp ground mace (optional, although I recommend it)
  • 1 lb unsalted butter, softened
  • 2 1/3 cup granulated sugar
  • 7 eggs
  • 1/2 tsp almond flavoring
  • 1/2 tsp vanilla
  1. Prepare cake pans, butter and flour (use the cake flour) the insides of the pans you will be using. Shake out the excess flour.
  2. Preheat oven to 350 degrees.
  3. In a large bowl, or over parchment paper, sift flour once, measure and re-sift with the salt and mace. Set aside.
  4. In another bowl, cream the butter till waxy, then add the sugar gradually and cream together till mixture is light and fluffy. Add the eggs, one at a time, beating well and scraping after each addition, till smooth. Add vanilla, almond extracts and blend.
  5. Gradually add the flour mixture beating and scraping after each addition till well blended. If using round cake pans, pour batter evenly into each prepared pan. Bake for 40-45 minutes, or until a cake tester comes out clean.
  6. *If using Lamb mold* Place the mold, nose side down on baking sheet and fill the batter so it is rounded on top. Cover with the other half of the mold and bake for 1 1/2 hours, but start checking the cake after 45 minutes. You should be able to start testing the cake at this time with a cake tester, it will be done when it comes out clean.
  7. Let cool on rack for at least 30 minutes, before you unmold it to cool down completely. Frost as desired.
Icing:
*enough to ice 1 cake
  • 2 sticks softened butter
  • 1lb confectioners sugar
  • 1 tsp vanilla
  • 4-8 tbs water
  1. Mix together the butter, sugar and vanilla. Start with 4 tbs water, if the consistency is too thick, add another tbs. (You don’t want it too thin, I’ve used no more than 5tbs of water) Beat the frosting for at least 7 minutes on high. You want the frosting to be rich and fluffy.
  2. Ice your cake and enjoy!
Source: Gina Marie’s Family

Italian Pasta Salad

I made this pasta salad for the bridal shower I catered several weeks back. I can’t even begin to stress how easy it is to make and how versatile it is. You can put whatever veggies you want in it; asparagus, mushrooms, cucumber, green onions, yellow squash, etc… I made it so it was vegetarian friendly, but you could add diced ham, pepperoni or salami, if you want.  Try feta cheese instead of cheddar or mozzarella. It’s better made a day ahead of when you want to serve it. I like to keep a little extra of the dressing on the side, so when I’m ready to serve, I toss it with a tablespoon or two of the dressing to freshen it up. I also don’t add the tomatoes till ready to serve, if added to early they won’t taste fresh.

This is a basic pasta salad recipe, take it and add what you want to make it your own.


Italian Pasta Salad:

  • 2lbs Pasta (any shapes you want)
  • 3 small zucchini, diced small
  • 2 red or green bell peppers, diced small
  • 1 pint cherry tomatoes, sliced in half
  • 1 can black olives, drained
  • 1 8oz block cheddar cheese, diced small
  • 1 8oz block mozzarella cheese, diced small

Dressing:

  • 1 package Good Seasons Italian dressing
  • 1/2 cup red wine vinegar
  • 3/4 cup olive oil
  • 3 tbs water
  • 2 tbs fresh lemon juice
  1. Boil pasta according to package directions, till Al dente. Drain and drizzle with a little olive oil to keep the pasta from sticking, set aside.
  2. In a very large bowl, whisk together the Good Seasoning, vinegar, water and lemon juice. Continue to whisk and slowly pour the oil, till combined.
  3. Add the pasta and all veggies but the tomatoes, to the bowl with half of the dressing, mix to combine; reserve the leftover dressing.
  4. Once the pasta has cooled down, add the cheese and refrigerate till ready to serve. Before serving, add tomatoes and a tablespoon or two of dressing to freshen up the salad.

Source: Gina Marie

Sweet Potatoes and Apples Casserole

It took me till I was an adult to really enjoy what the sweet potato has to offer. When I was little I wouldn’t touch the sweet potato casserole even if it had marshmallows melted all over it. The first time I really tried the sweet potato casserole was when my mother-in-law made it. She put apples in it and I figured I’d go ahead and try it.

I was very happy I did, and surprised at how yummy it was. The apples, brown sugar and spices took it to another level. I’ve been making it this way ever since.

This recipe is very forgiving. I rarely go by a strict a recipe for this one. I tend to buy more canned yams than I need. One year I didn’t have enough to my liking but it still turned out ok. I use 3 apples and found that’s a good ratio to 2-3 large cans of canned yams. You can adjust the amount of yams as you make this.

Sweet Potatoes and Apples Casserole:

  • 2-3 40 oz cans Canned Yams, drained
  • 3 Apples, peeled and cored and diced in 1 inch cubes. I use Gala or McIntosh
  • 1/4 packed brown sugar ( I use splenda brown sugar)
  • 1/2 tsp Cinnamon
  • 1/4 tsp ground or fresh nutmeg
  • 2 tbs unsalted butter
  • 1 bag small marshmallows
  1. Preheat oven to 350 degrees. Butter a deep, medium size baking dish, set aside.
  2. Mix the brown sugar, Cinnamon, nutmeg, and apples together in a small bowl, set aside.
  3. Slice the yams into 1/2 inch rounds or cut the larger pieces into smaller pieces. Layer half the yams into the baking dish. Add the apple mixture and top with the remaining yams. Bake at 350 degrees for about 1 hour.
  4. Just before serving, pour as many of the marshmallows on top that you want, and bake for another 5 minutes or until the marshmallows get a golden brown. Serve.

Green Rice

Green Rice has been apart of our families Thanksgiving, Christmas and Easter dinners since before I was born. It’s not the prettiest photo subject, but the way it tastes makes it a star. The name might fool you, Green Rice is basically a broccoli and cheese casserole. I remember as a kid, always fighting with my brother over who gets the biggest scoop of the Green Rice. I would rather have had a plate of Green Rice than turkey or stuffing. It’s that good!

If you are looking for side dishes for your Thanksgiving dinner that can be made ahead of time, this is the perfect one. You will make the recipe up until you have to bake it. Once you have put it in the casserole dish, cover it with foil then refrigerate till ready to bake. Anything to make your Thanksgiving day a little less stressful is a good thing.

Green Rice:

  • 1 medium onion, diced small
  • 2 stalks celery, diced small
  • 13 tbs unsalted butter plus 1tbs to butter casserole dish
  • 2 cans cream of mushroom soup
  • 1 15oz jar of Cheez Whiz
  • 2 1/3 cup Minute Rice (I use the brown kind)
  • 2 10 oz packages of chopped broccoli, thawed and excess liquid squeezed out
  1. Preheat oven to 350 degrees. Butter 9×13 casserole dish and set aside.
  2. In a 10 inch saute pan set over medium heat, melt butter and add the onions and celery. Cook until onions and celery are soft, about 8 minutes, take off heat.
  3. In a large mixing bowl, mix together the cream of mushroom soup and Cheez Whiz. Add the butter, onions and celery, stir to combine.
  4. Add the rice and broccoli and stir till everything is combined. Pour mixture into the buttered casserole dish. At this point you can refrigerate it or bake it for about 45 minutes to 1 hour, until golden brown and bubbly on top. Enjoy!