Hot Reuben Dip

Reuben Dip

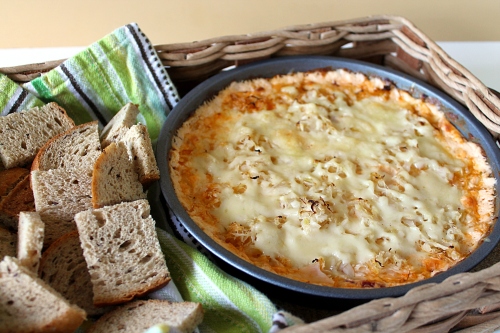
I’ve never been a big fan of the Reuben sandwich and I really don’t know why. I love all the ingredients but for some reason when I’ve seen it on the menu, I shy away. I saw this recipe that turns the sandwich into a dip and I decided to try it. What I found was that all the ingredients complemented each other without overpowering one another. I’m so glad I tried this dip, I don’t think I’ll shy away from a Reuben sandwich ever again.


Hot Reuben Dip:

  • 8 ounces cream cheese, softened
  • 1½ cups (6 ounces) shredded Swiss cheese
  • 4 ounces (about 4 slices) deli sliced corned beef, chopped
  • ½ cup Thousand Island dressing
  • ½ cup drained sauerkraut
  1. Preheat oven to 400 degrees F.
  2. In a large bowl mix together the cream cheese, 1 cup of the Swiss cheese, the dressing and corned beef. Spread in a pie plate or other shallow serving dish. Top with the sauerkraut and the remaining ½ cup of Swiss cheese.
  3. Bake for about 15 minutes, or until bubbly around the edges. Serve hot with cocktail-size rye bread squares.

Source: Brown Eyed Baker

Jalapeno Popper Dip

If you are planning a Super Bowl party, this dip has to be on the menu! Sadly, my Tampa Bay Buccaneers self destructed this season so my team is nowhere near the playoff season. But, I am cheering on the New England Patriots because their Offensive Coordinator is now the head coach for my beloved Penn State Nittany Lions. I am very excited about Coach O’Brien and hopes he does well throughout the playoffs.

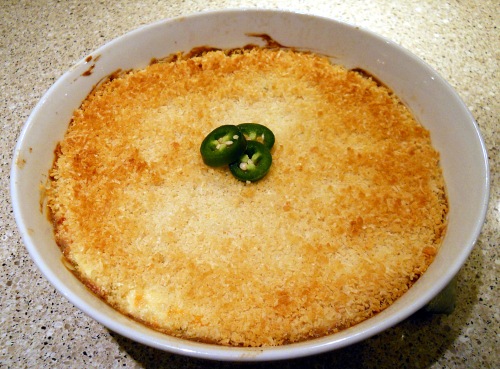
Let me get back to the food, if you love jalapeno poppers you are going to LOVE this dip. I wasn’t sure how much of the flavor of regular poppers would come out in the dip, and I was pleasantly surprised that it was strong. You will think you are eating poppers. I think they are best served with tortilla chips but you could use crackers too. You can up the amount of heat by using another jalapeno and the stems and ribs (the white part inside). With not knowing how much heat my guests would like, I took out the seeds and ribs on the jalapeno’s. I also added more cheese because life is better with more cheese. Anyway you make this, your guests will love it!

Jalapeno Popper Dip:

  • 2 (8 oz) packages cream cheese, at room temperature
  • 1 cup mayonnaise
  • 1 (4 oz) can chopped green chiles
  • 3 jalapenos, minced finely
  • 1 cup shredded Mexican style cheese
  • 1/2 cup shredded mozzarella cheese
  • 1 cup Panko breadcrumbs
  • 1/2 cup grated Parmesan cheese
  • nonstick cooking spray
  1. Preheat oven to 375 F.
  2. Combine the cream cheese, mayonnaise, green chiles, jalapenos, and both shredded cheeses in a medium bowl. Stir together until thoroughly combined and smooth. Transfer the mixture to a 9×9 baking dish.
  3. Mix the Panko and Parmesan together in a small bowl using a fork. Sprinkle evenly over the dip in the baking dish. Spray the topping lightly with cooking spray. Bake for 25-30 minutes, or until the topping is golden and the dip is hot. Serve with tortilla chips or crackers.

Slightly adapted from Tracey’s culinary adventures via My Baking Addiction (via Annie’s Eats)

Football! Football! Football!

Are you ready for some football? I know I am! It’s officially my favorite time of the year. I’ve already had my first pumpkin spice latte and I have pumpkin spice scentsy burning. I am seriously ready for fall! I am also ready to start cooking up football food. You can’t watch a football game without having great food. In the next several weeks I’ll be posting all sorts of goodies to eat while you watch your favorite teams.

Here is a link that will take you my previous Football Food Roundup.

And here are a few new added recipes that will be perfect for the game.

Stuffed Mushrooms

Spinach Dip

Shrimp Mousse

Chicken Enchilada Wraps

Italian Pasta Salad

Review: Tostitos® Dip Creations™ Freshly Made Guacamole Dip

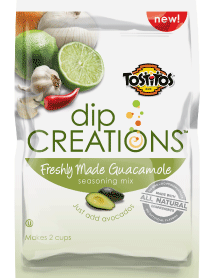
As part of the Foodbuzz Tastemaker Program, I sometimes get products to test out and blog about. This one is Tostitos® Dip Creations™ Freshly Made Guacamole Dip. I have my own personal way of making guacamole but was willing to try out this mix. If you are unsure of how to make a great tasting guacamole from scratch, this mix would be perfect for you.

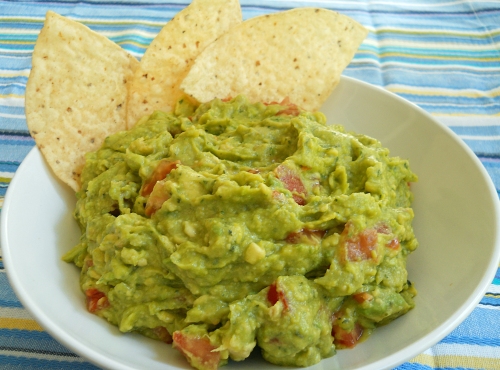
I was a little nervous about how it was going to turn out when I opened up the bag. The directions say to add the mix to three large avocados.  I mashed up my avocados and added the seasonings but thought it looked plain. I love texture in my guacamole so I decided to add tomatoes, something I always do anyway. I set it in the fridge to sit for 30 minutes to let the flavors meld (scared that it would turn brown). When I took it out to taste, I was pleasantly surprised to see it was still nice and green.  I was even more surprised at how good it tasted. The seasonings were dead on and there wasn’t one flavor that overpowered another. I really enjoyed the flavors, as did my family. Within minutes the guacamole was gone.

Overall: I would make it again but of course I’ll be sticking to my regular recipe which doesn’t have a lot of sodium and other things I can’t pronounce. I do suggest this dip mix for people who are unsure of what to put in their guacamole. You will be very happy with the outcome.

Note: I was not paid for this post; the opinions and views are strictly my own.

Oven Baked Fries

I am not exaggerating when I say these are the best oven fries I’ve ever had. I’ve had my eye on these babies for awhile. So, when the weather got nice for one day we grilled burgers and I made these fries.  The hardest thing about making your own fries in the oven, is getting them cooked to perfection. Soft and creamy on the inside and crispy on the outside. I could never get them to turn out that way. Thankfully the test kitchen at Cook’s Illustrated was able to figure out how to get them cooked perfectly. The ingredients are very simple and there is one important step in creating the perfect oven fries. The step may sound silly, but if not done you won’t have the creamy/crispy fries you long for. Soaking the potatoes in very hot tap water for a good 20 minutes is the key. I learned never to doubt Cook’s Illustrated and once I bit into a fry; I knew they had the winning recipe.

*Important Note* Make sure you use a heavy-duty baking sheet. If you use a lighter baking sheet the heat from the oven could cause it to warp.

Oven Baked Fries:

*Serves 3-4

  • 3 Russet Potatoes (about 8 oz each) peeled, each potato cut lengthwise into 10 to 12 even wedges
  • 5 tbs vegetable or peanut oil
  • Salt and ground black pepper
  1. Adjust an oven rack to the lowest position; heat the oven to 475 degrees. Place the potatoes in a large bowl and cover with hot tap water; soak 20 minutes. Meanwhile, coat an 18 by 12 inch heavy-duty rimmed baking sheet with 4 tbs of the oil and sprinkle evenly with 3/4 tsp salt and 1/4 tsp pepper; set aside.
  2. Drain the potatoes. Spread the potatoes out on a triple thickness of paper towels and pat throughly dry with additional paper towels. Rinse and wipe out the now-empty bowl; return the potatoes to the bowl and toss with remaining 1 tbs oil. Arrange the potatoes in a single layer on the prepared baking sheet; cover tightly with foil and bake for 5 minutes. Remove the foil and continue to bake until the bottoms of the potatoes are spotty golden brown, 15 to 20 minutes, rotating the baking sheet after 10 minutes. Using a metal spatula and tongs, scrape to loosen the potatoes from the pan, then flip each wedge, keeping the potatoes in a single layer. Continue baking until the fries are golden and crisp, 5 to 15 minutes longer, rotating the pan as needed if the fries are browning unevenly.
  3. Transfer the fries to a second baking sheet lined with paper towels to drain. Season with additional salt and pepper to taste and serve immediately.

Source: The New Best Recipe by Cook’s Illustrated

Spinach Dip

I love spinach and this dip is one of my ultimate favorites. It’s a very popular recipe but I will still post it just in case there are those who have never made it before. One of the things I did change was the amount of mayonnaise used. The original recipe calls for 1 cup but I feel that it gives to much of a mayonnaise taste so I cut it back to 3/4 cup. Other than that, I don’t change up the recipe too much and it’s always a hit. I love to double the recipe so I know I will have leftovers.


Spinach Dip:

  • 1 10 ounce pkg chopped frozen spinach, thawed and liquid squeezed out (place spinach in towel and squeeze)
  • 1 16 ounce container sour cream
  • 3/4 cup Mayonnaise
  • 1 package Knorr® Vegetable Soup recipe mix
  • 1 8 ounce can water chestnuts, chopped fine
  • 3 green onions, chopped fine
  1. Mix together the Mayo, sour cream and vegetable soup mix.
  2. Stir in the rest of the ingredients and mix till all combined. Place in refrigerator and chill at least 2 hours. Serve with pumpernickel bread, crackers and veggies.

Source: slightly adapted from Knorr


Basic Pizza Dough

Making pizza at home is something that a lot of people enjoy doing. It’s fun for the whole family to get involved in, especially the kids. My kids love to form the dough into the pizza shape and add whatever toppings they want. It’s really a great way to get little ones interested in cooking. Most grocery stores now have fresh dough you can buy, but they don’t compare to the dough you can make at home. I’ve made this recipe quite a few times now and it’s never let me down. The recipe says it’ll make 3 medium pizzas. Sadly, my pizza stone got broke some time back and I have yet to replace it. I have been making the pizzas in a sheet pan. If you like a very thick crust use the whole dough in one sheet pan. If you like it on the regular/thinner side, cut the dough in half. The dough also freezes very well. You’ll want to wrap it to freeze it once the first rise is done. I would recommend wrapping it saran wrap then put it into a gallon size freezer bag. The dough will expand a little till it’s frozen all the way through. When ready to use, take out of freezer and place in the refrigerator till thawed. Allow to come to room temperature (30 minutes) and it’s ready to be shaped.

One of my favorite pizzas is this white pizza. Heat olive oil in a small saute pan with 2 small cloves of garlic, chopped finely. Once the dough is ready for the toppings I use a pastry brush and spread the garlic infused olive oil all over the dough. I top it with dollops of goat cheese, mozzarella and Italian fontina cheeses. Bake at 450 degrees and it’s amazing! Serve with a spring green salad tossed with a lemon vinaigrette. 2 tbs freshly squeezed lemon juice, 4 tbs olive oil, salt and pepper to taste. Whisk together and serve.

Basic Pizza Dough:

Yields: 2-3 medium pizzas

  • 1/2 cup warm water (about 110 degrees)
  • 1 envelope (about 2 1/4 tsp) instant yeast
  • 1 1/4 cup water, at room temperature
  • 2 tbs olive oil
  • 4 cups (22 ounces) bread flour, plus more for dusting the work surface and hands
  • 1 1/2 tsp salt
  • Olive oil for oiling the bowl
  1. Measure the warm water into a 2-cup liquid measuring cup. Sprinkle in the yeast and let stand until the yeast dissolves and swells, about 5 minutes. Add the room-temperature water and 2tbs olive oil and stir to combine.
  2. Place the flour and salt in the bowl of a standing fitted with the paddle. Briefly combine the dry ingredients. Slowly add the liquid ingredients and continue to mix at low speed until a cohesive mass forms. Stop the  mixer and replace the paddle with the dough hook. Knead until the dough is smooth and elastic, about 5 minutes. Form the dough into a ball, put it in a deep oiled bowl, cover with plastic wrap. Let rise until doubled in size, 1 1/2 to 2 hours. Press the dough to deflate. The dough is now ready to be used. *Note* if you are having problems with forming the dough, let it sit to rest for about 15 minutes and try again.

To make by hand:

  1. Follow the recipe through step 1. Omit step 2 and instead combine the salt and half the flour in a deep bowl. Add the liquid ingredients and use a wooden spoon to combine. Add the remaining flour, stirring until a cohesive mass forms. Turn the dough onto a lightly floured work surface and knead until smooth and elastic, 7 to 8 minutes, using as little dusting flour as possible while kneading. Form the dough into a ball, put it in a deep oiled bowl, cover with plastic wrap. Let rise until doubled in size, 1 1/2 to 2 hours. Press the dough to deflate. The dough is now ready to be used.

Source: The New Best Recipe from Cook’s Illustrated