Restaurant-Style Queso Blanco Dip

If you are like my family when you go to a Mexican restaurant, you must order cheese dip with your chips. My kids are addicted to it. With Cinco de Mayo just a few days away, you can celebrate it by making a homemade version of the addicting cheese dip.

I’ve been seeing recipes popping up all over the blogosphere and decided to finally try it. The surprising ingredient is white American cheese. It melts wonderfully and gives it the taste that you get in the restaurants. When I went to the deli to get the cheese, I asked for a block of 3/4lb White American, un-sliced You can play around with the jalapenos and tomatoes and put in as little or as much as you would like. The recipe makes a large amount of dip, so this would be great to make with family and friends. Put it in a crock pot to keep it warm and enjoy!

Queso Blanco Dip:

  • 1 Tbs Vegetable or Canola oil
  • 1/4 cup white onion, diced
  • 1 large jalapeno or serrano, seeds and stem removed; diced
  • 12 oz white American cheese (I have the deli give 3/4lb block), shredded
  • 4 oz Monterrey Jack cheese, shredded
  • 1/4 cup-2/3 cup cream, half-and-half, or whole milk
  • 1 roma tomato, seeds removed and diced
  • 1 small bunch cilantro, roughly chopped
  1. Heat the oil in a saute pan. Cook the onion and pepper until softened and reduce heat to medium-low.
  2. Add the shredded cheese and 1/4 cup of the cream. Stir until mostly melted.
  3. Add the tomatoes, cilantro, and additional cream a little at a time until you reach desired consistency. (I needed to add a lot of cream to get it the right consistency, the cheese will thicken as it sits) Serve with chips

Source: Confections of a Foodie Bride

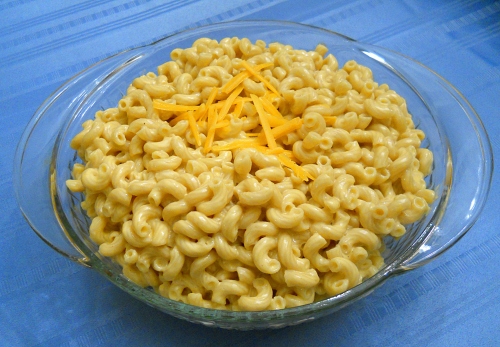
Everyday Mac-N-Cheese

I love homemade macaroni and cheese. I’ve made it countless ways as I try to find my favorite. I hate yet to find the right recipe that my kids and I go WOW over. There are a lot of good ones but none have blown our socks off. I will admit that the kids and I are mac-n-cheese snobs so it’s going to take a lot to impress us. If you notice I have not mentioned my husband, he likes mac-n-cheese, but it’s not one of his favorite dishes. The kids and I always stare at him funny when he says that.

I have always made baked mac-n-cheese so when I saw this recipe in the ATK Healthy Family Cookbook, I knew it was something I had to try. It was a lightened up version of macaroni and cheese but yet sounded like it was something we could like. Instead of making a Béchamel sauce consisting of flour, milk and butter; this is made with evaporated milk, lowfat milk and cornstarch to help thicken. They recommend using Cabot 50% light Vermont Cheddar Cheese but I was unable to find it. So I used regular Cabot Cheddar Cheese and it worked out fine, it just added a little more to the calories. My favorite part of this whole dish is that it didn’t need to be baked and it was fast and easy! The kids and I really liked it and so did my husband. I was hesitant on how the leftovers would taste, and was amazed they tasted just as good as it did the day before, maybe even better!

Everyday Mac-N-Cheese

  • 8 ounces whole-wheat macaroni (I used a little more)
  • Salt and Pepper
  • 1 (12oz) can reduced-fat evaporated milk
  • 3/4 cup 2% lowfat milk
  • 1/8 tsp dry mustard (I could not locate mine so I did a squirt of regular)
  • Pinch cayenne pepper
  • Pinch garlic powder
  • 2 tsp cornstarch
  • 2 cups shredded 50% light cheddar cheese
  1. Bring 2 1/2 quarts water to a boil in a large saucepan. Add the pasta and 2 tsp of salt and cook, stirring often, until completely tender. Reserve 1/2 cup of the cooking water, then drain the pasta and leave it in the colander.
  2. Combine the evaporated milk, 1/2 cup of the lowfat milk, mustard, 1/4 tsp salt, cayenne and garlic powder in the saucepan. Bring the mixture to a boil, then reduce to a simmer. Whisk the cornstarch and remaining 1/4 milk together, then whisk it into the simmering sauce. Continue to simmer, whisking constantly, until the sauce has thickened slightly and is smooth, about 2 minutes.
  3. Off the heat, gradually whisk in the cheddar until melted and smooth. Stir in the cooked pasta and let it sit until the sauce is thickened and the pasta is heated through, 2 to 5 minutes. Season with salt and pepper to taste and add the reserved cooking water as needed to loosen the sauce before serving. (I did not have to add any)

Source: America’s Test Kitchen Healthy Family Cookbook

Basic Pizza Dough

Making pizza at home is something that a lot of people enjoy doing. It’s fun for the whole family to get involved in, especially the kids. My kids love to form the dough into the pizza shape and add whatever toppings they want. It’s really a great way to get little ones interested in cooking. Most grocery stores now have fresh dough you can buy, but they don’t compare to the dough you can make at home. I’ve made this recipe quite a few times now and it’s never let me down. The recipe says it’ll make 3 medium pizzas. Sadly, my pizza stone got broke some time back and I have yet to replace it. I have been making the pizzas in a sheet pan. If you like a very thick crust use the whole dough in one sheet pan. If you like it on the regular/thinner side, cut the dough in half. The dough also freezes very well. You’ll want to wrap it to freeze it once the first rise is done. I would recommend wrapping it saran wrap then put it into a gallon size freezer bag. The dough will expand a little till it’s frozen all the way through. When ready to use, take out of freezer and place in the refrigerator till thawed. Allow to come to room temperature (30 minutes) and it’s ready to be shaped.

One of my favorite pizzas is this white pizza. Heat olive oil in a small saute pan with 2 small cloves of garlic, chopped finely. Once the dough is ready for the toppings I use a pastry brush and spread the garlic infused olive oil all over the dough. I top it with dollops of goat cheese, mozzarella and Italian fontina cheeses. Bake at 450 degrees and it’s amazing! Serve with a spring green salad tossed with a lemon vinaigrette. 2 tbs freshly squeezed lemon juice, 4 tbs olive oil, salt and pepper to taste. Whisk together and serve.

Basic Pizza Dough:

Yields: 2-3 medium pizzas

  • 1/2 cup warm water (about 110 degrees)
  • 1 envelope (about 2 1/4 tsp) instant yeast
  • 1 1/4 cup water, at room temperature
  • 2 tbs olive oil
  • 4 cups (22 ounces) bread flour, plus more for dusting the work surface and hands
  • 1 1/2 tsp salt
  • Olive oil for oiling the bowl
  1. Measure the warm water into a 2-cup liquid measuring cup. Sprinkle in the yeast and let stand until the yeast dissolves and swells, about 5 minutes. Add the room-temperature water and 2tbs olive oil and stir to combine.
  2. Place the flour and salt in the bowl of a standing fitted with the paddle. Briefly combine the dry ingredients. Slowly add the liquid ingredients and continue to mix at low speed until a cohesive mass forms. Stop the  mixer and replace the paddle with the dough hook. Knead until the dough is smooth and elastic, about 5 minutes. Form the dough into a ball, put it in a deep oiled bowl, cover with plastic wrap. Let rise until doubled in size, 1 1/2 to 2 hours. Press the dough to deflate. The dough is now ready to be used. *Note* if you are having problems with forming the dough, let it sit to rest for about 15 minutes and try again.

To make by hand:

  1. Follow the recipe through step 1. Omit step 2 and instead combine the salt and half the flour in a deep bowl. Add the liquid ingredients and use a wooden spoon to combine. Add the remaining flour, stirring until a cohesive mass forms. Turn the dough onto a lightly floured work surface and knead until smooth and elastic, 7 to 8 minutes, using as little dusting flour as possible while kneading. Form the dough into a ball, put it in a deep oiled bowl, cover with plastic wrap. Let rise until doubled in size, 1 1/2 to 2 hours. Press the dough to deflate. The dough is now ready to be used.

Source: The New Best Recipe from Cook’s Illustrated

Loaded Baked Potato Dip

I know I’ve posted quite a few dips recently and I don’t want to bog you down with dips. But so many people are looking for the right one to serve at parties, especially during playoffs. This one pairs very nicely with Buffalo Wings. I made the recipe exactly as it said but next time I’m going to add more cheese to the dip. I felt it could use more, possibly up to another cup. You can always more or less of anything in this dip, to suit your tastes. You could use any other kind of thick fries if you don’t want to use waffle cut. I do recommend using a thick cut, due to the dip being a little on the thick side. Small cut fries won’t stand up to it. I hope you enjoy the loaded baked potato dip as much as my family did.

Loaded Baked Potato:

  • 1  (2.1-oz.) package fully cooked bacon slices
  • 1  (16-oz.) container sour cream
  • 2  cups  (8 oz.) freshly shredded sharp Cheddar cheese
  • 1/3  cup  sliced fresh chives
  • 2  teaspoons  hot sauce
  • Salt and Pepper
  • Garnishes: cooked, crumbled bacon; sliced fresh chives; freshly cracked pepper
  • Serve with: waffle fries or other thick cut fries
  1. Microwave bacon according to package directions until crisp; drain on paper towels. Cool 10 minutes; crumble.
  2. Stir together bacon and next 4 ingredients, and salt and pepper to taste. Cover and chill 1 to 24 hours before serving.
  3. Garnish, if desired. Serve with crispy, warm waffle fries. Store leftovers in refrigerator up to 7 days.

Source: January 2011 issue of Southern Living Magazine

Hot Spinach and Artichoke Dip

Going to start off the week with one of my favorite dips, spinach and artichoke. We always end up ordering this when we go out to eat at a restaurant. The whole family enjoys it and it’s a fight for who will finish it off. Awhile back I decided I should try making this at home so we can enjoy it whenever we want. I finally found my go to recipe through Alton Brown. He is always spot-on with his recipes, but I did end up modifying this a little. The recipe is fast and easy, which I love. He had everything cooking on the stove and microwave, but I wanted to finish it off in the oven with melted cheese on top. That’s what took the dip to a whole new level. Serve this with tortilla chips or 1/2 inch sliced pieces of a French Baguette. You won’t miss your favorite restaurant dip again.

Hot Spinach and Artichoke Dip:

  • 1 cup thawed, chopped frozen spinach
  • 1 1/2 cups thawed, chopped frozen artichoke hearts
  • 6 ounces cream cheese
  • 1/4 cup sour cream
  • 1/4 cup mayonnaise
  • 1/3 cup grated Parmesan
  • 1/2 teaspoon red pepper flakes
  • 1/4 teaspoon salt
  • 1/4 teaspoon garlic powder
  • 1/2 cup shredded mozzarella cheese
  1. Preheat oven to 375 degrees.
  2. Boil spinach and artichokes in 1 cup of water until tender and drain. Discard liquid.
  3. Heat cream cheese in microwave for 1 minute or until hot and soft. Stir everything but the mozzarella together and place in a 9 inch pie plate. Sprinkle the mozzarella on top and bake for 10 minutes or until golden brown on top. Serve.

Source: Adapted from Alton Brow via Food Network

Goat and Cheddar Cheese Ball

Holidays are upon us and that means getting together with families and going to parties. One of the more popular things to serve at these gatherings are cheese balls. Instead of buying the processed kind at the store, make your own. It tastes better and doesn’t take long to make. This one combines some of my favorite cheeses, goat and sharp cheddar. You can use either the white or the orange cheddar, I used white. Make this at your next gathering, your guests or hosts will thank you.


Goat and Cheddar Cheese Ball:

  • 2 10oz blocks extra-sharp white Cheddar cheese, shredded
  • 1 8oz package cream cheese, softened
  • 2 4oz goat cheese logs, softened
  • 1/2 tsp pepper
  1. Stir together all ingredients. Shape mixture into a ball. You can then shape the ball into a pumpkin, if desired. Use your fingertips to make the vertical grooves of the pumpkin. To make the stem use a braided pretzel and flat leaf parsley works well for the leaves. Serve with crackers.

Source: Southern Living Magazine

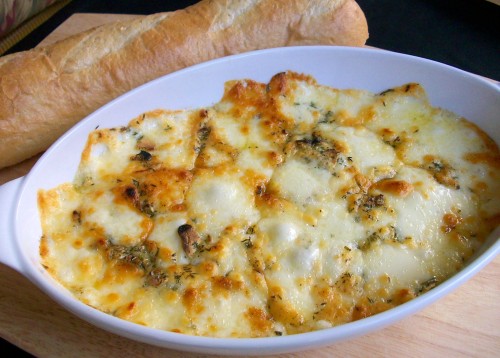
Baked Fontina

I got the new Ina Garten “How Easy is That?” cookbook a couple weeks ago. When I saw this recipe I knew it would be perfect for the cheese party we were having with my sister-in-law and her husband. This would make a great appetizer for your Thanksgiving get together.

The next time I make this I might not add as much olive oil as the recipe calls for. We felt there was a bit too much. I will leave the recipe as is because some might be ok with that much oil. I used a shallow baking dish instead of a cast iron pan and it worked just fine. I don’t think there anything better than melted cheese and crusty bread to dip into it.

Baked Fontina:

  • 1 1/2 lbs Italian Fontina, rind removed and 1 inch diced
  • 1/4 cup olive oil
  • 6 cloves garlic, thinly sliced
  • 1 tbs minced fresh thyme leaves
  • 1 tsp minced fresh rosemary leaves
  • 1 tsp kosher salt
  • 1 tsp freshly ground black pepper
  • 1 crust French baguette
  1. Preheat broiler and position oven rack 5 inches from the heat.
  2. Distribute the cubes of Fontina evenly in a 12 inch cast iron pan or shallow baking dish. Drizzle on the olive oil.
  3. Combine the garlic, thyme, and rosemary and sprinkle it over the cheese and olive oil.
  4. Sprinkle with salt and pepper and place the pan under the broiler for 6 minutes, until the cheese is melted and bubbling and starts to turn brown.
  5. Serve with the crusty French baguette

Source: How Easy is That by Ina Garten