Salted Caramels

Salted Caramels

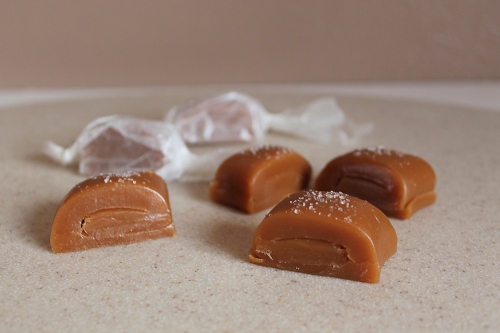
If you have ever been scared to make caramels, please don’t be. As long as you have the right equipment (candy thermometer) than you can make perfect caramel candies. My son has been asking me to make these for some time now. He really enjoyed watching the process and especially loved seeing how the heavy cream reacts when you add it to the sugar mixture. We couldn’t wait for them to set up so we could test them out. These are amazing! The hit of sea salt, really makes the caramels sing in your mouth. The recipe says to keep chilled and serve chilled. I think it’s more of a personal preference for this. I liked the caramels at room temperature.

I’ll be making another batch of these babies this weekend. They tend to not last long once they are done.

Salted Caramels:

  • Vegetable oil
  • 1 1/2 cups sugar
  • 1/4 cup light corn syrup
  • 1 cup heavy cream
  • 5 tablespoons unsalted butter
  • 1 teaspoon fine fleur de sel, plus extra for sprinkling (fine sea salt will also work)
  • 1/2 teaspoon pure vanilla extract
  1. Line an 8-inch-square baking pan with parchment paper, allowing it to drape over 2 sides, then brush the paper lightly with oil.
  2. In a deep saucepan (6 inches wide and 4 1/2 inches deep), combine 1/4 cup water, the sugar and corn syrup and bring them to a boil over medium-high heat. Boil until the mixture is a warm golden brown. Don’t stir — just swirl the pan.
  3. In the meantime, in a small pot, bring the cream, butter and 1 teaspoon of fleur de sel to a simmer over medium heat. Turn off the heat and set aside.
  4. When the sugar mixture is done, turn off the heat and slowly add the cream mixture to the sugar mixture. Be careful — it will bubble up violently. Stir in the vanilla with a wooden spoon and cook over medium-low heat for about 10 minutes, until the mixture reaches 248 degrees F (firm ball) on a candy thermometer.
  5. Very carefully (it’s hot!) pour the caramel into the prepared pan and refrigerate for a few hours, until firm. When the caramel is cold, pry the sheet from the pan onto a cutting board. Cut the square in half. (If the caramel is too hard, let it sit for about 15 minutes to get to room temp)
  6. Starting with a long side, roll the caramel up tightly into an 8-inch-long log. Sprinkle the log with fleur de sel, trim the ends and cut into 8 pieces. (Start by cutting the log in half, then continue cutting each piece in half until you have 8 equal pieces.)
  7. Cut parchment paper into 4-by-5-inch pieces and wrap each caramel individually, twisting the ends. Store in the refrigerator and serve the caramels chilled or at room temperature.

Source: slightly adapted from Barefoot Contessa How Easy is that
Chipotle Chicken – Copycat Version

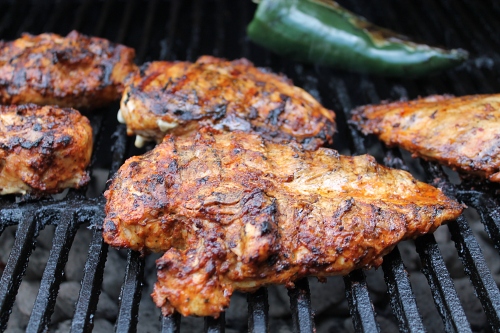
It’s a rare thing for me to make exact copycat recipes. But I’m a huge fan of the popular chain, Chipotle. I’ve already made a cilantro-lime rice that rivals theirs, and a corn salsa. Now it’s time for the main ingredient, the chicken. This chicken is full of strong flavors and you can turn up the heat or turn it down by how many chili’s you put in it. I didn’t put the whole 7oz of chipotle peppers in because I didn’t want it too spicy. I was able to find dried ancho chiles in my local Walmart’s produce department. You should also be able to find the chipotle peppers in adobo in Walmart’s Hispanic section. When you make this, use the leftover peppers in adobo in my hot corn dip. It’s to die for!

I will admit, that while these were really good, nothing can beat the actual burrito’s at Chipotle’s. Maybe it’s the atmosphere. But you can have fun with your family making them at home. I put everything together and then set everything out on a table so people could make their own burrito’s. Make sure you have plenty of lettuce, cheese, sour cream, guacamole, and of course, the cilanto-lime rice and corn salsa. It’ll make your burrito’s shine!

Chipotle Chicken:

  • 5-6 boneless and skinless chicken breasts, pounded flat (about 1/2 inch thickness)
  • 1 (2 ounce) package dried ancho chiles or 4-6 ancho chiles
  • 1 (7 ounce) can chipotle pepper in adobo sauce (discard chipotle pepper, skim out seeds)
  • 1 teaspoon black pepper
  • 2 teaspoons cumin powder
  • 2 tablespoons fresh oregano, chopped
  • 6 cloves garlic
  • 2 teaspoons salt
  • 1 red onion, quartered
  • 1/4 cup oil (canola/vegetable/olive)


  1. Soak the dried chilies overnight in water, until soft. Remove seeds. (If you forget to do this part, like me, pour boiling water over chiles and let soak till soft, about 30 minutes)
  2. Add chilies and rest of the ingredients in blender or food processor. Puree until smooth. Place chicken in a ziploc bag and pour marinade over chicken. Let refrigerate and marinate for at least 2 hours or overnight.
  3. Once chicken is ready, prepare your gas or charcoal grill. Cook over medium-high heat until cooked through, about 8-10 minutes per side. Make sure the chicken is cooked thoroughly. When done, take off heat and chop into small dices. Enjoy!

Source: slightly adapted from Chipotle Fan

Cilantro-Lime Rice

If you have ever eaten at Chipotle’s you know all about their cilantro-lime rice. Awhile back I decided to attempt making homemade versions of these yummy burritos. In the next couple posts, I’ll be posting 3 of the main ingredients you need to make burritos like theirs.

I am going to start with my favorite ingredient, the cilantro-lime rice. It was very easy to put together and would go great as a side dish to any grilled/roasted meat. I always cook the rice with 1/4 cup less water than what is normally recommended. I find it helps the rice not get too clumpy. I’ve included the difference in my recipe below.

Cilantro-Lime Rice:

Serves 4

  • 1 cup Basmati white or brown rice
  • 1 3/4 cup water
  • 2 limes
  • 3-4 tbs chopped cilantro
  • 2 tbs vegetable oil
  • Salt
  1. In a medium saucepan heat water to boiling. Stir in rice, juice of 1 lime, and pinch of salt. Cover and turn the heat to low and let simmer till rice is tender, about 15-18 minutes. (Can be cooked in a rice cooker)
  2. Remove from heat and transfer rice to bowl. Add the cilantro (as much as you like to taste), juice of second lime, (I recommend tasting after putting in half of the lime to see if it’s enough for you), vegetable oil, and salt to taste. Stir till combined and serve. 

Homemade Vegetable Fried Rice

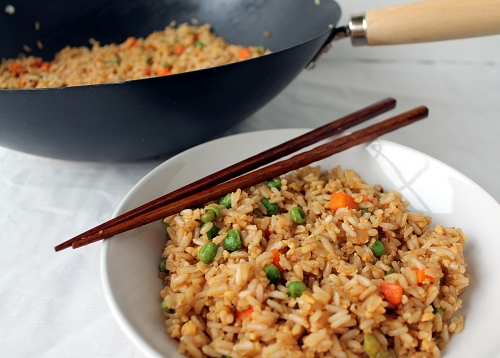
My family loves Chinese food and we do a good amount of take-out. I know we could lessen that and so I decided to begin to make my own version of our favorite things. The first step was fried rice. A long time ago we went to one place that put ginger in their fried rice. I loved it and haven’t found anyone else that does that. I knew that was a must ingredient to my homemade fried rice. I also love hoisin sauce and thought that might work in the rice too. I’m so glad I decided to add these two ingredients into the dish, the rice turned out to be some of the best I’ve ever had.

Making your own fried rice is really easy, but you do have to plan in advance. From what I’ve read, using cold cooked rice is the best way to get the right texture. I made the rice in the morning and put it in the fridge when it was done. If you don’t have time to do it in the morning, make it the night before. Either way, you must make your rice in advance.

Homemade Vegetable Fried Rice:

  • 3 cups cooked long grain rice, white or brown, cold
  • 3 tbs vegetable oil
  • 1 small white onion, diced small
  • 4 garlic cloves, finely minced
  • 3 tsp finely minced fresh ginger or freshly grated ginger (using microplane)
  • 4 green onions, thinly sliced (white and green parts)
  • 2 cups frozen peas and carrots
  • 2 eggs, lightly beaten
  • 3 tbs low-sodium soy sauce (you can add more to taste)
  • 2 tbs Hoisin Sauce
  1. Heat 1 tbs of the oil in a wok or 12 inch skillet set over medium-high heat. Add the onion and cook 2 minutes, until softened. Add the garlic and 2 tbs of the ginger, cook until fragrant. Add half of the green onions, peas and carrots and cook until they are warmed, about 3 minutes. 
  2. Push the vegetables to the side of the pan; making a hole in the center and add the remaining 2 tbs oil. Add the eggs to the center of the pan and whisk constantly till the eggs are just about cooked. Mix into the rest of the vegetables. 
  3. Add the rice and break up the clumps stir everything together then flatten the rice out. Let sit untouched for about 2 minutes. Stir the rice and add the soy sauce, remaining 1 tbs of ginger, and hoisin sauce, continuing to break up any rice clumps. Add the remaining green onions and adjust seasonings, to taste. Enjoy!
Source: Gina Marie Original


Baby Boy Onesie Cookies

I love making onesie cookies. I previously made girls ones for my niece and now it’s time to make boy ones for my nephew. I was unable to make my sister-in-laws shower down in Orlando, so I made these and sent them down.

I used the same sugar cookie dough that I have in the past. I tried doing a new technique with the royal icing but got a little frustrated when it wasn’t turning out how I wanted it. So I went back to the squeeze bottle way of filling in the cookies. Bake at 350 has tutorials on each of her decorated sugar cookies.

I am still having a hard time writing on the cookies. As with anything, practice makes perfect. I just have to keep doing it and not be so scared.

I know they had a great time at the shower and they enjoyed the cookies.

Herb-Crusted Pork Tenderloin

We have been doing really good about eating better and I’m constantly on the lookout for fresh ideas. I have my go-to recipe when it comes to pork tenderloin but there are times I want something different. When I got the new America’s Test Kitchen Light and Healthy 2012 magazine, I saw on the front cover was a fabulous looking pork tenderloin. This is the first recipe I’ve tried out the magazine, and there will be a lot more to follow.

I loved the combination of fennel and artichokes. I left out the olives because my husband despises them, but left them in the recipe so you can choose to put them in or not. I find it’s very important to get the silverskin off the tenderloin. If you don’t, the pork can be chewy and will get into a weird shape while cooking.

The picture above shows what the silverskin looks like. Take your knife and angle it slightly upward and use a gentle sawing motion to cut the silverskin away from the meat. That’s it! Very simple and makes for a better tenderloin.

Herb-Crusted Pork Tenderloin

  • 2 (1lb) Pork Tenderloin, trimmed of all visible fat and silverskin
  • 2 tsp dried herbes de Provence
  • Salt and Pepper
  • 2 large fennel bulbs, stalks discarded, bulbs halved, cored, and cut into 1/2 inch thick slives
  • 12 oz frozen artichoke hearts, thawed and patted dry
  • 1/3 cup pitted nicoise or kalamata olives, chopped coarse
  • 8 tsp extra-virgin olive oil
  • 4 garlic cloves, minced
  • 1 lb cherry tomatoes, halved
  • 1/2 cup low-sodium chicken broth
  • 1 tbs grated lemon zest plus 2 tbs juice
  • 2 tbs minced fresh parsley
  1. Adjust the oven rack to lower-middle position and heat oven to 450 degrees. Pat pork dry with paper towels, then season with herbes de Provence, 1/8 tsp salt and 1/8 tsp pepper. 
  2. Combine the fennel and 2 tbs water in bowl, cover and microwave until softened, about 5 minutes. Drain fennel well and toss with artichokes, olives, 2 tbs oil, garlic, 1/4 tsp salt, and pepper to taste. 
  3. Spread the vegetables in a large roasting pan. Lay pork on top of vegetables. Roast pork and vegetables for 15 minutes. Turn pork over and add tomatoes to roasting pan. Continue to roast pork and vegetables until meat registers 140-145 degrees, 10 to 15 minutes longer. 
  4. Transfer the pork to carving board, tent with foil, and let rest for 10 minutes. Stir broth and lemon zest into vegetables and continue to roast until fennel is tender and tomatoes have softened, about 10 minutes.
  5. Stir remaining 2 tsp oil, lemon juice, and parsley into roasted vegetables and season with salt and pepper to taste. Slice pork 1/2 inch thick and serve with vegetables. 

Chicken with Mustard Cream Sauce

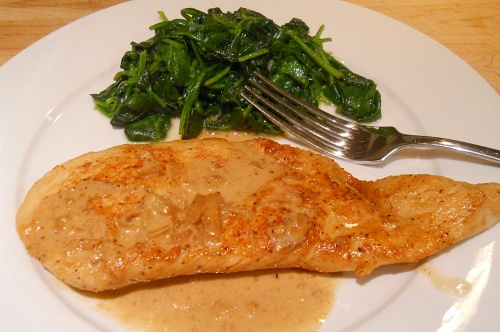
There are times when I see something on my Google Reader and I have to make it right away. This is one of those times. Pioneer Woman posted this recipe and it looked so good, that I knew I had to make it ASAP. What makes it even better is that I already had all the ingredients. It was totally meant to be. I am going to admit something… I am not a huge chicken fan. If given the choice, I won’t ever pick chicken. I will make it and eat it, but I won’t ever get seconds. I loved this dish so much, that I got a second piece of chicken! Even my daughter, who doesn’t like a lot of saucy things, loved it. This says a lot. The only thing I changed from the original recipe was adding shallots. Personally, I love shallots, but my husband said I could leave them out next time. It’ll be up to you and whether you want to add them or not.

You must go make this dish now! It’s fast and easy and you won’t regret it.

Chicken with Mustard Cream Sauce:

*Serves 4-8

  • 4 whole Boneless, Skinless Chicken Breasts or 8 chicken cutlets
  • 2 Tablespoons Olive Oil
  • 2 Tablespoons Butter
  • 3 whole Garlic Cloves, Minced
  • 2 medium shallots sliced thin (optional)
  • 1 cup Brandy (or White Wine If Preferred) *I loved the Brandy*
  • 1 Tablespoon (heaping) Dijon Mustard
  • 1 Tablespoon (heaping) Grainy Mustard
  • 1/4 cup (to 1/2) Heavy Cream
  • 1/4 cup (to 1/2) Chicken Broth
  • Salt And Pepper, to taste
  1. If using chicken breasts and not cutlets, cut the chicken breasts in half lengthwise so that you have eight smaller, thinner chicken cutlets. Salt and pepper both sides.
  2. Heat oil and butter in a large skillet over medium-high heat. Cook cutlets on both sides until nice and golden brown and cooked through. Remove chicken from the skillet and keep on a plate.
  3. Reduce the heat to medium. Add the shallots to the pan and cook for 2 minutes. Next add the garlic to the pan and saute it for a minute, stirring to make sure it won’t burn. Next pour in the brandy (or wine if using) being careful if cooking over an open flame. Then just let the brandy bubble up and cook until it’s reduced by half.
  4. Throw in the mustards and stir to combine, then pour in the cream. Stir in chicken broth, adding more if the sauce seems too thick. Taste sauce and adjust whatever you think it needs. Add chicken breasts back to the pan, nestling them into the sauce. Allow sauce to cook for another few minutes, shaking the pan if needed to move things around.
  5. Serve chicken with the sauce spooned over the top.

Source: slightly adapted from Pioneer Woman