Salted Caramels

Salted Caramels

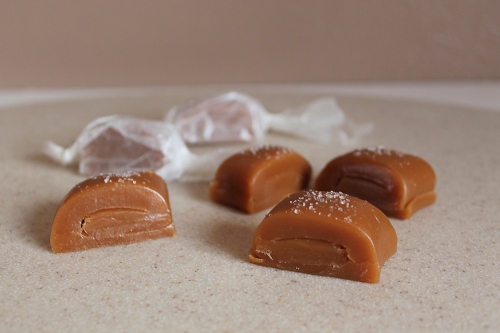
If you have ever been scared to make caramels, please don’t be. As long as you have the right equipment (candy thermometer) than you can make perfect caramel candies. My son has been asking me to make these for some time now. He really enjoyed watching the process and especially loved seeing how the heavy cream reacts when you add it to the sugar mixture. We couldn’t wait for them to set up so we could test them out. These are amazing! The hit of sea salt, really makes the caramels sing in your mouth. The recipe says to keep chilled and serve chilled. I think it’s more of a personal preference for this. I liked the caramels at room temperature.

I’ll be making another batch of these babies this weekend. They tend to not last long once they are done.

Salted Caramels:

  • Vegetable oil
  • 1 1/2 cups sugar
  • 1/4 cup light corn syrup
  • 1 cup heavy cream
  • 5 tablespoons unsalted butter
  • 1 teaspoon fine fleur de sel, plus extra for sprinkling (fine sea salt will also work)
  • 1/2 teaspoon pure vanilla extract
  1. Line an 8-inch-square baking pan with parchment paper, allowing it to drape over 2 sides, then brush the paper lightly with oil.
  2. In a deep saucepan (6 inches wide and 4 1/2 inches deep), combine 1/4 cup water, the sugar and corn syrup and bring them to a boil over medium-high heat. Boil until the mixture is a warm golden brown. Don’t stir — just swirl the pan.
  3. In the meantime, in a small pot, bring the cream, butter and 1 teaspoon of fleur de sel to a simmer over medium heat. Turn off the heat and set aside.
  4. When the sugar mixture is done, turn off the heat and slowly add the cream mixture to the sugar mixture. Be careful — it will bubble up violently. Stir in the vanilla with a wooden spoon and cook over medium-low heat for about 10 minutes, until the mixture reaches 248 degrees F (firm ball) on a candy thermometer.
  5. Very carefully (it’s hot!) pour the caramel into the prepared pan and refrigerate for a few hours, until firm. When the caramel is cold, pry the sheet from the pan onto a cutting board. Cut the square in half. (If the caramel is too hard, let it sit for about 15 minutes to get to room temp)
  6. Starting with a long side, roll the caramel up tightly into an 8-inch-long log. Sprinkle the log with fleur de sel, trim the ends and cut into 8 pieces. (Start by cutting the log in half, then continue cutting each piece in half until you have 8 equal pieces.)
  7. Cut parchment paper into 4-by-5-inch pieces and wrap each caramel individually, twisting the ends. Store in the refrigerator and serve the caramels chilled or at room temperature.

Source: slightly adapted from Barefoot Contessa How Easy is that

Cherry Cheesecake Cookies

Cherry Cheesecake Cookies

I really wanted to get these recipes posted sooner, but we had some personal issues come up and I’ve been very preoccupied with that. But I haven’t forgotten about you! So today, I will be posting two recipes in hopes that gives you enough time to gather the ingredients and make these wonderful treats this weekend. My plan for the weekend is to get together with family and make some more goodies for Christmas Day. I hope you get to do the same.

These cookies taste exactly like the name says, cherry cheesecake! They take some time to make but they are well worth all the work. I did find draining the cherries was a bit of a hassle. Use a good mesh strainer set over a large bowl, the filling slowly does separate from cherries. Just be patient and take out one cherry at a time and you’ll have yourself perfect cherry toppings!

Check back in a few hours for my next treat: Salted Caramels, Yummm!

Cherry Cheesecake Cookies:

  • 3 1/2 cups all-purpose flour
  • 2 tsp baking powder
  • 1 tsp salt
  • 2 (8oz) pkg cream cheese, softened
  • 20 tbs (2 1/2 sticks) unsalted butter, softened
  • 1 1/2 cups granulated sugar
  • 2 large eggs, room temperature
  • 2 tsp vanilla extract
  • 1 cup graham cracker crumbs
  • 3 (20oz) cans cherry pie filling, drained
  1. Combine flour, baking powder, and salt in a bowl. With electric mixer on medium-high speed, beat cream cheese, butter, and sugar until smooth and creamy, 2 minutes. Add eggs and vanilla, and mix until incorporated. Reduce speed to low, add flour mixture, and mix until the just combined. Divide dough in half, wrap in plastic wrap, and refrigerate until firm, 2 hours. 
  2. Adjust oven racks to upper-middle and lower-middle positions and heat oven to 350 degrees. Line 2 baking sheets with parchment paper. Place graham cracker crumbs in shallow dish. Working with one dough half, roll into 1 1/2 inch balls, then roll in graham cracker crumbs. Place balls 2 inches apart on prepared baking sheets. Using rounded tablespoon measure, make indention in center of each ball. Place 3 cherries (don’t be afraid of how large they are compared to cookie, it’ll puff up) in each dimple. Bake until cookies have cracked and are set, 12 to 14 minutes, switching and rotating sheets halfway through baking. Cool 10 minutes, then transfer to wire to cool completely. Repeat with remaining dough.  The cookies will last in the refrigerate for a few days.

Source: Americas Test Kitchen Holiday Cookies 2010


Chocolate Mint Cookies

Chocolate Mint Cookies

I’ve been having a lot of fun the past week with baking up a whole bunch of goodies for you. First up are these amazing Chocolate Mint Cookies. These cookies are very easy to put together. But you will need to plan to make these ahead of time since the dough will need to be refrigerated before you bake them. What I ended up doing was making the dough the night before I wanted to bake them and it worked out great. How these cookies get their mint flavor, is by placing an Andes chocolate mint on top of the cookie as soon as they come out of the oven. The heat coming from the cookie will soften the mint and will easily spread over the top. Let me just say, these will knock your socks off! They are sooo good. Happy Holiday Baking!

Chocolate Mint Cookies:

  • 1 1/4 cup all-purpose flour
  • 1/2 tsp baking soda
  • 1/4 tsp salt
  • 6 tbs (3/4 stick) unsalted butter
  • 3/4 cup packed light brown sugar
  • 6 oz bittersweet chocolate, chopped
  • 1 large egg
  • 36 pieces Andes chocolate mints, unwrapped

To Make Dough Ahead of time:

  1. Combine flour, baking soda, and salt in a medium bowl. Melt butter and brown sugar in a medium saucepan over low heat. Add bittersweet chocolate, cover pan with lid, and let stand off heat until chocolate melts, about 4 minutes. Stir until smooth, transfer chocolate to bowl of electric mixer, and let cool, about 10 minutes.
  2. With electric mixer on medium speed, beat the egg into cooled chocolate mixture until thoroughly combined. Reduce speed to low and mix in flour mixture until just combined, about 1 minute. Cover dough with plastic wrap and refrigerate until firm, about 1 hour or overnight.

Baking cookies:

  1. Adjust oven racks to upper-middle and lower-middle positions and heat oven to 350 degrees. Line 2 baking sheets with parchment paper.
  2. Roll 2 tsp dough into 1-inch balls and place 2 inches apart on prepared baking sheets. Bake until cookies are just set, 10 to 12 minutes, rotating and switching baking sheets halfway through baking time. Remove from oven, top each hot cookie with 1 mint, and allow chocolate to soften, about 1 minute. Using knife, spread softened mint over top of cookies and transfer to rack to cool completely, about 30 minutes. Store cookies in airtight container at room temp for up to 1 week.

Source: Americas Test Kitchen Holiday Cookies 2010

Tea Cake Cookies

Cookies

The great thing about living close to my parents again is that I can drop by their house and then leave with some goodies. My dad made these amazing tea cake cookies and I stole a whole bunch so I could take their photo and of course eat them. These cookies taste a little like a snickerdoodle cookie but have a cake like quality to them. They are soft and chewy, which is my favorite kind of cookie. This recipe makes 6 dozen cookies, which makes it a perfect cookie for the Holiday’s.

On a side note: I am in the process of baking up a whole bunch of goodies for the blog. Be ready in the coming weeks for some great Holiday recipes. Happy Baking!

Tea Cake Cookies:

  • 1 cup butter, softened
  • 1 1/4 cup sugar
  • 3/4 cup cane syrup
  • 1 tbs vanilla extract
  • 1 1/2 tsp fresh lemon juice
  • 3 large eggs
  • 4 1/2 cups self-rising flour
  • 1 1/2 tsp cinnamon
  1. Preheat oven to 350 degrees. Line cookies sheets with parchment paper.
  2. Whisk flour and cinnamon together in a medium size bowl, set aside. Beat butter and sugar at medium speed with an electric mixer until creamy. Add cane syrup and next 2 ingredients  beating just until blended. Add eggs, 1 at a time, beating just until blended after each addition.
  3. Gradually add flour, beating at low speed just until blended after each addition. Drop dough by rounded spoonfuls 2 inches on prepared baking sheets. (you can use a cookie scoop)
  4. Bake at 350 for 8-10 minutes or just until edges begin to turn golden brown. Cool on baking sheet for 1 minute then transfer to wire rack to completely cool. Cookies can be stored in airtight container for up to a week.

Source: Slightly adapted by Southern Living Magazine Nov 2012

Red Velvet Cookies

Normally I like to make things from scratch, but sometimes even I am not in the mood to get a ton of ingredients out. This is where these cookies come into play. All you need is a cake mix, eggs, oil, vanilla extract and a little extra flour. You can easily make them with a hand mixer or go ahead and pull out your stand mixer.

Originally I was hoping to make these like the recipe, which are red velvet crinkle cookies. But my dough was very oily and sucked up the powdered sugar so the first batch didn’t look like crinkles. I decided to do the rest of the cookies without rolling them in the powdered sugar. When I tasted them I decided they needed a little extra something, so I whipped up a glaze of powdered sugar and water. I drizzled that over the cookies and they looked beautiful and tasted great. These are quick and easy to whip up for your Valentines.

Red Velvet Cookies:

  • 1 box red velvet cake mix
  • 2 tbs all-purpose flour
  • 2 large eggs
  • 1/2 cup canola oil
  • 1 tsp vanilla extract
  • Powdered sugar, for rolling the cookies or for glazing
  1. Preheat oven to 350 degrees F. Line a large baking sheet with parchment paper set aside.
  2. In a large bowl, combine cake mix and flour. Whisk until clumps disappear. In the bowl of a stand mixer, or with a hand mixer, mix together cake mix, flour, eggs, oil and vanilla extract. Mix until smooth. Take about 1 tablespoon of cookie dough and form into a ball. *NOTE* If your cookies look oily and shiny, omit the rolling in the powdered sugar and place cookie dough balls on prepared baking sheet, flatten slightly with your palm. Bake for 10-12 minutes. 
  3. Roll the ball in powdered sugar until fully coated. Place cookie dough balls on prepared baking sheet. Bake for 10 minutes, or until edges are set and cookies begin to crack.
  4. Let cookies sit on baking sheet for 2 minutes. Transfer to cooling rack and let cool completely.
  5. If wanting to use glaze… Take 1 cup of powdered sugar and add 1 tsp of water. Whisk till it’s smooth and it’s at a drizzle consistency. You may need to add a bit more water or powdered sugar to get the right consistency. You really can’t mess it up.

Source: Slightly adapted from Two Peas and their Pod

Chocolate Crinkle Cookies

If you are going to make anything this holiday season; you must make these! I’ve always seen crinkle cookies but never made them. I was ready to make something new and try these and I am so glad I did. They are AMAZING! Soft and chocolaty and oh so good. You do have to plan a little ahead to make them. The dough requires to be refrigerated for at least 4 hours to set up. I ended up making the dough and got busy and wasn’t able to actually bake them for a couple days. There was no problem in letting the dough sit in the fridge for a couple days. So, if you are busy this week, make the dough and let it sit in the fridge till you are ready to roll and bake. The kids will love to roll the dough into a ball and into the powdered sugar. But be warned, it will be messy but that’s the fun part for the kids.

Chocolate Crinkle Cookies:

  • 1 cup unsweetened cocoa powder
  • 2 cups white sugar
  • 1 stick of unsalted butter, softened
  • 4 eggs
  • 2 tsp vanilla extract
  • 2 cups all-purpose flour
  • 2 tsp baking powder
  • 1/2 tsp salt
  • 1/2 cup confectioners’ sugar
  1. In a stand mixer, set with paddle attachment, or a hand mixer, cream together white sugar and butter.
  2. Beat in eggs one at a time, and then stir in the vanilla. Once mixed add the cocoa powder slowly making sure to mix very well.
  3. Combine the flour, baking powder, and salt; stir into the cocoa mixture. (The dough is very thick and sticky at this point)
  4. Cover the dough and chill for at least 4 hours or up to 3 days.
  5. Preheat the oven to 350 degrees and line 2-3 cookie sheets with parchment paper.
  6. Roll dough into one inch balls and place them on a plate (I used paper plates). Chill the cookies for 10-15 minutes just to firm them back up.
  7. In a bowl add the confectioner’s sugar. Roll each dough ball in the sugar making sure to coat the cookie as much as possible. Place the cookie balls onto the parchment lined cookie sheets.
  8. Bake in preheated oven for 10 to 12 minutes until they are crackly and puffy. Do NOT over cook or they will get very hard. Once done, let stand on the cookie sheet for a minute before transferring to wire racks to cool.
  9. Store in an airtight container. For up to 5 days.

Source: Simply Love Food

Snickerdoodles

Snickerdoodles are a classic cookie that everyone loves. It’s easy to make and fun to eat or should I say fun to make and easy to eat? Either way they are the perfect cookie to make around the holiday’s; especially if you have kids. My kids love to roll the dough into a ball and roll it into the cinnamon sugar. We had a really good time in the kitchen baking these and I know you will too.

Snickerdoodles:

  • 2 1/2 cups all-purpose flour
  • 2 tsp cream of tartar
  • 1 tsp baking soda
  • 1/2 tsp salt
  • 8 tbs (1 stick) unsalted butter, softened
  • 1/2 cup vegetable shortening
  • 1 3/4 cups granulated sugar
  • 2 large eggs, room temperature
  • 1 tbs ground cinnamon
  1. Adjust oven rack to middle position and heat oven to 375 degrees. Line 2 baking sheets with parchment paper. Combine flour, cream of tartar, baking soda, and salt in a bowl. With electric mixer on medium-high speed, beat the butter, shortening, and 1 1/2 cups sugar until light and fluffy, 2 minutes. Add eggs, 1 at a time, mixing after each until well incorporated. Reduce speed to low, add flour mixture, and mix until just combined.
  2. Combine cinnamon and remaining sugar in a bowl. Roll dough into 1 1/2 inch balls with moistened hands (we found that we did not need to have wet hands) toss in cinnamon sugar to coat, then place 2 inches apart on prepared baking sheets. Bake each sheet separately until edges are light golden brown and centers are soft and puffy, 10 to 12 minutes, rotating each sheet halfway through baking. Cool 10 minutes, then transfer to wire rack to cool completely.

Source: Americas Test Kitchen Holiday Cookies 2010