Spiced Peach and Carrot Bread

The past two weeks have been fun and fast. My son and I were spending time in the Chicago area celebrating my beautiful mother’s 60th birthday during the first week. Then last week I spent every moment I could with my kids since it was the last week of their summer vacation. That’s right, today I sit in a silent house while they are at school. I’m actually kind of sad. I’ve had so much fun with them this summer. I’m also a little sentimental because my daughter has started High School. But it’s going to be an exciting year, because she made Varsity Cheerleading. I am so proud of my baby girl! I could keep going on and on about my kids. But you aren’t here for that.

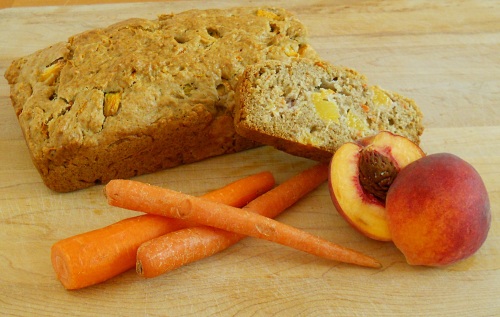
Let’s begin with our regularly scheduled recipes. Today I bring you this wonderful spiced peach and carrot bread. This was in the July issue of Southern Living magazine. My grandmother was in town when it came in and she saw it and asked that it be made. I had to agree with Nana because the recipe sounded wonderful. Plus I knew it would work with splenda. Both my husband and Nana are diabetics, so anything I can bake with splenda, I will. It turned out just as good as I figured it would. It was moist and best served warm with butter. You can reheat it in the microwave for a few seconds to warm it up. I did omit the nuts because I’m not a big fan of nuts in baked goods. Spiced Peach and Carrot Bread is a great way to use up what’s left of summer peaches!

Spiced Peach and Carrot Bread:

  • 3/4 cup chopped pecans(optional)
  • 2 1/2 cups all-purpose flour
  • 1 cup granulated sugar or Splenda
  • 1 tsp ground cinnamon
  • 1/4 tsp ground nutmeg
  • 3/4 tsp baking soda
  • 1/2 tsp baking powder
  • 1/2 tsp salt
  • 1 1/2 cups peeled and chopped fresh, ripe peaches (about 2-3 medium peaches)
  • 3/4 cup freshly grated carrots (about 2 carrots)
  • 2/3 cup vegetable oil
  • 1/2 cup milk (buttermilk would be really good)
  • 2 large eggs, lightly beaten
  1. Preheat the oven to 350 degrees. Toast pecans in a single layer on a baking sheet 8-10 minutes, or until toasted and fragrant, stirring halfway through. Cool 15 minutes.
  2. Whisk together the flour and next 6 ingredients in a large bowl. Add peaches and next 4 ingredients, and toasted pecans, stirring just until dry ingredients are moistened. Spoon the batter into a lightly greased 9×5 inch loaf pan (the batter will be very thick).
  3. Bake at 350 for 55-65 minutes, or until a wooden toothpick inserted in the center comes out clean.
  4. Cool the bread in the pan for 5-10 minutes, then run a knife around the edges and invert onto a cooling rack to cool completely.
Source: Southern Living, July Issue

Pioneer Woman’s Cinnamon Rolls

One thing I’ve never tried making from scratch is Cinnamon Rolls. I’ve always enjoyed eating them and have wanted to try making them. I finally had a weekend where my daughter was not having a cheer competition and we had no other plans. It was the perfect time to stay home all day and try making homemade Cinnamon Rolls. I’ve been looking at Pioneer Woman’s Cinnamon Rolls for a long time now. Recently, she was on The Today Show making them; it was a sign that I must make them.

If you want to eat these the day you make them, you must start the process in the morning. It does take some time but it’s worth it in the end. She does say that there is a point you can refrigerate the dough overnight or even for a few days. Which would be great if you want rolls fresh in the morning. I have yet to try this method but I do plan to try it out.

The recipe makes a ton of rolls, this is one half of the dough that is ready to be rolled up. I really loved this part of the recipe. It’s so much fun getting your hands dirty.

The one mistake I made (and I knew better) was packing them in to tightly before they had a chance to rise again. Thankfully it didn’t ruin them but next time I’ll be a little more cautious.

You end up with the best cinnamon rolls ever! As much as you want them all to yourself, you must give some away. I had my daughter take a pan to her youth group and we gave another pan to my husband’s grandmother.  Your waistline will thank you for sharing.


Pioneer Woman’s Cinnamon Rolls:

Dough:

  • 1 quart whole milk
  • 1 cup vegetable oil
  • 1 cup sugar
  • 2 packages (4 1/2 teaspoons total) active dry yeast
  • 9 cups all-purpose flour
  • 1 heaping tsp baking powder
  • 1 scant tsp baking soda
  • 1 heaping tbs salt

Filling:

  • 2 cups melted butter, plus more as needed
  • 1/4 cup ground cinnamon for sprinkling
  • 2 cups sugar, plus more as needed

Maple Frosting:

  • 2 pounds powdered sugar
  • 1/2 cup whole milk, more if needed for thinning
  • 6 tbs (3/4 stick) butter, melted
  • 1/4 cup strongly brewed coffee
  • Dash of salt
  • 2 tsp maple flavoring or maple extract
  1. Making the Dough: Mix the milk, vegetable oil and sugar in a pan. Scald the mixture (heat until just before the boiling point). Turn off heat and leave to cool 45 minutes to 1 hour. When the mixture is lukewarm to warm, but NOT hot, sprinkle in both packages of Active Dry Yeast. Let this sit for a minute. Then add 8 cups of all-purpose flour. Stir mixture together. Cover and let rise for an hour.
  2. After rising for an hour, add 1 more cup of flour, the baking powder, baking soda and salt. Stir mixture together; I found mixing it by hand was much easier than with a spoon. (At this point, you could cover the dough and put it in the fridge until you need it – overnight or even a day or two, if necessary. Just keep your eye on it and if it starts to overflow out of the pan, just punch it down)
  3. Preheat oven to 375 degrees
  4. When ready to prepare rolls: Sprinkle rolling surface generously with flour. Take half the dough and form a rough rectangle. Then roll the dough thin, maintaining a general rectangular shape. Drizzle 1/2 to 1 cup melted butter over the dough, spread the butter around with your hands. Now sprinkle 1 cup of sugar over the butter followed by a generous sprinkling of cinnamon.
  5. Starting at the opposite end, begin rolling the dough in a neat line toward you. Keep the roll relatively tight as you go. Next, pinch the seam of the roll to seal it.
  6. Spread 1 tablespoon of melted butter in a seven inch round foil cake or pie pan. Then begin cutting the rolls approximately ¾ to 1 inch thick and laying them in the buttered pans.
  7. Repeat this process with the other half of the dough. Let the rolls rise for 20 to 30 minutes, Bake until light golden brown, about 15 to 18 minutes.
  8. Make the Maple Frosting: Mix together all ingredients listed and stir well until smooth. It should be thick but pourable. Taste and adjust as needed. Generously drizzle over the warm rolls.

Source: Pioneer Woman


Basic Pizza Dough

Making pizza at home is something that a lot of people enjoy doing. It’s fun for the whole family to get involved in, especially the kids. My kids love to form the dough into the pizza shape and add whatever toppings they want. It’s really a great way to get little ones interested in cooking. Most grocery stores now have fresh dough you can buy, but they don’t compare to the dough you can make at home. I’ve made this recipe quite a few times now and it’s never let me down. The recipe says it’ll make 3 medium pizzas. Sadly, my pizza stone got broke some time back and I have yet to replace it. I have been making the pizzas in a sheet pan. If you like a very thick crust use the whole dough in one sheet pan. If you like it on the regular/thinner side, cut the dough in half. The dough also freezes very well. You’ll want to wrap it to freeze it once the first rise is done. I would recommend wrapping it saran wrap then put it into a gallon size freezer bag. The dough will expand a little till it’s frozen all the way through. When ready to use, take out of freezer and place in the refrigerator till thawed. Allow to come to room temperature (30 minutes) and it’s ready to be shaped.

One of my favorite pizzas is this white pizza. Heat olive oil in a small saute pan with 2 small cloves of garlic, chopped finely. Once the dough is ready for the toppings I use a pastry brush and spread the garlic infused olive oil all over the dough. I top it with dollops of goat cheese, mozzarella and Italian fontina cheeses. Bake at 450 degrees and it’s amazing! Serve with a spring green salad tossed with a lemon vinaigrette. 2 tbs freshly squeezed lemon juice, 4 tbs olive oil, salt and pepper to taste. Whisk together and serve.

Basic Pizza Dough:

Yields: 2-3 medium pizzas

  • 1/2 cup warm water (about 110 degrees)
  • 1 envelope (about 2 1/4 tsp) instant yeast
  • 1 1/4 cup water, at room temperature
  • 2 tbs olive oil
  • 4 cups (22 ounces) bread flour, plus more for dusting the work surface and hands
  • 1 1/2 tsp salt
  • Olive oil for oiling the bowl
  1. Measure the warm water into a 2-cup liquid measuring cup. Sprinkle in the yeast and let stand until the yeast dissolves and swells, about 5 minutes. Add the room-temperature water and 2tbs olive oil and stir to combine.
  2. Place the flour and salt in the bowl of a standing fitted with the paddle. Briefly combine the dry ingredients. Slowly add the liquid ingredients and continue to mix at low speed until a cohesive mass forms. Stop the  mixer and replace the paddle with the dough hook. Knead until the dough is smooth and elastic, about 5 minutes. Form the dough into a ball, put it in a deep oiled bowl, cover with plastic wrap. Let rise until doubled in size, 1 1/2 to 2 hours. Press the dough to deflate. The dough is now ready to be used. *Note* if you are having problems with forming the dough, let it sit to rest for about 15 minutes and try again.

To make by hand:

  1. Follow the recipe through step 1. Omit step 2 and instead combine the salt and half the flour in a deep bowl. Add the liquid ingredients and use a wooden spoon to combine. Add the remaining flour, stirring until a cohesive mass forms. Turn the dough onto a lightly floured work surface and knead until smooth and elastic, 7 to 8 minutes, using as little dusting flour as possible while kneading. Form the dough into a ball, put it in a deep oiled bowl, cover with plastic wrap. Let rise until doubled in size, 1 1/2 to 2 hours. Press the dough to deflate. The dough is now ready to be used.

Source: The New Best Recipe from Cook’s Illustrated

Parkerhouse Rolls

These rolls are amazing! I made them for Thanksgiving and I can’t wait to make them again for Christmas dinner. I was worried a little during the “rise” process. The dough didn’t seem to double in size as fast as I thought it would. I gave it an extra 30 minutes and in that 30 minutes the dough finally doubled in size. What I love about this recipe is that you allow the dough to rise only once. After the initial rise you can start forming the rolls and bake them. That makes it nice when you are making them the same day as your dinner.

I have been wanting a go to recipe for rolls and I’m happy to say that I found it. They tasted even better the next day smothered in mayonnaise and left over turkey.

Parkerhouse Rolls:

  • 1 1/4-ounce packet active dry yeast
  • 1/2 cup sugar
  • 7 1/2 to 8 cups all-purpose flour, plus more for dusting
  • 12 tablespoons (1 1/2 sticks) unsalted butter, melted and cooled, plus softened butter for brushing
  • 2 cups whole milk, at room temperature
  • 2 large eggs, at room temperature
  • 1 tablespoon kosher salt, plus more for sprinkling
  1. Measure out 1/2 cup warm water and check the temperature: It should be between 110 degrees F and 120 degrees F (comfortable bathwater temperature). Sprinkle the yeast into a large bowl, add the warm water and whisk in the sugar. Let sit 1 minute (it should bubble and froth slightly), then gently stir in 1 cup flour. Set aside near the stove while you prepare the dough.

Make the dough.

  1. Mix the melted butter and milk in a mixer with the hook attachment on low speed. Add the eggs and mix until blended. Scrape in the yeast mixture and mix until incorporated. Add 6 1/2 cups flour and 1 tablespoon salt; mix until the dough forms a ball, 2 to 3 minutes, adding up to 1/2 cup more flour if the dough is too wet and sticky.
  2. Brush a large bowl with softened butter. Transfer the dough to the bowl, cover with a towel and let rise in a warm place, 2 hours to 2 hours, 30 minutes. The dough should double in volume.

Shape the dough and bake.

  1. Preheat the oven to 375 degrees F and line a baking sheet with parchment paper. Dust a clean flat surface with flour and turn the dough out onto it. Flour your hands; gently press the dough into a 16-by-8-inch rectangle, about 1/2 to 3/4 inch thick (don’t use a rolling pin).
  2. With the short side in front of you, cut the dough in half lengthwise with a floured knife. Then slice crosswise into 12 strips.
  3. One at a time, fold each strip of dough unevenly in half so the top part slightly overlaps the bottom half, then tuck the overhang underneath. Place the rolls seam-side down on the prepared baking sheet in 3 tightly packed rows. (If making in advance, wrap the baking sheet tightly in plastic wrap and freeze up to 3 weeks.)
  4. Bake until the rolls are bursting at the seams and golden brown, 18 to 20 minutes. (If frozen, bake 25 minutes at 325 degrees F, then 10 minutes at 375 degrees F.) Remove from the oven and brush with softened butter. Sprinkle with salt and serve immediately.

Source: Alexandra Guarnaschelli via Food Network Magazine Nov Issue 2010

French Toast Bread Pudding

This recipe comes from Ina Garten’s new cookbook “How Easy is That?”.  My family loves breakfast and I love French Toast casseroles. It’s a nice break to not have to stand at the oven dipping the bread in the egg mixture, putting them in the pan, flipping and repeating. So when I saw this recipe in the book and on the Barefoot Bloggers website, I knew it was something I had to make.

I loved how it turned out. My kids on the other hand did not. They didn’t like the custardy (is that a word?) texture. But the adults really enjoyed it. The only thing that I felt it needed was a bit more bread. My 1 loaf of challah didn’t seem to be enough. Next time I might get 2 loaves and cram every part of the casserole dish with bread. The addition of the orange zest was really nice and I will be adding that to my regular French Toast recipe.


French Toast Bread Pudding:

  • 1 challah loaf, sliced 3/4 inch thick
  • 8 extra-large eggs (I used large with no issues)
  • 5 cups half-and-half or milk
  • 3 tbs honey
  • 1 tbs grated orange zest
  • 1 tsp pure vanilla extract
  • 1/4 tsp kosher salt
  • Confectioners’ sugar and pure maple syrup, for serving
  1. Preheat oven to 350 degrees
  2. Arrange the bread in two layers in a 9 x 13 x 2 inch baking dish, cutting the bread to fit the dish. Set aside.
  3. In a large bowl, whisk together the eggs, half-and-half, honey, orange zest, vanilla, and salt. Pour the mixture over the bread and press the bread down. Allow to soak for 10 minutes.
  4. Place the baking dish in a larger roasting pan and add enough very hot tap water to the roasting pan to come an inch up the side of the baking dish. Cover the roasting pan tightly with aluminum foil, tenting it so the foil doesn’t touch the pudding. Make two slashes in the foil to allow steam to escape. Bake for 45 minutes, remove the aluminum foil, and bake for another 45 minutes, until the pudding puffs up and the custard is set. Remove from oven and cool slightly.
  5. With a small sieve, dust lightly with confectioners’ sugar and serve hot in squares with maple syrup on the side.

Source: How Easy is That? by Ina Garten

Baked Fontina

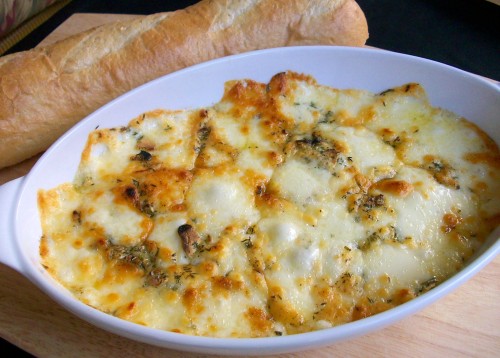
I got the new Ina Garten “How Easy is That?” cookbook a couple weeks ago. When I saw this recipe I knew it would be perfect for the cheese party we were having with my sister-in-law and her husband. This would make a great appetizer for your Thanksgiving get together.

The next time I make this I might not add as much olive oil as the recipe calls for. We felt there was a bit too much. I will leave the recipe as is because some might be ok with that much oil. I used a shallow baking dish instead of a cast iron pan and it worked just fine. I don’t think there anything better than melted cheese and crusty bread to dip into it.

Baked Fontina:

  • 1 1/2 lbs Italian Fontina, rind removed and 1 inch diced
  • 1/4 cup olive oil
  • 6 cloves garlic, thinly sliced
  • 1 tbs minced fresh thyme leaves
  • 1 tsp minced fresh rosemary leaves
  • 1 tsp kosher salt
  • 1 tsp freshly ground black pepper
  • 1 crust French baguette
  1. Preheat broiler and position oven rack 5 inches from the heat.
  2. Distribute the cubes of Fontina evenly in a 12 inch cast iron pan or shallow baking dish. Drizzle on the olive oil.
  3. Combine the garlic, thyme, and rosemary and sprinkle it over the cheese and olive oil.
  4. Sprinkle with salt and pepper and place the pan under the broiler for 6 minutes, until the cheese is melted and bubbling and starts to turn brown.
  5. Serve with the crusty French baguette

Source: How Easy is That by Ina Garten

Italian Style Stuffing with Sausage and Fennel

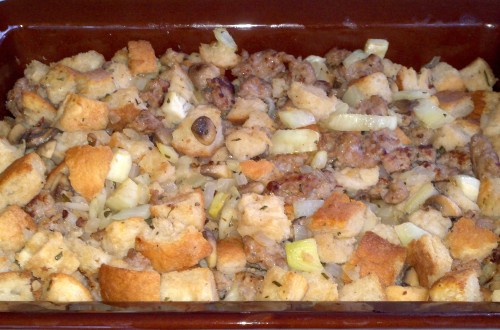
Don’t ya love the photo? It’s taken with my Droid. Thankfully the Droid pics won’t last long, I will be borrowing a camera from my in-laws. I do apologize for the photos that will be posted this week. Now onto the food…

Welcome to Thanksgiving week! If you are looking for a new stuffing for your Thanksgiving dinner, look no further. I found this recipe last year and fell in love with it. When I was a kid I was not a stuffing fan. At the dinner table I would put some on my plate, just to be nice, but would eat around it. Then one day I tasted stuffing with sausage and that opened up my eyes. I decided to search for the best stuffing I could find. This Italian style stuffing comes pretty darn close! How can you go wrong with fresh Italian bread, sausage and fennel? If you have never tried fennel, it has a liquorice smell and flavor. It also goes great with fish. The fennel is my favorite ingredient in the stuffing.

The original recipe doesn’t mention baking the stuffing, but using it as a turkey stuffer. Personally, I don’t like stuffing the bird with stuffing. Turkey should be stuffed with herbs, onions, lemons, garlic, salt and pepper. That helps give the turkey more flavor. What I like to do is after the stuffing is all mixed up, place it into a baking dish and bake it for about 45 minutes. Comes out perfect! I did omit the red pepper due to my husband not being able to eat it. It wasn’t missed, but I’m sure it would taste just fine with it in.

Italian Style Stuffing with Sausage and Fennel:

  • 3 tablespoons olive oil, divided
  • 1 pound sweet ltalian sausage, their casings removed
  • 2 small heads fennel, cut into ½-inch dice (3 cups)
  • 1 large onion, chopped
  • 1 large red bell pepper, seeded, cored, and cut into ½-inch dice
  • 10 ounces cremini (baby bella) mushrooms, sliced
  • 4 garlic cloves, chopped
  • 1 pound day-old, crusty Italian or French bread with a firm crumb, cut into 1-inch cubes (8 cups)
  • 1 cup freshly grated Parmesan cheese
  • 2 tablespoons chopped fresh rosemary
  • 1½ cups Turkey Stock, as needed
  • Salt and freshly ground black pepper
  1. Preheat oven to 350 degrees. Butter a 9×13 baking dish.
  2. Heat 1 tablespoon of the oil in a large skillet over medium-high heat. Add the sausage and cook, breaking up the sausage with the side of a spoon, until the sausage is cooked through, about 10 minutes. Using a slotted spoon, transfer the sausage to a large bowl, leaving the fat in the pan.
  3. Add the fennel and onion to the skillet and reduce the heat to medium. Cover and cook, stirring occasionally, until the fennel is tender, about 10 minutes. Transfer to the bowl with the sausage.
  4. Add the remaining 2 tablespoons of oil to the skillet and heat. Add the bell pepper and cook until it begins to soften, about 3 minutes. Add the mushrooms and cook, stirring occasionally, until the mushroom juices evaporate and the mushrooms begin to brown, about 12 minutes. Stir in the garlic and cook until it is fragrant, about 1 minute. Transfer to the bowl with the sausage and vegetables.
  5. Add the bread cubes, Parmesan, and rosemary. Stir in enough stock to moisten the cornbread, about 1½ cups. Season with the salt and pepper to taste. Place in baking dish and bake for 45 minutes, or until the top is a light golden brown.

Source: Cookstr from Rick Rodgers