Pumpkin Bread

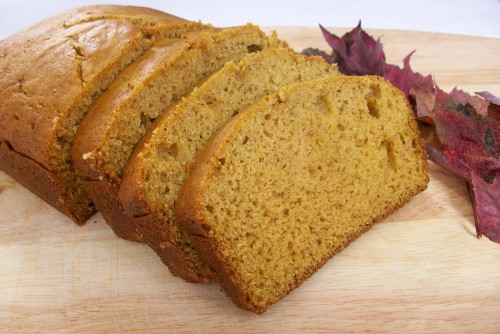
The leaves are changing and starting to fall. The temperature is also dropping, too fast for my liking. As long as I have pumpkin bread, everything is fine. This recipe has become a favorite of ours. The original recipe did not call for nutmeg, but I added it. I think nutmeg and pumpkin go together wonderfully. The bread was nice and moist. When you are stuck inside on rainy cold day, make sure you have all these ingredients and your rainy day will become brighter.

Pumpkin Bread:

  • 1 (16 oz.) can pumpkin or 1 1/2 cups fresh pumpkin
  • 1 2/3 cups sugar
  • 2/3 cup vegetable oil
  • 2 teaspoons vanilla
  • 4 large eggs
  • 3 cups all purpose flour
  • 2 teaspoons baking soda
  • 1 teaspoon salt
  • 1 teaspoon ground cinnamon
  • ½ teaspoon ground cloves
  • 1/8 teaspoon ground or fresh nutmeg
  • ½ teaspoon baking powder
  1. Move oven rack to low position so that tops of pans will be in center of oven. Heat oven to 350 degrees. Grease 2 loaf pans.
  2. Whisk together the flour, baking soda, salt, cinnamon, cloves, nutmeg and baking powder.
  3. In a separate large bowl, mix pumpkin, sugar, oil, vanilla, eggs. Stir in dry ingredients. Pour into pans.
  4. Bake loaves for 50-60 minutes or until toothpick inserted in center comes out clean. Cool 10 minutes in pans.

Source: slightly adapted from Dine and Dish
Garlic Bread with Herbs

Who doesn’t like garlic bread? Garlic bread is warm, buttery and full of yummy goodness. I’ve been making this version of garlic bread for awhile now. The sautéed herbs in a garlic-olive oil mixture takes the bread up a notch.  The recipe calls for ciabatta  bread but Italian bread would also work. This time I used a ciabatta baguette and it worked really nice. Sometimes I’ll add a bit more butter than recipe calls for, but that’s because I like it buttery. Make this garlic bread when you make baked ravioli or Chicken Parmesan .

Garlic Bread:

  • 6 large garlic cloves, chopped
  • 1/4 cup chopped flat-leaf parsley
  • 1/4 cup chopped fresh oregano leaves
  • 1/2 teaspoon kosher salt
  • Freshly ground black pepper
  • 1/2 cup good olive oil
  • 1 loaf ciabatta bread
  • 2 tablespoons unsalted butter
  1. Preheat the oven to 350 degrees F.
  2. Place the garlic in the bowl of a food processor and process until minced. Add the parsley, oregano, salt and pepper and pulse twice.
  3. Heat the olive oil in a medium saute pan and add the garlic mixture. Remove the pan from the heat.
  4. Slice the ciabatta bread in half horizontally, and spread the butter on 1 half. Spread the garlic mixture on the other half of the bread, and put the halves together. Wrap the bread in aluminum foil.
  5. Place the bread in the oven and bake for 5 minutes. Open the foil, and continue baking for an additional 5 minutes.

Source: Ina Garten via Food Network

Cheese Straws


I made these to go along with the Cheeseburger Macaroni. They are full of Parmesan flavor and what I love about them is their lightness. It’s not a heavy bread stick since it’s made with puff pastry so you don’t feel like you are eating tons of carbs. There are endless possibilities for these little babies, Chedder and adobo cheese straws, sun dried tomato, caper, and garlic cheese straws, everything cheese straws, etc… So many choices and they all will be great.

These are perfect for a weeknight dinner because they are quick to put together and quick to bake. Just make sure to have the puff pastry thawing in the refrigerator in the morning before you leave for work.

Cheese Straws

  • 1 (9 by 9 1/2-inch) sheet frozen puff pastry, thawed
  • 2 oz Parmesan or Asiago cheese, grated (1 cup)
  • 1/4 tsp salt
  • 1/8 tsp pepper
  1. Adjust the oven racks to the upper- and lower- middle positions and heat the oven to 425 degrees.
  2. Lay the puff pastry on a sheet of parchment paper and sprinkle with the Parmesan, salt and pepper.
  3. Top with another sheet of parchment and, using a rolling pin, press the cheese into the dough, rolling to shape the dough into a 10-inch square.
  4. Remove the top layer of parchment and, using a sharp knife (or pizza cutter), cut the dough into thirteen 3/4 inch wide strips. Gently twist each strip of dough and transfer to a baking sheet lined with parchment paper, spacing the strips about 1 inch apart.
  5. Bake until the straws are fully puffed and golden brown, about 10 minutes, reversing the position of the baking sheet from top to bottom halfway through baking. Cool for 5 minutes before serving.

Source: The America’s Test Kitchen Family Cookbook

Italian Bread

Homemade bread is simply the best thing ever. There is something so soothing about kneeding the bread and the smell, oh the smell. It’s heaven! I had been searching for a good Italian bread recipe and when I saw this one on Annie’s Eats I knew I found it. I’ve made this bread a handful of times and each time it comes out better. The recipe calls for the bread to be kneaded in the stand mixer for a total of 10 minutes. But I found that once the dough started to come together and was still a little sticky, kneading it by hand was better. I added flour to the dough as I kneaded it so it wouldn’t stick to me or the counter. I think by doing that you don’t over flour it.

You need to allow a lot of time for making bread, but the smell of the house and the bread alone is well worth all the work!

*You will need to start the process the night before you want to bake it.

Italian Bread

For the preferment:

  • 1 cup water
  • 1 cup bread flour
  • ½ tsp. instant yeast

For the dough:

  • All of the preferment
  • 5 cups bread flour
  • ½ cup nonfat dry milk
  • 1 tbsp. brown sugar or granulated sugar
  • 1 tbsp. salt
  • 2 tsp. instant yeast
  • 1 tbsp. olive oil
  • 2 cups water, at room temperature

  1. To make the preferment, combine the water, flour and yeast in a medium bowl.  Mix well to blend, cover with plastic wrap, and let sit at room temperature at least 4 hours and up to 16 hours.
  2. When you are ready to make the dough, in the bowl of a stand mixer fitted with the paddle attachment, combine the preferment, 4 cups of the flour, dry milk, sugar, salt, yeast, olive oil and water.  Mix on low speed until a sticky dough has formed.  Switch to the dough hook and add the remaining flour ¼ cup at a time.  Continue kneading on low speed until the flour has been incorporated (At this stage is when I’ve taken it out of the bowl and hand kneaded it. You will end up adding more than 5 cups of flour) and you have a dough that is smooth and elastic, and no longer sticky.  The total kneading time should be about 10 minutes.
  3. Transfer the dough to a well greased bowl, turning once to coat, and cover with plastic wrap.  Allow to rise at room temperature until approximately doubled in size, about 2 hours.  Punch down the dough, cover once more, and let rise again for 30 minutes.
  4. Turn the dough out onto a lightly floured work surface.  Knead the dough once or twice and divide into two equal portions.  Cover the two pieces of dough with a damp towel and allow to relax for 20 minutes.
  5. Shape the two portions of dough into the desired final shape and transfer to a baking sheet lined with parchment or a silicone baking mat .  Cover again with a damp kitchen towel and let rise until approximately doubled in bulk, about 1 hour.
  6. Preheat the oven to 425˚ F.  Just before placing the loaves in the oven, brush or spray them lightly with water.  Place in the oven and bake for 20 minutes before rotating them.  Bake another 20-30 minutes, or until the internal temperature reaches 200˚ F.  Remove from the oven, transfer to a wire cooling rack and let cool at least 30 minutes before slicing and serving.

Source: Annie’s Eats