Spiced Peach and Carrot Bread

The past two weeks have been fun and fast. My son and I were spending time in the Chicago area celebrating my beautiful mother’s 60th birthday during the first week. Then last week I spent every moment I could with my kids since it was the last week of their summer vacation. That’s right, today I sit in a silent house while they are at school. I’m actually kind of sad. I’ve had so much fun with them this summer. I’m also a little sentimental because my daughter has started High School. But it’s going to be an exciting year, because she made Varsity Cheerleading. I am so proud of my baby girl! I could keep going on and on about my kids. But you aren’t here for that.

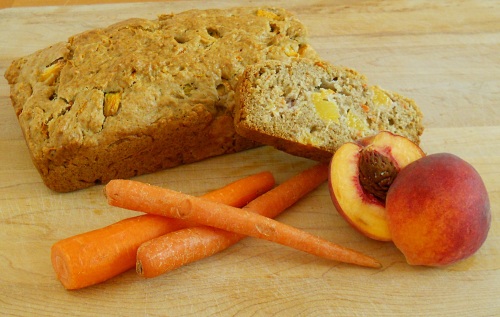
Let’s begin with our regularly scheduled recipes. Today I bring you this wonderful spiced peach and carrot bread. This was in the July issue of Southern Living magazine. My grandmother was in town when it came in and she saw it and asked that it be made. I had to agree with Nana because the recipe sounded wonderful. Plus I knew it would work with splenda. Both my husband and Nana are diabetics, so anything I can bake with splenda, I will. It turned out just as good as I figured it would. It was moist and best served warm with butter. You can reheat it in the microwave for a few seconds to warm it up. I did omit the nuts because I’m not a big fan of nuts in baked goods. Spiced Peach and Carrot Bread is a great way to use up what’s left of summer peaches!

Spiced Peach and Carrot Bread:

  • 3/4 cup chopped pecans(optional)
  • 2 1/2 cups all-purpose flour
  • 1 cup granulated sugar or Splenda
  • 1 tsp ground cinnamon
  • 1/4 tsp ground nutmeg
  • 3/4 tsp baking soda
  • 1/2 tsp baking powder
  • 1/2 tsp salt
  • 1 1/2 cups peeled and chopped fresh, ripe peaches (about 2-3 medium peaches)
  • 3/4 cup freshly grated carrots (about 2 carrots)
  • 2/3 cup vegetable oil
  • 1/2 cup milk (buttermilk would be really good)
  • 2 large eggs, lightly beaten
  1. Preheat the oven to 350 degrees. Toast pecans in a single layer on a baking sheet 8-10 minutes, or until toasted and fragrant, stirring halfway through. Cool 15 minutes.
  2. Whisk together the flour and next 6 ingredients in a large bowl. Add peaches and next 4 ingredients, and toasted pecans, stirring just until dry ingredients are moistened. Spoon the batter into a lightly greased 9×5 inch loaf pan (the batter will be very thick).
  3. Bake at 350 for 55-65 minutes, or until a wooden toothpick inserted in the center comes out clean.
  4. Cool the bread in the pan for 5-10 minutes, then run a knife around the edges and invert onto a cooling rack to cool completely.
Source: Southern Living, July Issue

Basic Pizza Dough

Making pizza at home is something that a lot of people enjoy doing. It’s fun for the whole family to get involved in, especially the kids. My kids love to form the dough into the pizza shape and add whatever toppings they want. It’s really a great way to get little ones interested in cooking. Most grocery stores now have fresh dough you can buy, but they don’t compare to the dough you can make at home. I’ve made this recipe quite a few times now and it’s never let me down. The recipe says it’ll make 3 medium pizzas. Sadly, my pizza stone got broke some time back and I have yet to replace it. I have been making the pizzas in a sheet pan. If you like a very thick crust use the whole dough in one sheet pan. If you like it on the regular/thinner side, cut the dough in half. The dough also freezes very well. You’ll want to wrap it to freeze it once the first rise is done. I would recommend wrapping it saran wrap then put it into a gallon size freezer bag. The dough will expand a little till it’s frozen all the way through. When ready to use, take out of freezer and place in the refrigerator till thawed. Allow to come to room temperature (30 minutes) and it’s ready to be shaped.

One of my favorite pizzas is this white pizza. Heat olive oil in a small saute pan with 2 small cloves of garlic, chopped finely. Once the dough is ready for the toppings I use a pastry brush and spread the garlic infused olive oil all over the dough. I top it with dollops of goat cheese, mozzarella and Italian fontina cheeses. Bake at 450 degrees and it’s amazing! Serve with a spring green salad tossed with a lemon vinaigrette. 2 tbs freshly squeezed lemon juice, 4 tbs olive oil, salt and pepper to taste. Whisk together and serve.

Basic Pizza Dough:

Yields: 2-3 medium pizzas

  • 1/2 cup warm water (about 110 degrees)
  • 1 envelope (about 2 1/4 tsp) instant yeast
  • 1 1/4 cup water, at room temperature
  • 2 tbs olive oil
  • 4 cups (22 ounces) bread flour, plus more for dusting the work surface and hands
  • 1 1/2 tsp salt
  • Olive oil for oiling the bowl
  1. Measure the warm water into a 2-cup liquid measuring cup. Sprinkle in the yeast and let stand until the yeast dissolves and swells, about 5 minutes. Add the room-temperature water and 2tbs olive oil and stir to combine.
  2. Place the flour and salt in the bowl of a standing fitted with the paddle. Briefly combine the dry ingredients. Slowly add the liquid ingredients and continue to mix at low speed until a cohesive mass forms. Stop the  mixer and replace the paddle with the dough hook. Knead until the dough is smooth and elastic, about 5 minutes. Form the dough into a ball, put it in a deep oiled bowl, cover with plastic wrap. Let rise until doubled in size, 1 1/2 to 2 hours. Press the dough to deflate. The dough is now ready to be used. *Note* if you are having problems with forming the dough, let it sit to rest for about 15 minutes and try again.

To make by hand:

  1. Follow the recipe through step 1. Omit step 2 and instead combine the salt and half the flour in a deep bowl. Add the liquid ingredients and use a wooden spoon to combine. Add the remaining flour, stirring until a cohesive mass forms. Turn the dough onto a lightly floured work surface and knead until smooth and elastic, 7 to 8 minutes, using as little dusting flour as possible while kneading. Form the dough into a ball, put it in a deep oiled bowl, cover with plastic wrap. Let rise until doubled in size, 1 1/2 to 2 hours. Press the dough to deflate. The dough is now ready to be used.

Source: The New Best Recipe from Cook’s Illustrated

Parkerhouse Rolls

These rolls are amazing! I made them for Thanksgiving and I can’t wait to make them again for Christmas dinner. I was worried a little during the “rise” process. The dough didn’t seem to double in size as fast as I thought it would. I gave it an extra 30 minutes and in that 30 minutes the dough finally doubled in size. What I love about this recipe is that you allow the dough to rise only once. After the initial rise you can start forming the rolls and bake them. That makes it nice when you are making them the same day as your dinner.

I have been wanting a go to recipe for rolls and I’m happy to say that I found it. They tasted even better the next day smothered in mayonnaise and left over turkey.

Parkerhouse Rolls:

  • 1 1/4-ounce packet active dry yeast
  • 1/2 cup sugar
  • 7 1/2 to 8 cups all-purpose flour, plus more for dusting
  • 12 tablespoons (1 1/2 sticks) unsalted butter, melted and cooled, plus softened butter for brushing
  • 2 cups whole milk, at room temperature
  • 2 large eggs, at room temperature
  • 1 tablespoon kosher salt, plus more for sprinkling
  1. Measure out 1/2 cup warm water and check the temperature: It should be between 110 degrees F and 120 degrees F (comfortable bathwater temperature). Sprinkle the yeast into a large bowl, add the warm water and whisk in the sugar. Let sit 1 minute (it should bubble and froth slightly), then gently stir in 1 cup flour. Set aside near the stove while you prepare the dough.

Make the dough.

  1. Mix the melted butter and milk in a mixer with the hook attachment on low speed. Add the eggs and mix until blended. Scrape in the yeast mixture and mix until incorporated. Add 6 1/2 cups flour and 1 tablespoon salt; mix until the dough forms a ball, 2 to 3 minutes, adding up to 1/2 cup more flour if the dough is too wet and sticky.
  2. Brush a large bowl with softened butter. Transfer the dough to the bowl, cover with a towel and let rise in a warm place, 2 hours to 2 hours, 30 minutes. The dough should double in volume.

Shape the dough and bake.

  1. Preheat the oven to 375 degrees F and line a baking sheet with parchment paper. Dust a clean flat surface with flour and turn the dough out onto it. Flour your hands; gently press the dough into a 16-by-8-inch rectangle, about 1/2 to 3/4 inch thick (don’t use a rolling pin).
  2. With the short side in front of you, cut the dough in half lengthwise with a floured knife. Then slice crosswise into 12 strips.
  3. One at a time, fold each strip of dough unevenly in half so the top part slightly overlaps the bottom half, then tuck the overhang underneath. Place the rolls seam-side down on the prepared baking sheet in 3 tightly packed rows. (If making in advance, wrap the baking sheet tightly in plastic wrap and freeze up to 3 weeks.)
  4. Bake until the rolls are bursting at the seams and golden brown, 18 to 20 minutes. (If frozen, bake 25 minutes at 325 degrees F, then 10 minutes at 375 degrees F.) Remove from the oven and brush with softened butter. Sprinkle with salt and serve immediately.

Source: Alexandra Guarnaschelli via Food Network Magazine Nov Issue 2010

French Toast Bread Pudding

This recipe comes from Ina Garten’s new cookbook “How Easy is That?”.  My family loves breakfast and I love French Toast casseroles. It’s a nice break to not have to stand at the oven dipping the bread in the egg mixture, putting them in the pan, flipping and repeating. So when I saw this recipe in the book and on the Barefoot Bloggers website, I knew it was something I had to make.

I loved how it turned out. My kids on the other hand did not. They didn’t like the custardy (is that a word?) texture. But the adults really enjoyed it. The only thing that I felt it needed was a bit more bread. My 1 loaf of challah didn’t seem to be enough. Next time I might get 2 loaves and cram every part of the casserole dish with bread. The addition of the orange zest was really nice and I will be adding that to my regular French Toast recipe.


French Toast Bread Pudding:

  • 1 challah loaf, sliced 3/4 inch thick
  • 8 extra-large eggs (I used large with no issues)
  • 5 cups half-and-half or milk
  • 3 tbs honey
  • 1 tbs grated orange zest
  • 1 tsp pure vanilla extract
  • 1/4 tsp kosher salt
  • Confectioners’ sugar and pure maple syrup, for serving
  1. Preheat oven to 350 degrees
  2. Arrange the bread in two layers in a 9 x 13 x 2 inch baking dish, cutting the bread to fit the dish. Set aside.
  3. In a large bowl, whisk together the eggs, half-and-half, honey, orange zest, vanilla, and salt. Pour the mixture over the bread and press the bread down. Allow to soak for 10 minutes.
  4. Place the baking dish in a larger roasting pan and add enough very hot tap water to the roasting pan to come an inch up the side of the baking dish. Cover the roasting pan tightly with aluminum foil, tenting it so the foil doesn’t touch the pudding. Make two slashes in the foil to allow steam to escape. Bake for 45 minutes, remove the aluminum foil, and bake for another 45 minutes, until the pudding puffs up and the custard is set. Remove from oven and cool slightly.
  5. With a small sieve, dust lightly with confectioners’ sugar and serve hot in squares with maple syrup on the side.

Source: How Easy is That? by Ina Garten

Garlic Bread with Herbs

Who doesn’t like garlic bread? Garlic bread is warm, buttery and full of yummy goodness. I’ve been making this version of garlic bread for awhile now. The sautéed herbs in a garlic-olive oil mixture takes the bread up a notch.  The recipe calls for ciabatta  bread but Italian bread would also work. This time I used a ciabatta baguette and it worked really nice. Sometimes I’ll add a bit more butter than recipe calls for, but that’s because I like it buttery. Make this garlic bread when you make baked ravioli or Chicken Parmesan .

Garlic Bread:

  • 6 large garlic cloves, chopped
  • 1/4 cup chopped flat-leaf parsley
  • 1/4 cup chopped fresh oregano leaves
  • 1/2 teaspoon kosher salt
  • Freshly ground black pepper
  • 1/2 cup good olive oil
  • 1 loaf ciabatta bread
  • 2 tablespoons unsalted butter
  1. Preheat the oven to 350 degrees F.
  2. Place the garlic in the bowl of a food processor and process until minced. Add the parsley, oregano, salt and pepper and pulse twice.
  3. Heat the olive oil in a medium saute pan and add the garlic mixture. Remove the pan from the heat.
  4. Slice the ciabatta bread in half horizontally, and spread the butter on 1 half. Spread the garlic mixture on the other half of the bread, and put the halves together. Wrap the bread in aluminum foil.
  5. Place the bread in the oven and bake for 5 minutes. Open the foil, and continue baking for an additional 5 minutes.

Source: Ina Garten via Food Network

Cheese Straws


I made these to go along with the Cheeseburger Macaroni. They are full of Parmesan flavor and what I love about them is their lightness. It’s not a heavy bread stick since it’s made with puff pastry so you don’t feel like you are eating tons of carbs. There are endless possibilities for these little babies, Chedder and adobo cheese straws, sun dried tomato, caper, and garlic cheese straws, everything cheese straws, etc… So many choices and they all will be great.

These are perfect for a weeknight dinner because they are quick to put together and quick to bake. Just make sure to have the puff pastry thawing in the refrigerator in the morning before you leave for work.

Cheese Straws

  • 1 (9 by 9 1/2-inch) sheet frozen puff pastry, thawed
  • 2 oz Parmesan or Asiago cheese, grated (1 cup)
  • 1/4 tsp salt
  • 1/8 tsp pepper
  1. Adjust the oven racks to the upper- and lower- middle positions and heat the oven to 425 degrees.
  2. Lay the puff pastry on a sheet of parchment paper and sprinkle with the Parmesan, salt and pepper.
  3. Top with another sheet of parchment and, using a rolling pin, press the cheese into the dough, rolling to shape the dough into a 10-inch square.
  4. Remove the top layer of parchment and, using a sharp knife (or pizza cutter), cut the dough into thirteen 3/4 inch wide strips. Gently twist each strip of dough and transfer to a baking sheet lined with parchment paper, spacing the strips about 1 inch apart.
  5. Bake until the straws are fully puffed and golden brown, about 10 minutes, reversing the position of the baking sheet from top to bottom halfway through baking. Cool for 5 minutes before serving.

Source: The America’s Test Kitchen Family Cookbook

Italian Bread

Homemade bread is simply the best thing ever. There is something so soothing about kneeding the bread and the smell, oh the smell. It’s heaven! I had been searching for a good Italian bread recipe and when I saw this one on Annie’s Eats I knew I found it. I’ve made this bread a handful of times and each time it comes out better. The recipe calls for the bread to be kneaded in the stand mixer for a total of 10 minutes. But I found that once the dough started to come together and was still a little sticky, kneading it by hand was better. I added flour to the dough as I kneaded it so it wouldn’t stick to me or the counter. I think by doing that you don’t over flour it.

You need to allow a lot of time for making bread, but the smell of the house and the bread alone is well worth all the work!

*You will need to start the process the night before you want to bake it.

Italian Bread

For the preferment:

  • 1 cup water
  • 1 cup bread flour
  • ½ tsp. instant yeast

For the dough:

  • All of the preferment
  • 5 cups bread flour
  • ½ cup nonfat dry milk
  • 1 tbsp. brown sugar or granulated sugar
  • 1 tbsp. salt
  • 2 tsp. instant yeast
  • 1 tbsp. olive oil
  • 2 cups water, at room temperature

  1. To make the preferment, combine the water, flour and yeast in a medium bowl.  Mix well to blend, cover with plastic wrap, and let sit at room temperature at least 4 hours and up to 16 hours.
  2. When you are ready to make the dough, in the bowl of a stand mixer fitted with the paddle attachment, combine the preferment, 4 cups of the flour, dry milk, sugar, salt, yeast, olive oil and water.  Mix on low speed until a sticky dough has formed.  Switch to the dough hook and add the remaining flour ¼ cup at a time.  Continue kneading on low speed until the flour has been incorporated (At this stage is when I’ve taken it out of the bowl and hand kneaded it. You will end up adding more than 5 cups of flour) and you have a dough that is smooth and elastic, and no longer sticky.  The total kneading time should be about 10 minutes.
  3. Transfer the dough to a well greased bowl, turning once to coat, and cover with plastic wrap.  Allow to rise at room temperature until approximately doubled in size, about 2 hours.  Punch down the dough, cover once more, and let rise again for 30 minutes.
  4. Turn the dough out onto a lightly floured work surface.  Knead the dough once or twice and divide into two equal portions.  Cover the two pieces of dough with a damp towel and allow to relax for 20 minutes.
  5. Shape the two portions of dough into the desired final shape and transfer to a baking sheet lined with parchment or a silicone baking mat .  Cover again with a damp kitchen towel and let rise until approximately doubled in bulk, about 1 hour.
  6. Preheat the oven to 425˚ F.  Just before placing the loaves in the oven, brush or spray them lightly with water.  Place in the oven and bake for 20 minutes before rotating them.  Bake another 20-30 minutes, or until the internal temperature reaches 200˚ F.  Remove from the oven, transfer to a wire cooling rack and let cool at least 30 minutes before slicing and serving.

Source: Annie’s Eats