Cilantro-Lime Rice

If you have ever eaten at Chipotle’s you know all about their cilantro-lime rice. Awhile back I decided to attempt making homemade versions of these yummy burritos. In the next couple posts, I’ll be posting 3 of the main ingredients you need to make burritos like theirs.

I am going to start with my favorite ingredient, the cilantro-lime rice. It was very easy to put together and would go great as a side dish to any grilled/roasted meat. I always cook the rice with 1/4 cup less water than what is normally recommended. I find it helps the rice not get too clumpy. I’ve included the difference in my recipe below.

Cilantro-Lime Rice:

Serves 4

  • 1 cup Basmati white or brown rice
  • 1 3/4 cup water
  • 2 limes
  • 3-4 tbs chopped cilantro
  • 2 tbs vegetable oil
  • Salt
  1. In a medium saucepan heat water to boiling. Stir in rice, juice of 1 lime, and pinch of salt. Cover and turn the heat to low and let simmer till rice is tender, about 15-18 minutes. (Can be cooked in a rice cooker)
  2. Remove from heat and transfer rice to bowl. Add the cilantro (as much as you like to taste), juice of second lime, (I recommend tasting after putting in half of the lime to see if it’s enough for you), vegetable oil, and salt to taste. Stir till combined and serve. 

Homemade Vegetable Fried Rice

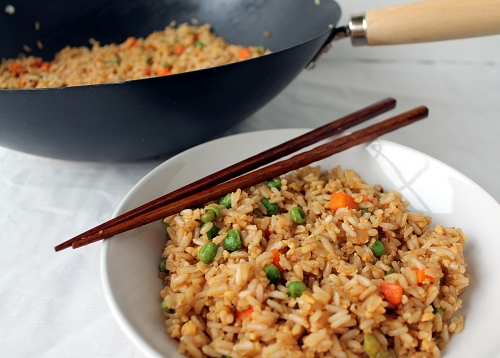
My family loves Chinese food and we do a good amount of take-out. I know we could lessen that and so I decided to begin to make my own version of our favorite things. The first step was fried rice. A long time ago we went to one place that put ginger in their fried rice. I loved it and haven’t found anyone else that does that. I knew that was a must ingredient to my homemade fried rice. I also love hoisin sauce and thought that might work in the rice too. I’m so glad I decided to add these two ingredients into the dish, the rice turned out to be some of the best I’ve ever had.

Making your own fried rice is really easy, but you do have to plan in advance. From what I’ve read, using cold cooked rice is the best way to get the right texture. I made the rice in the morning and put it in the fridge when it was done. If you don’t have time to do it in the morning, make it the night before. Either way, you must make your rice in advance.

Homemade Vegetable Fried Rice:

  • 3 cups cooked long grain rice, white or brown, cold
  • 3 tbs vegetable oil
  • 1 small white onion, diced small
  • 4 garlic cloves, finely minced
  • 3 tsp finely minced fresh ginger or freshly grated ginger (using microplane)
  • 4 green onions, thinly sliced (white and green parts)
  • 2 cups frozen peas and carrots
  • 2 eggs, lightly beaten
  • 3 tbs low-sodium soy sauce (you can add more to taste)
  • 2 tbs Hoisin Sauce
  1. Heat 1 tbs of the oil in a wok or 12 inch skillet set over medium-high heat. Add the onion and cook 2 minutes, until softened. Add the garlic and 2 tbs of the ginger, cook until fragrant. Add half of the green onions, peas and carrots and cook until they are warmed, about 3 minutes. 
  2. Push the vegetables to the side of the pan; making a hole in the center and add the remaining 2 tbs oil. Add the eggs to the center of the pan and whisk constantly till the eggs are just about cooked. Mix into the rest of the vegetables. 
  3. Add the rice and break up the clumps stir everything together then flatten the rice out. Let sit untouched for about 2 minutes. Stir the rice and add the soy sauce, remaining 1 tbs of ginger, and hoisin sauce, continuing to break up any rice clumps. Add the remaining green onions and adjust seasonings, to taste. Enjoy!
Source: Gina Marie Original


Chicken and Couscous with Fennel and Orange

I would first like to apologize for not posting in almost 2 weeks. We have had some hiccups with the house and I’ve had my main focus on those. Hopefully, we won’t be having many more hiccups and I can get back to blogging. Now, onto the food.

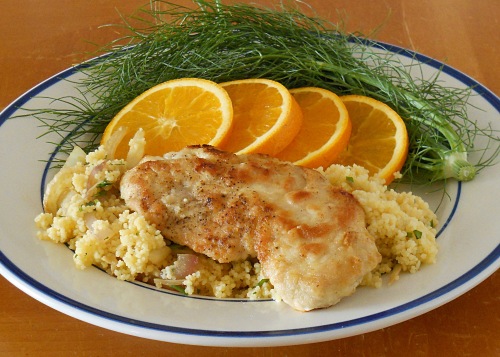
This dish is full of flavors. My favorite one being the fennel. I LOVE fennel! And anytime I can use it in a dish, I will. For those not familiar with it, it’s got a licorice taste. I personally don’t like the candy licorice, but fennel makes me swoon. I could go on and on about fennel, but there are other elements to the dish too. The couscous gets cooked in chicken broth and orange juice to give a wonderful flavor. The chicken gets a great browned exterior from the dredging in flour. But what’s best of all about this whole thing is that it’s all done 1 skillet! No need to dirty several pans. I am looking forward to making this recipe again. Enjoy!

Chicken and Couscous with Fennel and Orange:

  • 4 boneless, skinless chicken breasts, tenderloins removed and breasts trimmed. (I bought cutlets and used 6 cutlets)
  • 1/2 cup unbleached all-purpose flour
  • Salt and ground black pepper
  • 1/2 cup olive oil
  • 1 medium onion, sliced thin
  • 1 fennel bulb, trimmed, cored and sliced thin
  • 1 cup plain couscous
  • 3 medium garlic cloves, minced or pressed through a garlic press (about 1 tbs)
  • Cayenne Pepper
  • 1 cup orange juice
  • 3/4 cup low-sodium chicken broth
  • 1/4 cup minced fresh cilantro leaves
  1. If you are not using cutlets, pound each chicken breast between 2 sheets of plastic wrap to a uniform 1/2 inch thickness. Place the flour in a shallow dish. Pat the chicken breasts dry with paper towels and season with salt and pepper. Working with 1 chicken breast at a time, dredge in the flour, shaking off the excess.
  2. Heat 2 tbs of the oil in a 2 inch nonstick skillet over medium high heat until just smoking. Carefully lay the chicken breasts in the skillet and cook until well browned on the first side, 6-8 minutes.
  3. Flip the chicken breasts over, reduce the heat to medium, and continue to cook until the thickest part of the chicken registers 160-165 degrees on an instant-read thermometer, 6-8 minutes longer. Transfer the chicken breasts to a plate, tent loosely with foil, and let rest while cooking the vegetables and couscous.
  4. Add 1 tbs more oil to the skillet and return to medium-high heat until shimmering. Add the onion, fennel, and 1/2 tsp salt and cook until the onion is softened, 5-7 minutes. Stir in the couscous, garlic, and a pinch cayenne and cook until fragrant, about 30 seconds.. Stir in the 3/4 cup of the orange juice and broth, scraping up any browned bits. Bring to a simmer, cover, and let sit off the heat until the liquid is absorbed, about 5 minutes.
  5. Whisk the remaining 5 tbs oil, remaining 1/4 cup orange juice, 2 tbs of the cilantro, and a pinch of the cayenne together in a small bowl.
  6. Gently fold the remaining 2 tbs cilantro into the couscous with a fork and season with salt and pepper to taste.. Drizzle the oil-orange juice mixture over the chicken and couscous before serving.
Source: The Best Skillet Recipes by Cook’s Illustrated

Basmati Rice Pilaf

Before I get into this recipe, I want to apologize in advance if I don’t post much next week. My beautiful sister-in-law will be having a baby girl in March and I’m co-hosting her shower. This weekend I’ll be working on making 50-60 onesie sugar cookies. Next week I’ll be prepping all the food. I’m super excited about the shower and will blog about it when it’s all over.

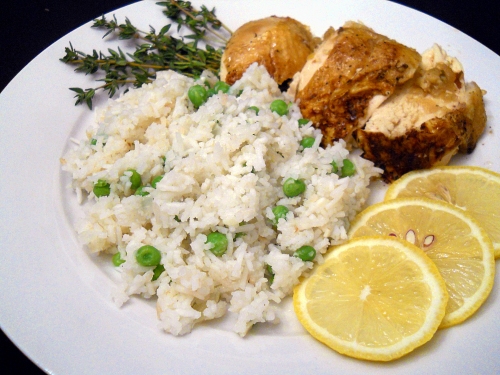
Onto the recipe. I made the Basmati Rice Pilaf when I made the Chicken In A Pot. The sauce from the chicken went perfectly with the rice. The one thing I forgot to add to the rice was the scallions. I don’t think it made a huge difference, but I love scallions and would loved to have had them in it.

Basmati Rice Pilaf:

  • 1 tbs olive oil
  • 1 small onion, minced
  • Salt and Pepper
  • 1 1/2 cups basmati rice, rinsed and drained *See note at bottom
  • 2 1/2 cups water
  • 2 minced garlic cloves
  • 1 tsp grated lemon zest
  • 1/8 tsp red pepper flakes
  • 1/2 cup frozen peas, thawed
  • 2 thinly sliced scallions
  • 1 tbs fresh lemon juice
  1. Heat the oil in a large saucepan over medium heat until shimmering. Add the onion and 1/4 tsp salt and cook, stirring occasionally, until the onion is softened, about 5 minutes.
  2. Stir in the rice, garlic, lemon zest and red pepper flakes and cook, stirring often, until the edges of the grains begin to turn translucent, about 3 minutes. Stir in the water and bring to a simmer. Reduce the heat to low, cover and continue to simmer until the rice is tender and the water is absorbed, 16-18 minutes.
  3. Remove the pot from the heat and sprinkle the peas over the top. Lay a clean folded kitchen towel on the pot and replace the lid over the towel. Let sit for 10 minutes. Add the lemon juice and scallions, fluff the rice with a fork, season with salt and pepper to taste, and serve.

*Note: Rinsing the rice: Rinse the rice in a fine mesh strainer under cold water until the water runs clear, then set the strainer of rinsed rice over a bowl to drain until needed. Rinsing the rice removes excess starch so the rice is light and fluffy, not clumped and sticky.

Source: America’s Test Kitchen Healthy Family Cookbook

Pork Roast with Hoppin John Stuffing

It’s officially 2011 and I’m so ready for the start of the new year. My family went through a rough 2010 and I am determined to make 2011 much better. I don’t make resolutions at the beginning of the year because I feel we always need to make changes in our lives throughout the years. But it doesn’t hurt to try and use this time to change something. I’m going to be a lot more positive about our situation and not worry about little things. I know that in a few months things are going to be looking up! I truly hope that everyone has the best year yet!
A great way to kick off the new year is by making some good luck food. It’s not too late to make this. Hoppin John Stuffing is a southern dish that combines food thought to bring you good luck. I took this from Wikipedia as it best describes what the ingredients mean.
The peas, since they swell when cooked, symbolize prosperity; the greens symbolize money; the pork, because pigs root forward when foraging, represents positive motion
We could all use that in our life.
The recipe has a few steps and you don’t have to make the pork in order to have the stuffing. I’ve made the Hoppin John to be served on it’s own. I still recommend using the egg to help bind the stuffing, but make sure to bake it at 350 for at least 40 minutes.
This is what the stuffing looks like after it’s been all mixed together. Yummm
If you are stuffing the pork roast, this is what it’ll look like when you have it butterflied and added the stuffing. Be sure to always season the pork with salt and pepper before you add the stuffing.
Here it is all tied up. There are many methods in which to tie up a roast. Do what you are comfortable with as long as it’s tied, who cares how it looks. It’ll be cut off before serving anyway.
Enjoy!
Pork Roast with Hoppin John Stuffing:
  • 1 small onion, diced small
  • 1/2 medium-size green bell pepper, diced small
  • 2 tbs olive oil
  • 1 1/2 cups cooked long-grain rice
  • 1 1/2 cups frozen chopped collard greens, thawed (I used one 15oz can drained, since I could not find frozen)
  • 1 15oz can Black Eye Peas, rinsed and drained
  • 1/2 cup diced cooked country ham (used leftovers from Christmas)
  • 1/2 tsp sugar
  • 1/2 tsp salt
  • 1 large egg, lightly beaten
  • 1 (2 1/2 – 3-pound) boneless pork loin roast
  1. Preheat oven to 375 degrees
  2. Saute onion and bell pepper in olive oil in a large skillet set over medium-high heat 5-7 minutes or until tender. Remove from heat. Add rice and next 5 ingredients; stir in egg. Set stuffing aside. (If only using stuffing, place in casserole dish and bake at 350 for 40 minutes)
  3. Butterfly pork loin roast by making a lengthwise cut down the center of 1 flat side, cutting to within 1/2 inch of bottom. From bottom of cut, slice horizontally to 1/2 inch from left side; repeat procedure to right side. Open roast, and place between 2 sheets of heavy-duty plastic wrap (or ziplock bag); flatten to 1/2 inch thickness using a meat mallet or rolling pin.
  4. Spoon 1 1/2 cups stuffing evenly over roast, leaving a 1/2 inch border. Roll up; tie with kitchen string at 1 inch intervals. Place seam side down, in a lightly greased 11×7-inch baking dish.
  5. Bake for 55-60 minutes or until a meat thermometer inserted in center reaches 150 degrees. Place the remaining stuffing in small casserole dish and bake for 30 minutes.

Source: Southern Living Magazine, Published around 9 years ago.

Green Rice

Green Rice has been apart of our families Thanksgiving, Christmas and Easter dinners since before I was born. It’s not the prettiest photo subject, but the way it tastes makes it a star. The name might fool you, Green Rice is basically a broccoli and cheese casserole. I remember as a kid, always fighting with my brother over who gets the biggest scoop of the Green Rice. I would rather have had a plate of Green Rice than turkey or stuffing. It’s that good!

If you are looking for side dishes for your Thanksgiving dinner that can be made ahead of time, this is the perfect one. You will make the recipe up until you have to bake it. Once you have put it in the casserole dish, cover it with foil then refrigerate till ready to bake. Anything to make your Thanksgiving day a little less stressful is a good thing.

Green Rice:

  • 1 medium onion, diced small
  • 2 stalks celery, diced small
  • 13 tbs unsalted butter plus 1tbs to butter casserole dish
  • 2 cans cream of mushroom soup
  • 1 15oz jar of Cheez Whiz
  • 2 1/3 cup Minute Rice (I use the brown kind)
  • 2 10 oz packages of chopped broccoli, thawed and excess liquid squeezed out
  1. Preheat oven to 350 degrees. Butter 9×13 casserole dish and set aside.
  2. In a 10 inch saute pan set over medium heat, melt butter and add the onions and celery. Cook until onions and celery are soft, about 8 minutes, take off heat.
  3. In a large mixing bowl, mix together the cream of mushroom soup and Cheez Whiz. Add the butter, onions and celery, stir to combine.
  4. Add the rice and broccoli and stir till everything is combined. Pour mixture into the buttered casserole dish. At this point you can refrigerate it or bake it for about 45 minutes to 1 hour, until golden brown and bubbly on top. Enjoy!

Butternut Squash Risotto

Everyone has their favorite comfort foods. I have several and risotto is at the top of the list. I find it relaxing standing at the stove, with a glass of wine in one hand and stirring risotto with the other. It’s also nice watching my 14 year old daughter stirring the risotto while I’m holding a glass of wine. Either way is relaxing. A lot of people are scared to make risotto and you shouldn’t be. The only thing is time. If you can devote about 30 minutes to standing at the stove you can make a great risotto. For those who aren’t sure what risotto is, it’s the Italians version of a rice dish. Nice a creamy and oh so good.

Butternut Squash is in season and goes great with risotto. The roasted butternut squash gets caramelized and a bit sweet. Saffron is also a star in the risotto. Saffron can be a bit expensive but it’s worth it for this recipe. When I know I want to make risotto I make sure to have homemade chicken stock on hand. I can’t stress enough how much better risotto is with a homemade stock. It really does bump up the flavors. If you can’t find pancetta, bacon will make a good substitute. You can serve this as a main meal or a side. I made the risotto and served it with a roasted chicken, arugula and spinach salad with apples and dried cranberries. It made the perfect fall meal.

Butternut Squash Risotto

  • 1 butternut squash (2 pounds)
  • 2 tablespoons olive oil
  • Kosher salt and freshly ground black pepper
  • 6 cups chicken stock, preferably homemade
  • 6 tablespoons (3/4 stick) unsalted butter
  • 2 ounces pancetta, diced
  • 1/2 cup minced shallots (2 large)
  • 1 1/2 cups Arborio rice (10 ounces)
  • 1/2 cup dry white wine
  • 1 teaspoon saffron threads
  • 1 cup freshly grated Parmesan cheese
  1. Preheat the oven to 400 degrees.
  2. Peel the butternut squash, remove the seeds, and cut it into 3/4-inch cubes. You should have about 6 cups. Place the squash on a sheet pan and toss it with the olive oil, 1 teaspoon salt, and 1/2 teaspoon pepper. Roast for 25 to 30 minutes, tossing once, until very tender. Set aside.
  3. Meanwhile, heat the chicken stock in a small covered saucepan. Leave it on low heat to simmer.
  4. In a heavy-bottomed pot or Dutch oven, melt the butter and saute the pancetta and shallots on medium-low heat for 10 minutes, until the shallots are translucent but not browned. Add the rice and stir to coat the grains with butter. Add the wine and cook for 2 minutes. Add 2 full ladles of stock to the rice plus the saffron, 1 teaspoon salt, and 1/2 teaspoon pepper. Stir, and simmer until the stock is absorbed, 5 to 10 minutes. Continue to add the stock, 2 ladles at a time, stirring every few minutes. Each time, cook until the mixture seems a little dry, then add more stock. Continue until the rice is cooked through, but still al dente, about 30 minutes total. Off the heat, add the roasted squash cubes and Parmesan cheese. Mix well and serve.

Source: Barefoot Contessa Family Style by Ina Garten