Vanilla Bean Cupcakes

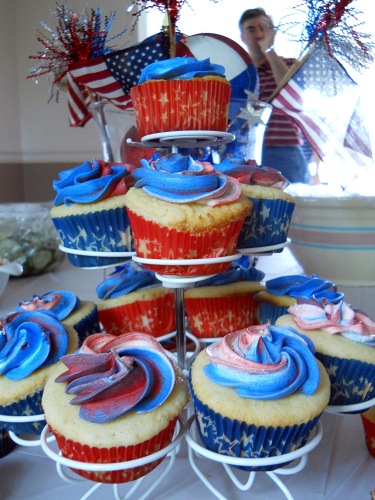
Pay no attention to the man behind the cupcakes. He’s a figment of your imagination. I obviously made these for the 4th of July and sadly the only really good picture of the cupcakes was the one with my brother-in-law Dave photobombing. But that’s ok, now you understand what kind of family I have. It’s a fun one!

I had a vanilla bean that was just itching to be used and I’ve had this recipe bookmarked for quite sometime now. I also couldn’t wait to make it so I could place the used vanilla bean into my sugar container. For those who never know what to do with the leftover vanilla bean, do not throw them away! Place them in sugar and you will have vanilla sugar to be used in all sorts of your baked goods. You will be happy you did it.

These cupcakes are very light in texture and oh, so yummy. I used my favorite buttercream icing and for this occasion I colored the icing red, white and blue to get that swirl on top. Be creative and have fun when making cupcakes, I know I do.

Vanilla Bean Cupcakes:

Yields about 30 cupcakes

  • 3 cups cake flour
  • 1 tbsp. baking powder
  • 1/2 tsp. salt
  • 1 vanilla bean, split lengthwise
  • 16 tbsp. unsalted butter, at room temperature
  • 2 cups sugar
  • 5 large eggs, at room temperature
  • 1 1/4 cups buttermilk, at room temperature
  • 1 tbsp. vanilla extract
  1. Preheat the oven to 350° F.  Line two cupcake pans with paper liners.  Set aside.
  2. In a medium mixing bowl, combine the cake flour, baking powder and salt.  Whisk together and set aside.  Add the butter to the bowl of an electric mixer fitted with the paddle attachment.  Scrape the vanilla bean seeds into the bowl of the mixer with the butter and discard the pod (or reserve for another use.)  Beat on medium-high speed for 3 minutes, until light and creamy in color.  Scrape down the sides of the bowl and beat for one more minute.
  3. Add the sugar to the butter mixture, ¼ cup at a time, beating 1 minute after each addition.  Mix in the eggs one at a time until incorporated.  Scrape down the sides of the bowl after each addition.  Combine the buttermilk and the vanilla extract in a liquid measuring cup.  With the mixer on low speed, add the dry ingredients alternately with the wet ingredients, beginning and ending with the dry ingredients and mixing just until incorporated.  Scrape down the sides of the bowl and mix for 15 seconds longer.
  4. Divide the batter between the prepared paper liners, filling each about 2/3 of the way full (you will likely have batter left over after filling 24 wells.)  Bake 18-22 minutes, or until a toothpick inserted in the center comes out clean.  Allow to cool in the pans 5-10 minutes, then transfer to a cooling rack to cool completely.  Replace paper liners and bake remaining batter if desired.  Frost cooled cupcakes as desired.

Source: Annies Eats via Confections of a Foodie Bride, who adapted it from The Well-Decorated Cake
S’mores Cake

I’ve made this cake a couple times now. The first time I made it, was when my son had his cub scout banquet. It was a perfect dessert to feed the hungry cub scouts since s’mores and cub scouts go hand in hand. But, I was very heavy handed on the marshmallow fluff in the middle. The top layer of the cake just about slid off while it was setting up in the fridge. I knew the fluff would expand a little but it expanded more than I was expecting. So, when I went to make this for our 4th of July cookout, I knew to go a little easier on the fluff. This time, I went way to easy and none of the fluff peaked through the graham cracker layers. I piped in more fluff so it would look pretty. I feel like Goldilocks, the first one was too much, the second one was too little, but the third one will be just right.

You will LOVE this cake. It’s a hit no matter how much fluff you put on it.

NOTE:

Tomorrow, I will be posting a special post regarding the giveaway, celebrating my 1 year Anniversary here on Gina Marie’s Kitchen. 

S’mores Cake:

The Cake:

  • 2 cups graham cracker crumbs
  • 2 tsp. baking powder
  • 1/4 tsp. salt
  • 3 large eggs, separated
  • 8 tbsp. unsalted butter, at room temperature
  • 1 cup sugar
  • 1 tsp. vanilla extract
  • 1 cup milk

Filling:

  • Marshmallow Fluff
Chocolate Ganache:
  • 8 oz. milk chocolate, finely chopped
  • 1/4 cup heavy cream
  • 2 tbsp. unsalted butter cut into 4 pieces, at room temperature
  • 2 tbsp. light corn syrup
To make the cake:
  1. Preheat the oven to 375° F.  Line the bottom of two 9-inch round cake pans with parchment or wax paper.  Grease and flour the sides of the pans; set aside.  In a medium bowl, combine the graham cracker crumbs, baking powder and salt; stir together and set aside.
  2. In the bowl of an electric mixer fitted with the whisk attachment, beat the egg whites on medium-high speed until soft peaks form.  Transfer to a separate bowl and set aside.  Replace the mixer bowl and fit with the paddle attachment.  Cream together the butter and sugar and beat on medium speed until light and fluffy, about 2 minutes.  Mix in the egg yolks until well combined.  Stir in the vanilla extract.
  3. Add in the dry ingredients alternately with the milk on low speed, beginning and ending with the dry ingredients and mixing just until incorporated.  Using a rubber spatula, fold in about a third of the egg whites to lighten the batter.  Gently fold in the remaining egg whites until completely incorporated.
  4. Divide the batter evenly between the prepared pans.  Bake the cakes for about 20 minutes or until a toothpick inserted in the center comes out clean.  Allow the cakes to cool in the pans for about 5-10 minutes, then invert onto a wire rack, remove the parchment paper and let cool completely.
Adding the Fluff:
  1. Once the cake has cooled completely, transfer one of the cake layers to a cardboard cake circle and place on a serving platter.  Carefully spread (I used a piping bag) a layer of marshmallow fluff over the cake, not quite reaching the edges.  Top with the remaining cake layer and refrigerate for about 1 hour.
Making the ganache:
  1. Combine the chocolate, cream, butter and corn syrup in a heatproof bowl set over simmering water.  Heat until the chocolate has melted, then whisk the ingredients together until completely smooth.  Pour glaze over the top of the chilled cake, allowing it to run down the sides in some places.  Return to the refrigerator to chill until set and ready to serve.

Glazed Lemon Cookies

Next week I will be officially living in my new house. We have been busy painting and getting it ready to move into and that’s why I’ve been a little absent. I can’t tell you how excited I am to get into my new kitchen and start cooking up great things for this blog. Thanks for bearing with me while I’ve been a little distracted with life.

I made these for my husband to take into work. Back when he started a few months ago, I had made snicker cookies and one of his news bureau’s heard about those cookies and wished they had some too. I can’t let anyone down, so I had to make them something. I wanted to make something with a little zing and freshness that spring/summer offers. I remembered I had bookmarked lemon cookies awhile back and knew that was what I had to make. These glazed lemon cookies are really good. They are small and full of lemon flavor. When my son saw I was making these he asked if he was going to be able to have some. Thankfully this recipe yields about 3 dozen cookies so I had plenty for him to have. He loves lemons and will eat them as I cut them. His review: Two thumbs up.


Glazed Lemon Cookies:

Makes about 3 dozen cookies

  • 2 1/4 cups all-purpose flour
  • 1/2 teaspoon baking powder
  • 1/2 teaspoon salt
  • 3/4 cup granulated sugar
  • 2 tablespoons lemon zest
  • 1 cup unsalted butter, at room temperature
  • 1 egg
  • 1 teaspoon vanilla extract
Glaze:
  • 1 cup powdered sugar
  • 4-5 teaspoons fresh lemon juice
  1. Preheat the oven to 35o degrees F. Line two baking sheet with parchment paper or a silicone baking mat. Set aside.
  2. Combine flour, baking powder, and salt in a small bowl. Whisk and set aside.
  3. In a small bowl, add granulated sugar and lemon zest. Rub the sugar and lemon zest together with your fingers, until fragrant.
  4. Beat butter and sugar/lemon mixture together until light and fluffy. Beat in egg and vanilla extract. Mix until smooth.
  5. Slowly beat in flour mixture on low speed until blended. Drop dough by tablespoon onto prepared baking sheets, spacing 2 inches apart. Gently flatten dough with the palm of your hand.
  6. Bake for 12-14 minutes or until cookies are just set and slightly golden brown. Cool cookies on baking sheet for 2 minutes and transfer to cooking racks. Cool completely.
  7. In a medium bowl, whisk together powdered sugar and lemon juice. Dip each cookie top into the lemon glaze. Let cookies sit until icing has set.

Tiramisu Cupcakes

Today we are closing on our house and in celebration I want to post these awesome cupcakes. I made them for Mother’s Day, we had a house full of “moms” and I wanted to make something nice for them. I really enjoyed the cupcakes but they didn’t turn out exactly liked I had hoped for. I got a little distracted when they were baking and they ended up baking a little longer than they should have. Sadly, they were a little dry, but that was totally my fault. Even though they were a little dry, the flavor was great. I was a little hesitant about the amount of coffee-marsala syrup that gets put on the cupcakes. I thought for sure there was too much. I was mistaken, you need to make sure you get all that yummy syrup all over those cupcakes. Don’t worry about the cupcakes being too soggy, they won’t be. I am looking forward to making these again and making sure they get pulled out before they get overbaked.

Speaking of Mother’s Day, my sister-in-law celebrated her first Mother’s Day this year. My precious, beautiful, and talented niece Victoria is now 2 months old. For those who have been following my blog, she is the one we were throwing the baby shower for. I am just so thrilled to finally be able to introduce her to you. I am even more thrilled to start making her baby food, once it’s time for her to eat it. I do plan on blogging all about it.

Tiramisu Cupcakes:

Makes about 18 cupcakes

Cupcakes:

  • 1 1/4 cups cake flour, sifted
  • 3/4 teaspoon baking powder
  • 1/2 teaspoon coarse salt
  • 1/4 cup milk
  • 1 vanilla bean*, halved lengthwise, seeds scraped and reserved
  • 4 tablespoons unsalted butter, at room temperature, cut into pieces
  • 3 whole eggs plus 3 egg yolks, at room temperature
  • 1 cup granulated sugar
Coffee-Marsala Syrup
  • 1/3 cup plus 1 tablespoon freshly brewed very strong coffee (or espresso)
  • 1 ounce marsala
  • 1/4 cup granulated sugar

Mascarpone Frosting

  • 1 cup heavy cream
  • 8 ounces mascarpone cheese, room temperature
  • 1/2 cup confectioners’ sugar, sifted
  • Unsweetened cocoa powder, for dusting
  1. Preheat oven to 325 degrees F. Line standard muffin tins with paper liners. Sift together cake flour, baking powder, and salt. Heat milk and vanilla-bean pod and seeds in a small saucepan over medium heat just until bubbles appear around the edge. Remove from heat. Whisk in butter until melted, and let stand 15 minutes. Strain milk mixture through a fine sieve into a bowl, and discard vanilla-bean pod.
  2. With an electric mixer on medium speed, whisk together whole eggs, yolks, and sugar. Set mixing bowl over a pan of simmering water, and whisk by hand until sugar is dissolved and mixture is warm, about 6 minutes. Remove bowl from heat. With an electric mixer on high speed, whisk until mixture is fluffy, pale yellow, and thick enough to hold a ribbon on the surface for several seconds when whisk is lifted.
  3. Gently but thoroughly fold flour mixture into the egg mixture in three batches; stir ½ cup batter into the strained milk mixture to thicken, then fold milk mixture into the remaining batter until just combined.
  4. Divide batter evenly among lined cups, filling each three-quarters full. Bake, rotating tins halfway through, until centers are completely set and edges are light golden brown, about 20 minutes. Transfer tins to wire racks to cool completely before removing cupcakes.
  5. Make the syrup: Stir together coffee, marsala, and sugar until sugar is dissolved. Let cool.
  6. Brush tops of cupcakes evenly with coffee-marsala syrup; repeat until all syrup has been used. Allow cupcakes to absorb liquid 30 minutes.
  7. Make frosting: With an electric mixer on medium speed, whisk heavy cream until stiff peaks form (be careful not to overbeat, or cream will be grainy). In another bowl, whisk together mascarpone and confectioners’ sugar until smooth. Gently fold whipped cream into mascarpone mixture until completely incorporated. Use immediately.
  8. To finish, pipe or dollop frosting onto cupcakes; refrigerate up to overnight in airtight containers. Dust generously with cocoa powder just before serving.

Source: Brown Eyed Baker via Martha Stewart’s Cupcakes

Peanut Butter Snicker Cookies

My husband officially started his new job a few weeks ago. I wanted him to go in on his first day with cookies. How could anyone be worried about their new boss when he comes bringing cookies? I had it all planned out, I was going to be making oreo stuffed cookies. But the day I was going to the store to get all the ingredients, this recipe appeared on my Google Reader feed. I knew right then and there this was what I’d be making for him. The recipe calls for the new Snickers Peanut Butter squares. Sadly, my store was all sold out except for 1 lonely package. I bought it and got the rest in regular snickers. They turned out great having a nice mix between the two snickers. My husband tells me they got rave reviews and I have set the bar high for myself. I look forward to baking them all sorts of things once the kids and I get over there this summer.

Peanut Butter Snicker Cookies:

*Makes about 24

  • 1 1/4 cups all-purpose flour
  • 3/4 teaspoon baking soda
  • 1/2 teaspoon baking powder
  • 1/4 teaspoon salt
  • 1/2 cup unsalted butter, softened
  • 1 cup creamy peanut butter
  • 3/4 cup granulated sugar
  • 1/2 cup light brown sugar
  • 1 egg
  • 1 tablespoon milk
  • 1 teaspoon vanilla extract
  • 1 1/2 cups chopped Snickers Peanut Butter squares or Snickers candy bars  (4 regular size bars)
  • 3/4 cup milk chocolate chips
  1. Preheat oven to 350 degrees F. Line a two baking sheets with parchment paper or silicone baking mats. Set aside.
  2. In a medium bowl, whisk together the flour, baking soda, baking powder, and salt. Set aside.
  3. In the bowl of a stand mixer, beat the butter and the peanut butter together until fluffy. Add the sugars and beat until smooth. Add the egg and mix until combined. Add the milk and the vanilla extract and mix again.
  4. Add the flour mixture and beat until flour disappears. Stir in the chopped Snickers and chocolate chips.
  5. Drop by heaping tablespoons onto the prepared baking sheets. (I weighed mine out to about 2 ounces of dough per cookie.) Gently flatten each cookie ball with the palm of your hand. Bake for 10-11 minutes, or until cookies are slightly brown on the edges.
  6. Cool the cookies on the baking sheets for about 5 to 10 minutes, then remove to a rack to cool completely. Store in an airtight container at room temperature.

Easter Lamb Cake

I want to share with you what one of my families Easter traditions are. We have several, but my favorite one is this Lamb Cake. Sadly, this year will be the first year I will not be making one. We are heading to where we will be moving soon, to be with my husband. He’s already started working and the kids and I are waiting for school to end before we are permanently there. Anyway, this picture comes from last years cake so please ignore the lack of decorations around the lamb. I have no idea why I took a picture of the cake before it was completed, but this was before I decided to start doing a blog. The one thing I would like to point out is the platter the lamb is on. This was my Great Grandmother’s and she used it to put her Lamb Cake on. One thing I wished I had of hers was the cast iron lamb mold. I have a very flimsy one, which desperately needs replaced. If you want to make a Lamb cake I highly recommend a good mold, so the cake batter doesn’t flow out the sides (like mine).

Let’s talk about the cake… It’s basically a spice cake and in order for the cake to stand up it has to be firm and dense. The cake has an ingredient in it called ground mace. The only time I ever use ground mace is when I make this cake. I honestly think this is what makes this cake taste wonderful. Whenever I smell the ground mace, it reminds me of my childhood. I can’t tell you how long this recipe has been in my family, but I know that at least my Great Grandmother used it. You don’t have to make this in a lamb cake mold. It would be great as a layered cake too. The recipe makes 2 lamb cakes. If you wanted to make it as a layered cake I would use 2 or 3 9 inch round cake pans. I’ve never made it as a round cake before so I’m unsure exactly how  many pans you would need. But, the cakes really puff up so I am thinking 3 might be good.

Either way you make this, I am just so thrilled to share my family recipe with you. I really hope you make this and enjoy it with your family. Happy Easter!

Lamb Cake Spice Cake:

makes 2 lamb cakes or 2-3 9inch round cakes

  • 4 1/2 cups Sifted Cake Flour
  • 1/2 tsp salt
  • 1/2 tsp ground mace (optional, although I recommend it)
  • 1 lb unsalted butter, softened
  • 2 1/3 cup granulated sugar
  • 7 eggs
  • 1/2 tsp almond flavoring
  • 1/2 tsp vanilla
  1. Prepare cake pans, butter and flour (use the cake flour) the insides of the pans you will be using. Shake out the excess flour.
  2. Preheat oven to 350 degrees.
  3. In a large bowl, or over parchment paper, sift flour once, measure and re-sift with the salt and mace. Set aside.
  4. In another bowl, cream the butter till waxy, then add the sugar gradually and cream together till mixture is light and fluffy. Add the eggs, one at a time, beating well and scraping after each addition, till smooth. Add vanilla, almond extracts and blend.
  5. Gradually add the flour mixture beating and scraping after each addition till well blended. If using round cake pans, pour batter evenly into each prepared pan. Bake for 40-45 minutes, or until a cake tester comes out clean.
  6. *If using Lamb mold* Place the mold, nose side down on baking sheet and fill the batter so it is rounded on top. Cover with the other half of the mold and bake for 1 1/2 hours, but start checking the cake after 45 minutes. You should be able to start testing the cake at this time with a cake tester, it will be done when it comes out clean.
  7. Let cool on rack for at least 30 minutes, before you unmold it to cool down completely. Frost as desired.
Icing:
*enough to ice 1 cake
  • 2 sticks softened butter
  • 1lb confectioners sugar
  • 1 tsp vanilla
  • 4-8 tbs water
  1. Mix together the butter, sugar and vanilla. Start with 4 tbs water, if the consistency is too thick, add another tbs. (You don’t want it too thin, I’ve used no more than 5tbs of water) Beat the frosting for at least 7 minutes on high. You want the frosting to be rich and fluffy.
  2. Ice your cake and enjoy!
Source: Gina Marie’s Family

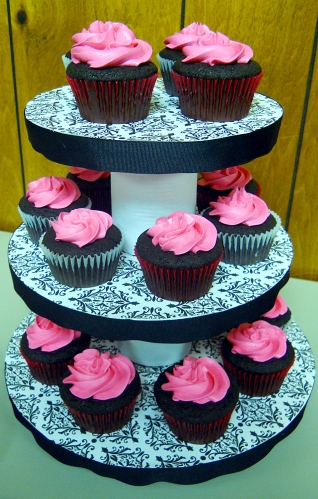
Cupcake Tower with Ganache Filled Cupcakes

For the bridal shower I hosted a few weeks ago, I knew what kind of cupcakes I was going to make. But how was I going to display them? Then I remembered I had seen a tutorial on how to make your own cupcake tower on Annie’s Eats blog. The nice thing about making your own cupcake tower is that you are able to make it fit whatever theme your party is. I am looking forward to football season so I can make a Penn State cupcake tower.

If you want to make this, Annie has a terrific tutorial on her blog and you can find that here. The one thing I did differently was instead of using a round foam disc, my father-in-law made me a round wooden disc. I felt that would going to give it more stability, but I’m sure using the foam disc will work out just fine. I like the wooden bottom because I can reuse it for other cupcake towers.

For the cupcakes I made Dark Chocolate Cupcakes with Buttercream Frosting and I hollowed out the center and filled it with ganache. To put ganache in the middle of a cupcake is easy. Take a sharp knife and cut a little hole in the top-middle of the cupcake. Take it out, but be careful to leave the top so you can put it back on the cupcake once you are done with the filling. Once you have your hole fill it with desired filling and place the “lid” back on and frost as usual.

Ganache:

  • 1/2 cup heavy cream
  • 8 ounces good semisweet chocolate chips
  • 1 teaspoon instant coffee granules
  1. Cook the heavy cream, chocolate chips, and instant coffee in the top of a double boiler over simmering water until smooth and warm, stirring occasionally.
  2. Let sit in refrigerator for about 30 minutes. Take melon baller or spoon ganache in the middle of the cupcakes.

Source: Ina Garten via Food Network