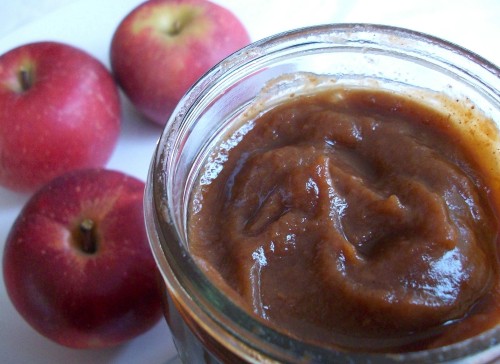
Apple Butter – No Sugar Added

I’m always looking for recipes that have no sugar added or no sugar. My husband is a diabetic and has a sweet tooth. A lot of the recipes I make can be adapted and splenda can be used in place of sugar. But sometimes it doesn’t work well. The chewy chocolate chip cookies do not work well with splenda. The whole texture is changed and has an off flavor. When I saw an apple butter recipe come through my Google Reader, I knew it was something I had to try. It didn’t call for any sugar and relied on the sweetness in the apples and unsweetened apple juice. Perfect!

Last week we got a bunch of fresh Pennsylvania apples and I set off to see if this recipe works. I started the process at 8:00pm in the evening. Seeing that it would take 15 hours of cooking time in the crock pot, I knew starting it at night was the wise decision. The apples were done around 11:00am and the house smelled amazing. I was a little unsure if the apples would get that dark color you find in apple butter, but they did. They were a beautiful dark brown and cooked to perfection. One of the things I noticed is that there was a lot of liquid. I decided to take the apples out with a slotted spoon then put them through a blender. If I hadn’t the apple butter would have had more liquid and not be as thick as it should. The apple butter tasted really good. The only thing was that it had a tiny bit of tang to it. Next time I make this I am going to cut down on the apple cider vinegar. I don’t think there is a need for 1/4 cup of vinegar. I’ve adjusted the recipe to reflect those changes.

Challenge For You:

There was another photo I was going to use, but as I was showing my father-in-law the photo he saw something in the apple butter. As soon as he pointed out what he saw, I could no longer use it as my main photo because it ruined it for me. I decided to still put it on here to see if you could see what he did. We had a very good laugh over this, especially since it’s something I had not planned.

Can you spot the unborn piglet?

Apple Butter:

  • 10 whole Medium Sized Apples (I used a mix of Winesap and Empire)
  • 2 cups Unsweetened Apple Juice
  • ¼ cups Water
  • 2 tbs Apple Cider Vinegar
  • ½ teaspoons Pure Vanilla Extract
  • 1 Tablespoon Cinnamon
  • ¼ teaspoons Ground Cloves
  • ¼ teaspoons Ground Nutmeg
  • 1 pinch Sea Salt (I used Kosher)

1. Place cored and sliced apples (not peeled) into a large crock-pot / slow cooker.

2. Pour juice on top of sliced apples. Add water, apple cider vinegar, extract and spices. Stir all ingredients together, cover pot and let it cook for 15 hours on low.

3. The liquid will reduce and the apples will be very soft, darker in color. After 15 hours, turn the crock pot off and let the apples cool down a bit (about 30 minutes), then with slotted spoon, transfer the mixture into a blender and blend until completely smooth.

4. Let the apple butter cool and then transfer into storage containers. It should store well in the fridge for about 3 weeks. You could even freeze it.

Source: slightly adapted from  Tasty Kitchen

Pumpkin Scones with Spiced Glaze

I had fresh pumpkin puree begging to be used.  Pumpkin scones were always something I’ve wanted to make and knew the puree would be perfect for them. I found the pumpkin scones on Brown Eyed Baker. The spiced glaze is what really attracted me to it and I must admit, that is what makes the scone really shine. When I was making the dough I found it was pretty soft, softer than most scone doughs. I added a bit more flour to them as I was patting them out and that helped. They turned out fabulous, there was the right amount of spices to bring out the pumpkin flavor. I’ve been enjoying these with a nice cup of tea or coffee.

Pumpkin Scones:

  • 2 cups all-purpose flour
  • 7 Tablespoons granulated sugar
  • 1 Tablespoon baking powder
  • ½ teaspoon salt
  • ½ teaspoon ground cinnamon
  • ½ teaspoon ground nutmeg
  • ¼ teaspoon ground cloves
  • ¼ teaspoon ground ginger
  • 6 Tablespoons cold butter
  • ½ cup fresh or canned pumpkin
  • 3 Tablespoons half-and-half
  • 1 large egg
  1. Preheat the oven to 425 degrees F. Line a baking sheet with parchment paper; set aside.
  2. Combine flour, sugar, baking powder, salt, cinnamon, nutmeg, cloves and ginger in a large bowl. Use a fork to cut the butter into the dry ingredients until mixture is crumbly and no chunks of butter are obvious; set aside.
  3. In a separate bowl, whisk together the pumpkin, half-and-half and egg. Fold wet ingredients into dry ingredients, and form the dough into a ball. Pat out dough onto a lightly floured surface and form it into a 1-inch thick rectangle about 3 times as long as wide. Use a large knife or a pizza cutter to slice the dough twice through the width, making three equal portions. Cut each of the portions in an X pattern (four pieces) so you end up with 12 triangular slices of dough. Place on prepared baking sheet. Bake for 14-16 minutes, or until light brown. Place on wire rack to cool.

Spiced Glaze:

  • 1 cup plus 3 Tablespoons powdered sugar
  • 2 Tablespoons milk
  • ¼ teaspoon ground cinnamon
  • 1/8 teaspoon ground nutmeg
  • 1 pinch ground ginger
  • 1 pinch ground cloves

Mix all the ingredients together. Drizzle over each scone and allow the icing to dry before serving (about an hour).

Source: Brown Eyed Baker

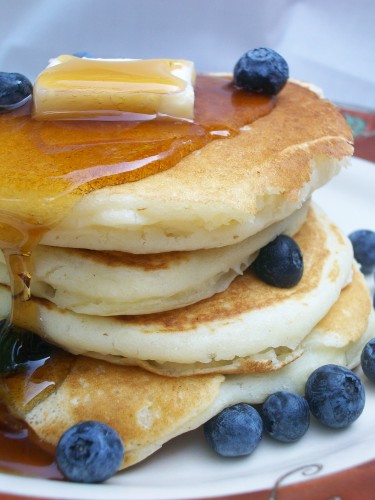
Fluffy Buttermilk Pancakes

I love making a big breakfast on the weekends and pancakes have always been a family favorite. One day I decided to try this recipe and after we devoured them, I was kicking myself for ever using a box mix. If you use a box mix to make pancakes, STOP! Making fresh homemade pancakes is just as easy as using a box but produces better results.

See…You can’t make a box pancake mix look this good!

This is a basic pancake recipe. If you want to kick them up a notch and add fruits or chocolate chips, you can. After you put the batter on the griddle; add whatever you want to the top of the batter. We like blueberries, pineapple, banana, and the kids like chocolate chips. Enjoy!

Fluffy Buttermilk Pancakes

  • 2 cups all-purpose flour
  • 2 tbs sugar
  • 2 tsp baking powder
  • ½ tsp baking soda
  • ½ tsp salt
  • 1 large egg
  • 3 tbs unsalted butter, melted
  • 2 cups buttermilk
  • 1-2 tsp vegetable oil

1. Adjust an oven rack to the middle position and heat the oven to 200 degrees. Set a wire cooling rack over a baking sheet and set aside.

2. Whisk together the flour, sugar, baking powder, baking soda, and salt in a large bowl. In a separate bowl, whisk together the egg, melted butter, and then the buttermilk. Make a well in the center of the dry ingredients, pour the buttermilk mixture into the well, and whisk very gently until the buttermilk mixture is just incorporated (a few lumps should remain). Be careful not to overmix the batter.

3. Heat a 12-inch nonstick skillet (or use a griddle) over medium heat for 3-5 minutes. Brush the pan bottom with 1tsp oil (I like to use butter). Using ¼ cup of the batter per pancake, add the batter to the skillet (only 2 or 3 pancakes will fit at a time) and cook until large bubbles begin to appear, about 2 minutes. Flip the pancakes and cook until golden brown on the second side, about 1 ½ minutes longer. Spread the pancakes out over the wire rack on the baking sheet (they shouldn’t overlap) and hold in the warm oven. Repeat with the remaining batter, brushing the skillet with oil as needed between batches. (After I use the butter the first time I don’t butter the pan again)

Source: Adapted from The America’s Test Kitchen Family Cookbook