Stovetop Chicken Fajitas

We love fajitas in our family and the best way to make them is on the grill. I know there are people out there who will continue to use their grill in the snow and freezing cold; but I am not one of them. That’s why when I saw this recipe I knew I had to try it. Making fajitas on the stove is a great to enjoy them on those really cold snowy days. I had been craving fajitas and these hit the spot. The whole dish came together nicely and we had no leftovers. I served these with a fresh tomato salsa. I can’t wait to make them again.


Stovetop Chicken Fajitas:

  • 2 tsp canola oil
  • 2 red bell peppers, stemmed, seeded, and sliced thin
  • 1 red onion, halved and sliced thin
  • Salt and Pepper
  • 4 (6oz) boneless, skinless chicken breasts, trimmed, pounded so the chicken is all the same thickness
  • 1/2 cup orange juice
  • 3/4 cup minced fresh cilantro
  • 1 tbs Worcestershire sauce
  • 4 garlic cloves
  • 2 tsp minced canned chipotle chile in adobo sauce
  • 1 tsp yellow mustard
  • 1 tomato, cored, seeded and chopped medium
  • 3 scallions, sliced thin
  • 8 whole-wheat flour tortillas, warmed
  1. Heat the oil in a 12-inch skillet over medium high heat until just smoking. Add the bell peppers and onion and cook, stirring occasionally, until softened and well-browned, 5-7 minutes. Transfer to a bowl, season with salt and pepper to taste, and cover to keep warm.
  2. Pat the chicken dry with paper towels and season with salt and pepper. Combine the orange juice, 1/2 cup of the cilantro, Worcestershire, garlic, and chipotles in the skillet. Add the chicken and bring to a simmer over medium-low heat, about 5 minutes. When the liquid is simmering, flip the chicken over, cover, and continue to cook until the chicken registers 160-165 on an instant-read thermometer, 10-12 minutes longer.
  3. Transfer the chicken to a plate and shred it into bite-sized pieces when cool enough to handle. Meanwhile, continue to simmer the sauce over medium heat until slightly thickened and reduced to 1/4 cup, about 5 minutes.
  4. Off the heat, stir in the mustard, tomato, scallions, remaining 1/4 cup cilantro and shredded chicken. Season with salt and pepper to taste, and serve with the pepper-onion mixture and warm tortillas.

Source: America’s Test Kitchen Healthy Family Cookbook

Chicken In A Pot With Thyme and Lemon

The flu bug has officially visited my house. I was the second person to get hit and hopefully the last. I can finally look and think about food again. I was wanting to post this recipe earlier but there was no way I could even think about it. Thankfully I’m on the mend and can start giving you wonderful recipes again.

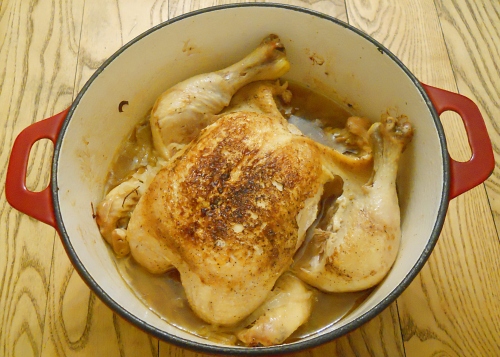
Cooking a whole chicken in a pot is the classic French way to cook a chicken. I’ve never tried it before and I’m so glad I finally made it. I now have my favorite way to cook chicken. The recipe comes from my new America’s Test Kitchen Healthy Family Cookbook, which is now one of my favorites. I loved that everything is cooked in one pot. You brown the chicken with the onions and then throw it in the oven. After 2 hours of baking, I checked the chicken to find it was not done. I decided to crank the temp on the oven to 350 and let it go for 40 minutes. That did the trick, the chicken was cooked perfectly. The sauce was my favorite part of the meal! We spooned it over the chicken and the basmati rice pilaf I made to go along side it. I could have kept eating the sauce with a spoon. This made a great Sunday night dinner for us, but could easily be made during the week.


Chicken in a pot with Thyme and Lemon:

  • 1 (4lb) whole chicken, neck and giblets removed
  • Salt and Pepper
  • 1 tbs extra-virgin olive oil
  • 1 onion, halved and sliced thin
  • 6 garlic cloves, peeled and crushed
  • 1 bay leaf
  • 2-4 sprigs fresh thyme
  • 1 tsp fresh lemon juice
  1. Adjust oven rack to the lower position and heat the oven to 250 degrees. Pat the chicken dry with paper towels, tuck the wings under the chicken. Season with salt and pepper.
  2. Heat the oil in a large Dutch oven over medium-high heat until just smoking. Add the chicken, breast-side down, and scatter the onion, garlic, bay leaf and thyme around the chicken. Brown the chicken on both sides, 10-12 minutes. Turn the chicken breast-side up.
  3. Off the heat, place a large sheet of aluminium foil over the pot and press to seal, then cover tightly with the lid. Transfer the pot to the oven and cook until the breast registers 160 to 165 degrees and the thighs register 175 degrees on an instant-read thermometer, 1 hour 20 minutes to 1 hour 50 minutes.
  4. Transfer the chicken to a carving board, ten loosely with foil, and let rest for 20 minutes. Strain the juices from the pot into a fat separator (if you don’t have one strain them into a bowl and skim off the fat), reserving the strained vegetables. Let the juices settle for about 5 minutes.
  5. Add the defatted juices, strained vegetables, and any accumulated chicken juice back to the pot and bring to a simmer over medium heat. Off the heat, discard the bay leaf and thyme sprigs, stir in the lemon juice, and season with salt and pepper to taste. Carve the chicken and remove the skin. Serve, passing the sauce separately.

Source: America’s Test Kitchen Healthy Family Cookbook

Lemon Chicken Breasts

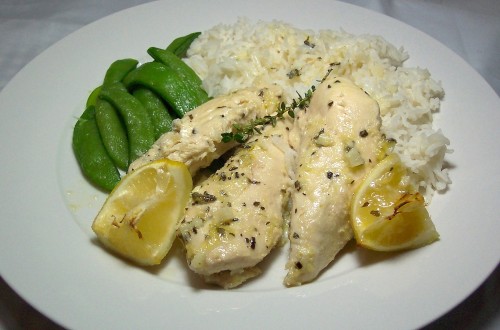
I’m on an Ina Garten “How Easy Is That?” kick. I love her new cookbook! There are so many great and easy recipes in it. I wish now that I had already bought all my Christmas gifts for family, because this cookbook would make a perfect gift for a lot of them. Anyway, I saw the recipe for lemon chicken breasts and I had a lot of the ingredients already. I knew I had bought chicken breasts from Costco a few week backs and pulled them out of the freezer. As I go to make the dish, I realize I didn’t buy chicken breasts but instead bought chicken tenders. Ugh! Well, gotta make the best of the situation so I used the tenders and I don’t think it made one bit of difference. I ended up doubling the recipe because I had a lot of tenders. The sauce is amazing and really made those chicken tenders taste great. I’m looking forward to trying this with chicken breasts next time to see how those turn out.


Lemon Chicken Breasts or Tenders:

  • 1/4 cup olive oil
  • 3 tbs minced garlic (9 cloves)
  • 1/3 dry white wine
  • 1 tbs grated lemon zest (2 lemons)
  • 2 tbs freshly squeezed lemon juice
  • 1 1/2 tsp dried oregano
  • 1 tsp minced fresh thyme leaves
  • Kosher salt and freshly ground pepper
  • 4 boneless chicken breasts, skin on or 1 package of chicken tenders
  • 1 lemon
  1. Preheat oven to 400 degrees.
  2. Warm the olive oil in a small saucepan over medium-low heat, add the garlic, and cook for just 1 minute but don’t allow the garlic to turn brown. Off the heat, add the white wine, lemon zest, lemon juice, oregano, thyme, and 1 tsp salt and pour into a 9×12 inch baking dish.
  3. Pat the chicken breasts dry and place them skin side up over the sauce. Brush the chicken breasts with olive oil and sprinkle them liberally with salt and pepper. Cut the lemon in 8 wedges and tuck it among the pieces of chicken.
  4. Bake for 30-40 minutes, depending on the size of the chicken breasts, until the chicken is done and the skin is lightly browned. If the chicken isn’t browned enough, put it under the broiler for 2 minutes. Cover the pan tightly with foil and allow to rest for 10 minutes. Sprinkle with salt and serve hot with the pan juices.

Source: How Easy is That? by Ina Garten

Penne with Chicken and Broccoli

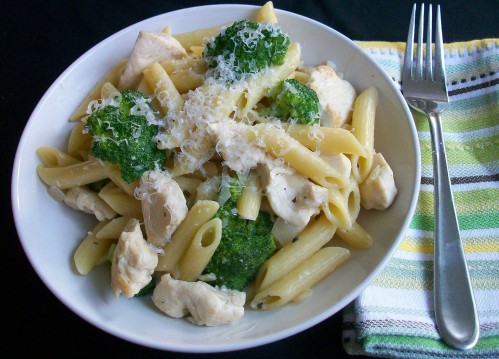
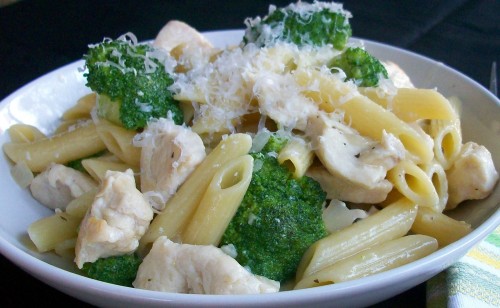
I got a new cookbook awhile back called The Best Skillet Recipes from the editors of Cook’s Illustrated. I love this cookbook! It’s filled with easy recipes you can do in a 12 inch skillet, which makes it perfect for weeknight meals. I have a long list of recipes I want to try and decided to start with Penne with Chicken and Broccoli. Turns out it was a great recipe to begin with. Simple pasta dishes always makes me happy. The whole dish comes together nicely and packs more flavor than I had anticipated. My kids loved this dinner and we didn’t have any leftovers!

Penne with Chicken and Broccoli:

  • 1/4 cup olive oil
  • 1 lb boneless, skinless chicken breasts (about 3 medium) trimmed and sliced thin
  • 1 medium onion, minced
  • Salt
  • 6 medium garlic cloves, minced or pressed through a garlic press (about 2tbs)
  • 1/4 tsp red pepper flakes
  • 1/4 tsp dried oregano
  • 1/2 cup dry white wine
  • 2 1/2 cups water
  • 2 cups low-sodium chicken broth
  • 8 ounces (about 2 1/2 cups) Penne
  • 8 ounces broccoli florets, cut into bite sized pieces (about 3 cups)
  • 2 ounces Parmesan cheese, grated (1 cup) plus extra for serving
  • Ground black pepper
  1. Heat 1 tbs of the oil in a 12-inch nonstick skillet over high heat until just smoking. Add the chicken, break up any clumps, and cook, without stirring, until beginning to brown, about 1 minute. Stir the chicken and continue to cook until cooked through, 2 to 3 minutes longer. Transfer the chicken to a bowl, cover to keep warm, and set aside.
  2. Add 1tbs more oil to the skillet and heat over medium heat until shimmering. Add the onion and 1/2 tsp of salt and cook, stirring often, until softened, 5 to 7 minutes. Stir in the garlic, red pepper flakes, and oregano and cook until fragrant, about 30 seconds. Stir in the wine and simmer until nearly evaporated, 1 to 2 minutes.
  3. Stir in the water and broth, then add the pasta. Increase the heat to high and cook at a vigorous simmer, stirring often, for 12 minutes.
  4. Stir in the broccoli and continue to simmer, stirring often, until the pasta and broccoli are tender and the liquid has thickened, 3 to 5 minutes.
  5. Return the chicken, along with any accumulated juices, to the skillet and cook until warmed through, about 1 minute. Off the heat, stir in the remaining 2 tbs olive oil, Parmesan, and season with salt and pepper to taste. Serve, passing extra Parmesan separately.

Source: The Best Skillet Recipes from the editors of Cook’s Illustrated

Homemade Chicken Stock

If you have never made chicken stock before, you don’t know what you are missing. I love making stock on a day I know that we will be home, since it does take several hours to make. But it’s well worth the waiting time. I make a huge pot and freeze the stock for when I need it. I’ll freeze it in 1 cup portions and up to 4 cups. That way if a recipe calls for a small amount of stock, I don’t have to thaw out 4 cups and have the rest go to waste.

There are so many ways to make stock and you really can’t screw it up. I’ve even taken this recipe and made it without the chicken so I have vegetable stock. When I do that, I add mushrooms to give the veggie stock another dimension. The original recipe calls for 3 whole chickens, but a lot of us don’t have an enormous stock pot to hold that many chickens. I will add the chicken and veggies to the pot and add enough water to fill almost to the top. I usually get about 16-18 cups of stock. You don’t have to defat the stock right away. I found that when you freeze the stock and thaw it in the fridge, the layer of fat will stay on top and can be easily removed before using.

This weekend my mother and Aunt will be visiting. I’m planning on making them a big meal that includes butternut squash risotto. In order to make a great risotto, you need to have great stock. So this past weekend I got the chicken and veggies together and made stock since I was out.

Chicken Stock:

  • 1 (5-pound) roasting chicken
  • 1 large yellow onions, unpeeled and quartered
  • 2 carrots, unpeeled and halved
  • 2 stalks celery with leaves, cut into thirds
  • 2 parsnips, unpeeled and cut in half, optional
  • 10 sprigs fresh parsley
  • 8 sprigs fresh thyme
  • 10 sprigs fresh dill
  • 1 head garlic, unpeeled and cut in 1/2 crosswise
  • 1 tablespoons kosher salt
  • 1 teaspoons whole black peppercorns
  1. Place the chicken, onions, carrots, celery, parsnips, parsley, thyme, dill, garlic, and seasonings in a stockpot.
  2. Add enough water to cover and come to 1 inch below the top and bring to a boil. Simmer, uncovered, for 3 hours.
  3. Strain the entire contents of the pot through a colander and discard the solids.
  4. Use immediately or pack in containers and freeze for up to 3 months

Source: adapted from Barefoot Contessa Ina Garten

Buffalo Chicken Wings

Wings are a staple during football season. I’ve made them several different ways and found Ina’s way to be the easiest. I am not a big fan of fried chicken wings and have always baked them. But I found with baking them they don’t crisp up like you would get with fried. Ina’s recipe calls for broiling the wings which gives it a nice crispy outside. When it came time to flipping the wings, I decided to put them on a new baking sheet due to all the fat that was on the first sheet. That helped with really crisping them up. I suggest putting on more sauce then you think it needs. I didn’t get a huge amount of the hot sauce flavor and ended up making some extra to dip them into. Overall they turned out great. Serve them with celery and blue cheese dressing (or ranch).

Buffalo Chicken Wings:

    • 16 chicken wings (about 3 pounds)

    • 1/4 pound (1 stick) unsalted butter

    • 4 teaspoons Frank’s Hot Sauce

    • 1 teaspoon kosher salt

  1. Preheat the broiler.
  2. Cut the chicken wings in thirds, cutting between the bones. Discard the wing tips.
  3. Melt the butter, hot sauce, and salt. Put the wings on a sheet pan and brush them with the melted butter.
  4. Broil them about 3 inches below the heat for 8 minutes. Turn the wings, brush them again with the butter, and broil for 4 more minutes or until cooked.

Source: Ina Garten via Food Network


Stuffed Chicken Breasts with Ham, Cheddar and Thyme

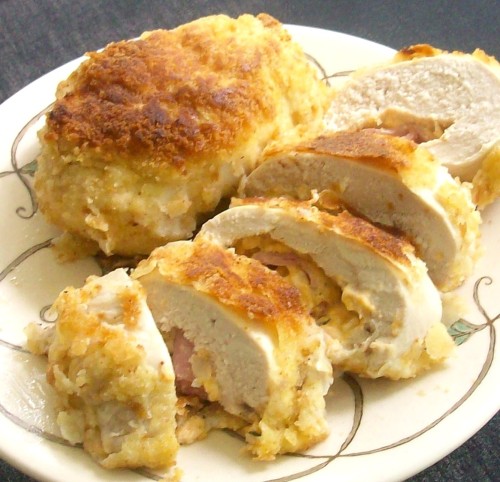
A few weeks ago I was in State College, PA doing a little shopping and ran across a special fall issue of Cooks Illustrated magazine. I love Cook Illustrated and with fall coming, I had to have it. In the issue was a stuffed chicken recipe that sounded so good I had to make it right away. The recipe calls for fresh bread crumbs and I decided to use fresh and dried to see if there was a difference. There really wasn’t a huge difference so if you don’t want to make the fresh bread crumbs, dried will work just fine. I didn’t pound the chicken breasts thin enough and wished I had. Some of the cheese mixture did end up leaking out of the chicken while it was baking. Make sure to pound the chicken thin so you can get a good seal on the filling. The cheese filling is really tasty and you don’t want to waste any of it.

What’s nice about this recipe is that you can make it ahead of time up to stage 4. When ready to cook you can continue stage 5-6.

Stuffed Chicken Breasts with Ham, Cheddar and Thyme

Chicken:

  • 8 boneless, skinless chicken breasts (5-6 oz each), tenderloins removed and reserved for another use
  • 4 slices high-quality white sandwich bread, torn into 1 inch pieces. (or 3 cups of dried bread crumbs)
  • 1 cup unbleached all-purpose flour
  • 4 large eggs
  • 1 cup plus 1 tbs vegetable oil

Filling:

  • 2 tbs butter
  • 1 onion, minced
  • 1 medium-garlic clove, minced or pressed through garlic press (1 tsp)
  • 8 oz cream cheese, softened
  • 2 tsp chopped fresh thyme leaves
  • 8 oz chedder cheese, shredded (2 cups)
  • salt and pepper
  • 8 slices (about 8 oz) thin-sliced cooked deli ham
  1. Place each chicken breast in a large ziplock bag or on a large sheet of plastic wrap, cover with second sheet and pound with meat pounder or rolling pin till 1/4 inch thick throughout. Each pounded breast should measure roughly 6 inches wide and 8 1/2 inches long. Cover and refrigerate while preparing filling.
  2. Heat butter in medium skillet over low heat until melted; add onion and cook, stirring occasionally, until deep golden brown, 15-20 minutes. Stir in garlic and cook until fragrant, about 30 seconds longer; set aside.
  3. In medium bowl using hand-held mixer, beat cream cheese on medium speed until light and fluffy, about 1 minute. Stir in onion mixture, thyme, and cheddar; season with salt and pepper and set aside.
  4. Place breasts skinned side down on work surface; season with salt and pepper. Fill with cheese and ham, roll and wrap each breast tightly in foil, twisting the foil ends in opposite directions. Refrigerate at least for 45 minutes or more.
  5. If not using dried bread crumbs: pulse bread in food processor until evenly textured, 8-10 one second pulses ( you should have 3 1/2 cups fresh bread crumbs). Adjust oven rack to lower-middle position and heat oven to 400 degrees. Spread flour in pie plate or shallow baking dish. Beat eggs with 1 tbs vegetable oil and 1 tbs water in second pie plate or shallow baking dish. Spread bread crumbs in third pie plate or shallow baking dish. Unwrap chicken breasts. Roll 1 stuffed chicken breast in flour; shake off excess. Using tongs, then roll breast in egg mixture; let excess drip off. Transfer breast to bread crumbs; shake dish to roll breast in crumbs, then press with fingers to adhere crumbs. Place breaded chicken breast on large wire rack set over baking sheet. Repeat with remaining breasts.
  6. Heat 3/4 cup oil in medium skillet over medium-high heat until shimmering but not smoking. Add 4 chicken breasts to skillet, seam side down, and cook until medium golden brown, about 2 minutes. Turn each breast and cook until medium golden brown on all sides, 2 to 3 minutes longer. Return chicken breasts, seam side down, to baking sheet. Add remaining 1/4 cup oil to skillet and repeat with remaining chicken breasts. Once all chicken breasts have been fried, place baking sheet in oven and bake breasts until deep golden brown and instant-read thermometer inserted into center of each breast registers 160 degrees, about 20 minutes, rotating pan halfway through cooking. Let stand 5 minutes before slicing each breast crosswise diagonally into 4 to 5 medallions; arrange on individual dinner plates and serve.

Source: Cook’s Illustrated Special: Fall Entertaining