Sweet Potatoes and Apples Casserole

It took me till I was an adult to really enjoy what the sweet potato has to offer. When I was little I wouldn’t touch the sweet potato casserole even if it had marshmallows melted all over it. The first time I really tried the sweet potato casserole was when my mother-in-law made it. She put apples in it and I figured I’d go ahead and try it.

I was very happy I did, and surprised at how yummy it was. The apples, brown sugar and spices took it to another level. I’ve been making it this way ever since.

This recipe is very forgiving. I rarely go by a strict a recipe for this one. I tend to buy more canned yams than I need. One year I didn’t have enough to my liking but it still turned out ok. I use 3 apples and found that’s a good ratio to 2-3 large cans of canned yams. You can adjust the amount of yams as you make this.

Sweet Potatoes and Apples Casserole:

  • 2-3 40 oz cans Canned Yams, drained
  • 3 Apples, peeled and cored and diced in 1 inch cubes. I use Gala or McIntosh
  • 1/4 packed brown sugar ( I use splenda brown sugar)
  • 1/2 tsp Cinnamon
  • 1/4 tsp ground or fresh nutmeg
  • 2 tbs unsalted butter
  • 1 bag small marshmallows
  1. Preheat oven to 350 degrees. Butter a deep, medium size baking dish, set aside.
  2. Mix the brown sugar, Cinnamon, nutmeg, and apples together in a small bowl, set aside.
  3. Slice the yams into 1/2 inch rounds or cut the larger pieces into smaller pieces. Layer half the yams into the baking dish. Add the apple mixture and top with the remaining yams. Bake at 350 degrees for about 1 hour.
  4. Just before serving, pour as many of the marshmallows on top that you want, and bake for another 5 minutes or until the marshmallows get a golden brown. Serve.

Green Rice

Green Rice has been apart of our families Thanksgiving, Christmas and Easter dinners since before I was born. It’s not the prettiest photo subject, but the way it tastes makes it a star. The name might fool you, Green Rice is basically a broccoli and cheese casserole. I remember as a kid, always fighting with my brother over who gets the biggest scoop of the Green Rice. I would rather have had a plate of Green Rice than turkey or stuffing. It’s that good!

If you are looking for side dishes for your Thanksgiving dinner that can be made ahead of time, this is the perfect one. You will make the recipe up until you have to bake it. Once you have put it in the casserole dish, cover it with foil then refrigerate till ready to bake. Anything to make your Thanksgiving day a little less stressful is a good thing.

Green Rice:

  • 1 medium onion, diced small
  • 2 stalks celery, diced small
  • 13 tbs unsalted butter plus 1tbs to butter casserole dish
  • 2 cans cream of mushroom soup
  • 1 15oz jar of Cheez Whiz
  • 2 1/3 cup Minute Rice (I use the brown kind)
  • 2 10 oz packages of chopped broccoli, thawed and excess liquid squeezed out
  1. Preheat oven to 350 degrees. Butter 9×13 casserole dish and set aside.
  2. In a 10 inch saute pan set over medium heat, melt butter and add the onions and celery. Cook until onions and celery are soft, about 8 minutes, take off heat.
  3. In a large mixing bowl, mix together the cream of mushroom soup and Cheez Whiz. Add the butter, onions and celery, stir to combine.
  4. Add the rice and broccoli and stir till everything is combined. Pour mixture into the buttered casserole dish. At this point you can refrigerate it or bake it for about 45 minutes to 1 hour, until golden brown and bubbly on top. Enjoy!

Italian Style Stuffing with Sausage and Fennel

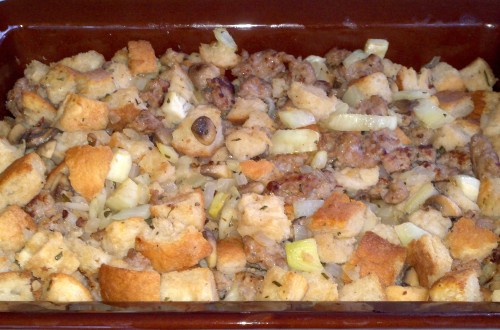
Don’t ya love the photo? It’s taken with my Droid. Thankfully the Droid pics won’t last long, I will be borrowing a camera from my in-laws. I do apologize for the photos that will be posted this week. Now onto the food…

Welcome to Thanksgiving week! If you are looking for a new stuffing for your Thanksgiving dinner, look no further. I found this recipe last year and fell in love with it. When I was a kid I was not a stuffing fan. At the dinner table I would put some on my plate, just to be nice, but would eat around it. Then one day I tasted stuffing with sausage and that opened up my eyes. I decided to search for the best stuffing I could find. This Italian style stuffing comes pretty darn close! How can you go wrong with fresh Italian bread, sausage and fennel? If you have never tried fennel, it has a liquorice smell and flavor. It also goes great with fish. The fennel is my favorite ingredient in the stuffing.

The original recipe doesn’t mention baking the stuffing, but using it as a turkey stuffer. Personally, I don’t like stuffing the bird with stuffing. Turkey should be stuffed with herbs, onions, lemons, garlic, salt and pepper. That helps give the turkey more flavor. What I like to do is after the stuffing is all mixed up, place it into a baking dish and bake it for about 45 minutes. Comes out perfect! I did omit the red pepper due to my husband not being able to eat it. It wasn’t missed, but I’m sure it would taste just fine with it in.

Italian Style Stuffing with Sausage and Fennel:

  • 3 tablespoons olive oil, divided
  • 1 pound sweet ltalian sausage, their casings removed
  • 2 small heads fennel, cut into ½-inch dice (3 cups)
  • 1 large onion, chopped
  • 1 large red bell pepper, seeded, cored, and cut into ½-inch dice
  • 10 ounces cremini (baby bella) mushrooms, sliced
  • 4 garlic cloves, chopped
  • 1 pound day-old, crusty Italian or French bread with a firm crumb, cut into 1-inch cubes (8 cups)
  • 1 cup freshly grated Parmesan cheese
  • 2 tablespoons chopped fresh rosemary
  • 1½ cups Turkey Stock, as needed
  • Salt and freshly ground black pepper
  1. Preheat oven to 350 degrees. Butter a 9×13 baking dish.
  2. Heat 1 tablespoon of the oil in a large skillet over medium-high heat. Add the sausage and cook, breaking up the sausage with the side of a spoon, until the sausage is cooked through, about 10 minutes. Using a slotted spoon, transfer the sausage to a large bowl, leaving the fat in the pan.
  3. Add the fennel and onion to the skillet and reduce the heat to medium. Cover and cook, stirring occasionally, until the fennel is tender, about 10 minutes. Transfer to the bowl with the sausage.
  4. Add the remaining 2 tablespoons of oil to the skillet and heat. Add the bell pepper and cook until it begins to soften, about 3 minutes. Add the mushrooms and cook, stirring occasionally, until the mushroom juices evaporate and the mushrooms begin to brown, about 12 minutes. Stir in the garlic and cook until it is fragrant, about 1 minute. Transfer to the bowl with the sausage and vegetables.
  5. Add the bread cubes, Parmesan, and rosemary. Stir in enough stock to moisten the cornbread, about 1½ cups. Season with the salt and pepper to taste. Place in baking dish and bake for 45 minutes, or until the top is a light golden brown.

Source: Cookstr from Rick Rodgers

Butternut Squash Risotto

Everyone has their favorite comfort foods. I have several and risotto is at the top of the list. I find it relaxing standing at the stove, with a glass of wine in one hand and stirring risotto with the other. It’s also nice watching my 14 year old daughter stirring the risotto while I’m holding a glass of wine. Either way is relaxing. A lot of people are scared to make risotto and you shouldn’t be. The only thing is time. If you can devote about 30 minutes to standing at the stove you can make a great risotto. For those who aren’t sure what risotto is, it’s the Italians version of a rice dish. Nice a creamy and oh so good.

Butternut Squash is in season and goes great with risotto. The roasted butternut squash gets caramelized and a bit sweet. Saffron is also a star in the risotto. Saffron can be a bit expensive but it’s worth it for this recipe. When I know I want to make risotto I make sure to have homemade chicken stock on hand. I can’t stress enough how much better risotto is with a homemade stock. It really does bump up the flavors. If you can’t find pancetta, bacon will make a good substitute. You can serve this as a main meal or a side. I made the risotto and served it with a roasted chicken, arugula and spinach salad with apples and dried cranberries. It made the perfect fall meal.

Butternut Squash Risotto

  • 1 butternut squash (2 pounds)
  • 2 tablespoons olive oil
  • Kosher salt and freshly ground black pepper
  • 6 cups chicken stock, preferably homemade
  • 6 tablespoons (3/4 stick) unsalted butter
  • 2 ounces pancetta, diced
  • 1/2 cup minced shallots (2 large)
  • 1 1/2 cups Arborio rice (10 ounces)
  • 1/2 cup dry white wine
  • 1 teaspoon saffron threads
  • 1 cup freshly grated Parmesan cheese
  1. Preheat the oven to 400 degrees.
  2. Peel the butternut squash, remove the seeds, and cut it into 3/4-inch cubes. You should have about 6 cups. Place the squash on a sheet pan and toss it with the olive oil, 1 teaspoon salt, and 1/2 teaspoon pepper. Roast for 25 to 30 minutes, tossing once, until very tender. Set aside.
  3. Meanwhile, heat the chicken stock in a small covered saucepan. Leave it on low heat to simmer.
  4. In a heavy-bottomed pot or Dutch oven, melt the butter and saute the pancetta and shallots on medium-low heat for 10 minutes, until the shallots are translucent but not browned. Add the rice and stir to coat the grains with butter. Add the wine and cook for 2 minutes. Add 2 full ladles of stock to the rice plus the saffron, 1 teaspoon salt, and 1/2 teaspoon pepper. Stir, and simmer until the stock is absorbed, 5 to 10 minutes. Continue to add the stock, 2 ladles at a time, stirring every few minutes. Each time, cook until the mixture seems a little dry, then add more stock. Continue until the rice is cooked through, but still al dente, about 30 minutes total. Off the heat, add the roasted squash cubes and Parmesan cheese. Mix well and serve.

Source: Barefoot Contessa Family Style by Ina Garten

Buffalo Chicken Wings

Wings are a staple during football season. I’ve made them several different ways and found Ina’s way to be the easiest. I am not a big fan of fried chicken wings and have always baked them. But I found with baking them they don’t crisp up like you would get with fried. Ina’s recipe calls for broiling the wings which gives it a nice crispy outside. When it came time to flipping the wings, I decided to put them on a new baking sheet due to all the fat that was on the first sheet. That helped with really crisping them up. I suggest putting on more sauce then you think it needs. I didn’t get a huge amount of the hot sauce flavor and ended up making some extra to dip them into. Overall they turned out great. Serve them with celery and blue cheese dressing (or ranch).

Buffalo Chicken Wings:

    • 16 chicken wings (about 3 pounds)

    • 1/4 pound (1 stick) unsalted butter

    • 4 teaspoons Frank’s Hot Sauce

    • 1 teaspoon kosher salt

  1. Preheat the broiler.
  2. Cut the chicken wings in thirds, cutting between the bones. Discard the wing tips.
  3. Melt the butter, hot sauce, and salt. Put the wings on a sheet pan and brush them with the melted butter.
  4. Broil them about 3 inches below the heat for 8 minutes. Turn the wings, brush them again with the butter, and broil for 4 more minutes or until cooked.

Source: Ina Garten via Food Network


Garlic Bread with Herbs

Who doesn’t like garlic bread? Garlic bread is warm, buttery and full of yummy goodness. I’ve been making this version of garlic bread for awhile now. The sautéed herbs in a garlic-olive oil mixture takes the bread up a notch.  The recipe calls for ciabatta  bread but Italian bread would also work. This time I used a ciabatta baguette and it worked really nice. Sometimes I’ll add a bit more butter than recipe calls for, but that’s because I like it buttery. Make this garlic bread when you make baked ravioli or Chicken Parmesan .

Garlic Bread:

  • 6 large garlic cloves, chopped
  • 1/4 cup chopped flat-leaf parsley
  • 1/4 cup chopped fresh oregano leaves
  • 1/2 teaspoon kosher salt
  • Freshly ground black pepper
  • 1/2 cup good olive oil
  • 1 loaf ciabatta bread
  • 2 tablespoons unsalted butter
  1. Preheat the oven to 350 degrees F.
  2. Place the garlic in the bowl of a food processor and process until minced. Add the parsley, oregano, salt and pepper and pulse twice.
  3. Heat the olive oil in a medium saute pan and add the garlic mixture. Remove the pan from the heat.
  4. Slice the ciabatta bread in half horizontally, and spread the butter on 1 half. Spread the garlic mixture on the other half of the bread, and put the halves together. Wrap the bread in aluminum foil.
  5. Place the bread in the oven and bake for 5 minutes. Open the foil, and continue baking for an additional 5 minutes.

Source: Ina Garten via Food Network

Football Sandwiches aka Ham and Cheese Yumminess

A few years ago one of my best friends, Kali, was telling me about these sandwiches her mother makes for football season, Christmas Eve and just about any other time of the year. Her mother, Patty, has been making them for as long as Kali can remember. They sounded interesting and I asked her to please get the recipe from her mom. I’m so happy that Patty gave me the recipe. These sandwiches are sooooooo good (yes I used more than one o cause that’s how good they are).

The sauce is what takes the sandwiches from plain ole’ ham and cheese to ham and cheese yumminess! It’s made with butter, horseradish mustard, grated onion and poppy seeds. Doesn’t get any better than that! The other great thing about these sandwiches is that you can make them ahead of time and pop them in the oven when you are ready. Kali says they can be put in the freezer. I have yet to try that because they are gone before I need to think about freezing. The sandwiches are great to take to tailgates parties. They are individually wrapped in foil so they stay nice and warm in an insulated bag.

Patty, my family and I thank you for this recipe. It’s become a staple on game days. And when Penn State starts playing Nebraska again after they join the Big Ten; we will be thinking of you as we are eating the sandwiches and watching the Lions run all over the Huskers. 🙂 GO STATE!

Note: I doubled the sauce recipe because I love slathering on a lot of sauce. Also, when using Kaiser rolls, they tend to be a bit bigger than regular hamburger buns and need the extra sauce.

Football Sandwiches:

  • 12 Kaiser rolls or regular buns
  • 1 1/2 – 2lbs sliced ham
  • 1 lb swiss cheese

Sauce:

  • 2 sticks of butter, softened
  • 6 tbs horseradish mustard
  • 2 tbs grated onion
  • 2 tbs poppy seeds
  1. Preheat oven to 300 degrees.
  2. Combine all the ingredients for the sauce. Split the rolls and spread the sauce on the inside of both sides of the buns.
  3. Place a slice or two of ham and a slice of cheese on the buns and replace the top of the bun.
  4. Individually wrap each sandwich in tin foil. At this point you can refrigerate the sandwiches till you need them.
  5. Bake for 20-25 minutes or until the cheese is nice and melted. Serve hot.

Source: Patty and Kali Johnson