Pumpkin Cookies

Have I told you lately how much I love fall? I can’t get enough pumpkin and these soft pumpkin cookies are the best of the season! The cookies are super soft and have a cake-like texture. I was planning on putting a spice glaze on top, but when I tasted them I realized the hard glaze would ruin the texture of the cookies. Since discovering this recipe I’ve already whipped up several batches to give out. Everyone loves them and I know you will too.

As a side note: I will soon be posting what I have found to be the best Pumpkin Whoopie Pie recipe. Look for that on Friday.

Pumpkin Cookies:

  • 1 1/2 cups all-purpose flour
  • 1 tablespoons cinnamon
  • 1/2 teaspoon baking powder
  • 1/2 teaspoon baking soda
  • 1/2 teaspoon salt
  • 1/2 teaspoon ground ginger
  • 1/4 teaspoon ground nutmeg
  • 1/2 cup granulated sugar
  • 1/2 cup dark brown sugar
  • 1/2 cup canola or vegetable oil
  • 1 1/2 cups chilled pumpkin puree (canned pumpkin)
  • 1 egg
  • 1/2 teaspoon vanilla extract
  1. Preheat oven to 350 degrees F. Line baking sheets with parchment paper or a silicone baking mat.
  2. In a large bowl, whisk together the flour, cinnamon, baking powder, baking soda, salt, ginger and nutmeg. Set aside.
  3. In a separate bowl, whisk the granulated sugar, the dark brown sugar, and the oil together. Add the pumpkin puree and whisk to combine thoroughly. Add the eggs and vanilla and whisk until combined.
  4. Gradually add the flour mixture to the pumpkin mixture and whisk until completely combined.
  5. Use a small cookie scoop or a large spoon to drop a rounded, heaping tablespoon of the dough onto the prepared baking sheets, about 1 inch apart.
  6. Bake for 10 to 12 minutes, making sure that the cookies are just starting to crack on top and a toothpick inserted into the center of a cookie comes out clean. The cookies should be firm when touched. Remove from the oven and let the cookies cool completely on a cooling rack.

Soft Sugar Cookies

Hi, did you forget about me? I haven’t forgotten about you! I’ve just been a tiny bit busy with my daughters cheerleading. We got through homecoming week and I am hoping to be able to breathe for a little bit. I like being busy but that also means not as much time in the kitchen as I hope. I am going to work hard to change that.

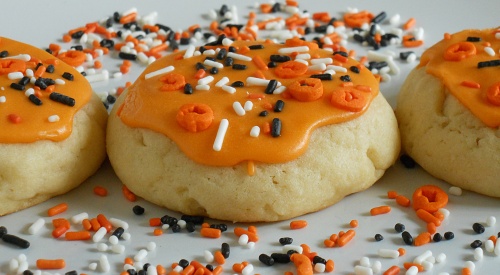
Now, onto these delicious cookies! I can’t begin to stress to you how awesome these are. They have become my favorite cookie. I have always loved the store- bought soft sugar cookies, but the icing usually is kinda eh. These cookies are much better than the store-bought kind. They have a lot more flavor and the icing is simply the best. One piece of advice I would give, is to use vanilla sugar instead of plain sugar. I found that using the vanilla sugar gives the cookies that extra punch of flavor. But don’t worry, if you don’t have vanilla beans stored in your sugar, you can use regular and they’ll still taste better than the store-bought.

Soft Sugar Cookies:

Cookies:

Makes about 2 dozen cookies

  • 4 1/2 cups all-purpose flour
  • 4 1/2 teaspoons baking powder
  • 1 teaspoon salt
  • 1 1/2 cups (3 sticks) butter, at room temperature
  • 1 1/2 cups sugar (Vanilla)
  • 3 large eggs
  • 5 teaspoons vanilla extract
  1. Preheat the oven to 350 degrees.  Line baking sheets with parchment paper or silicone baking mats.
  2. In a medium bowl, whisk the flour, baking powder and salt.  Set aside
  3. In the bowl of an electric mixer fitted with a paddle attachment, beat the butter and sugar together on medium-high speed until soft and fluffy, about 2-3 minutes.  Beat in the eggs one at a time, mixing well after each addition.  Blend in the vanilla.
  4. With the mixer on low speed, add in the dry ingredients mixing just until incorporated and evenly mixed.  Cover and chill the dough for 1 hour.
  5. When you are ready to bake the cookies, scoop a scant quarter cup of dough and roll into a ball.  Flatten the ball slightly and place on the prepared baking sheet.  Repeat with the remaining dough, spacing the cookies at least 2-3 inches apart.
  6. Bake about 10-12 minutes or just until set  (The edges should be no more than very lightly browned if at all).  Let cool on the baking sheet for several minutes.  Transfer to a wire rack to cool completely.
 Frosting:
  • 5 cups confectioners’ sugar, sifted
  • 1/3 cup (5 1/3 tablespoons) unsalted butter, melted
  • 1 tablespoon vanilla extract
  • 7-8 tablespoon milk (plus more, as needed)
  • Food coloring (optional)
  • Sprinkles (optional)
  1. Place the confectioners’ sugar in a medium bowl.  Add the melted butter, vanilla, and milk to the bowl and whisk until smooth.  Whisk in additional milk as necessary, 1 teaspoon at a time, until you reach your desired consistency.
  2. Tint with food coloring, if desired.  Use a spatula or spoon to frost the cooled cookies (If the frosting begins to thicken as you decorate, just continue to whisk in small amounts of milk to keep it workable).  Top with sprinkles if desired.  Store in an airtight container.

Source:  Sing for your supper who got it from Annie’s Eats, originally from Hostess With the Mostess

Giant Double Chocolate Chip Cookies

If you are looking for a big cookie with tons of chocolate flavor, then look no further. This cookie has it all! Dark chocolate mixed with semi-sweet chocolate chips. What more could a chocolate lover ask for? The cookie is really big and chewy in texture. Everything I want in a cookie. I’ve made it a couple times now and the second time I made it, I wanted to see if changing the size changed the texture. When I did that, I made sure to cut back the baking time by a couple minutes. Thankfully, the smaller cookies tasted just as good as the huge ones I made before. This recipe will become a favorite of yours and your loved ones. It won’t disappoint.

Giant Double Chocolate Chip Cookies:

Makes 12 very large cookies

  • 1 cup (2 sticks) cold, unsalted butter, cubed
  • 1 1/4 cup sugar
  • 2 large eggs
  • 1/2 cup dark cocoa powder
  • 2 1/4 cups all-purpose flour
  • 1/4 tsp. coarse salt
  • 1 tsp. baking powder
  • 2 1/2 cups semi-sweet chocolate chips
  1. Preheat the oven to 350 degrees.  Line baking sheets with parchment paper or silicone baking mats.  In the bowl of an electric mixer, combine the butter and sugar.  Beat together on medium-high speed until light and fluffy, 2-3 minutes.
  2. Blend in the eggs one at a time, scraping down the bowl as needed.  Mix in the cocoa powder until well blended.  Add the flour, salt and baking powder to the bowl and mix on low speed just until incorporated.  Fold in the chocolate chips with a spatula.  Transfer the dough to a work surface and knead briefly by hand to be sure the ingredients are well combined.
  3. Divide the dough into into 12 equal pieces (4 oz each). Roll each portion of dough into a ball and flatten just slightly into a disc. (The cookie does not spread out a lot)  Place on the prepared baking sheets, a few inches apart.  Bake 16-20 minutes.  Let cool on the baking sheets 5-10 minutes, then transfer to a wire rack to cool completely.

Shortcakes with Strawberries

Football has begun and fall is upon us. But before I start heading into the direction of pumpkins; I must post this shortcake recipe. I like using real shortcakes and not the kind you get in the store. Those are ok, but it is not the true southern way of eating strawberry shortcake. This sweetened biscuit is very fast and easy to make. I used strawberries when I made the shortcakes, but any kind of berry or even peaches will work with this. If using berries, you can macerate them in some sugar or in my case, splenda. Simply cut them up and put a couple tbs of sugar on them and let them sit and get all nice and juicy. Dollop whip cream on top and you have the best strawberry shortcakes ever!

Shortcakes:

  • 2 cups unbleached all-purpose flour
  • 2 tsp baking powder
  • 2 tbs sugar
  • 3/4 tsp table salt
  • 2/3 cup cold buttermilk
  • 1 large egg
  • 8 tbs unsalted butter, melted and cooled slightly
  1. Adjust oven rack to middle positions and heat oven to 475 degrees. Whisk flour, baking powder, 1 tbs sugar, and salt in large bowl.
  2. Whisk together buttermilk and egg in medium bowl; add melted butter and stir until butter forms small clumps.
  3. Add buttermilk mixture to dry ingredients and stir with wooden spoon until dough comes together and no dry flour remains. Continue stirring vigorously for 30 seconds. Using greased 1/3 cup dry measure, scoop up mound of dough and drop onto parchment-lined rimmed baking sheet (if dough sticks to cup use small spoon to pull it free). Repeat with remaining dough, spacing biscuits about 1 1/2 inches apart, to create 6 biscuits. Sprinkle remaining 1 tbs sugar evenly over top of biscuits. Bake until tops are golden brown and crisp, about 15 minutes. Transfer to wire rack and let cool for 15 minutes before assembling.
  4. To Assemble: Split each biscuit in half and place bottoms on individual plates. Spoon berries over each bottom, top with whip cream and place biscuit top on top.
Source: Cooks Illustrated Summer Entertaining

Spiced Peach and Carrot Bread

The past two weeks have been fun and fast. My son and I were spending time in the Chicago area celebrating my beautiful mother’s 60th birthday during the first week. Then last week I spent every moment I could with my kids since it was the last week of their summer vacation. That’s right, today I sit in a silent house while they are at school. I’m actually kind of sad. I’ve had so much fun with them this summer. I’m also a little sentimental because my daughter has started High School. But it’s going to be an exciting year, because she made Varsity Cheerleading. I am so proud of my baby girl! I could keep going on and on about my kids. But you aren’t here for that.

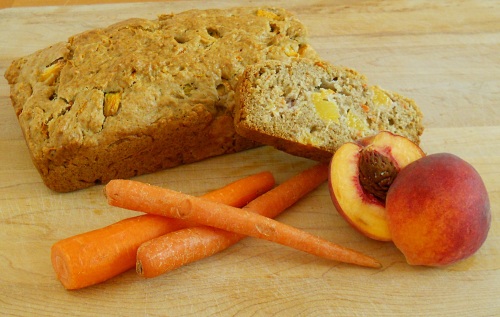
Let’s begin with our regularly scheduled recipes. Today I bring you this wonderful spiced peach and carrot bread. This was in the July issue of Southern Living magazine. My grandmother was in town when it came in and she saw it and asked that it be made. I had to agree with Nana because the recipe sounded wonderful. Plus I knew it would work with splenda. Both my husband and Nana are diabetics, so anything I can bake with splenda, I will. It turned out just as good as I figured it would. It was moist and best served warm with butter. You can reheat it in the microwave for a few seconds to warm it up. I did omit the nuts because I’m not a big fan of nuts in baked goods. Spiced Peach and Carrot Bread is a great way to use up what’s left of summer peaches!

Spiced Peach and Carrot Bread:

  • 3/4 cup chopped pecans(optional)
  • 2 1/2 cups all-purpose flour
  • 1 cup granulated sugar or Splenda
  • 1 tsp ground cinnamon
  • 1/4 tsp ground nutmeg
  • 3/4 tsp baking soda
  • 1/2 tsp baking powder
  • 1/2 tsp salt
  • 1 1/2 cups peeled and chopped fresh, ripe peaches (about 2-3 medium peaches)
  • 3/4 cup freshly grated carrots (about 2 carrots)
  • 2/3 cup vegetable oil
  • 1/2 cup milk (buttermilk would be really good)
  • 2 large eggs, lightly beaten
  1. Preheat the oven to 350 degrees. Toast pecans in a single layer on a baking sheet 8-10 minutes, or until toasted and fragrant, stirring halfway through. Cool 15 minutes.
  2. Whisk together the flour and next 6 ingredients in a large bowl. Add peaches and next 4 ingredients, and toasted pecans, stirring just until dry ingredients are moistened. Spoon the batter into a lightly greased 9×5 inch loaf pan (the batter will be very thick).
  3. Bake at 350 for 55-65 minutes, or until a wooden toothpick inserted in the center comes out clean.
  4. Cool the bread in the pan for 5-10 minutes, then run a knife around the edges and invert onto a cooling rack to cool completely.
Source: Southern Living, July Issue

Vanilla Bean Cupcakes

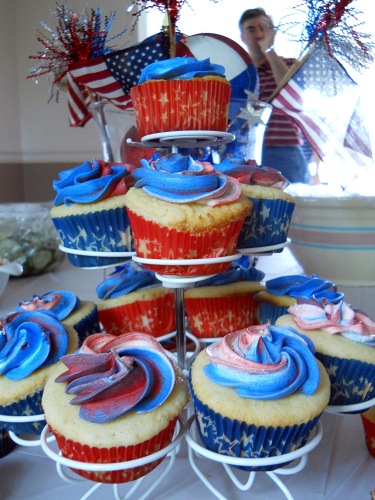
Pay no attention to the man behind the cupcakes. He’s a figment of your imagination. I obviously made these for the 4th of July and sadly the only really good picture of the cupcakes was the one with my brother-in-law Dave photobombing. But that’s ok, now you understand what kind of family I have. It’s a fun one!

I had a vanilla bean that was just itching to be used and I’ve had this recipe bookmarked for quite sometime now. I also couldn’t wait to make it so I could place the used vanilla bean into my sugar container. For those who never know what to do with the leftover vanilla bean, do not throw them away! Place them in sugar and you will have vanilla sugar to be used in all sorts of your baked goods. You will be happy you did it.

These cupcakes are very light in texture and oh, so yummy. I used my favorite buttercream icing and for this occasion I colored the icing red, white and blue to get that swirl on top. Be creative and have fun when making cupcakes, I know I do.

Vanilla Bean Cupcakes:

Yields about 30 cupcakes

  • 3 cups cake flour
  • 1 tbsp. baking powder
  • 1/2 tsp. salt
  • 1 vanilla bean, split lengthwise
  • 16 tbsp. unsalted butter, at room temperature
  • 2 cups sugar
  • 5 large eggs, at room temperature
  • 1 1/4 cups buttermilk, at room temperature
  • 1 tbsp. vanilla extract
  1. Preheat the oven to 350° F.  Line two cupcake pans with paper liners.  Set aside.
  2. In a medium mixing bowl, combine the cake flour, baking powder and salt.  Whisk together and set aside.  Add the butter to the bowl of an electric mixer fitted with the paddle attachment.  Scrape the vanilla bean seeds into the bowl of the mixer with the butter and discard the pod (or reserve for another use.)  Beat on medium-high speed for 3 minutes, until light and creamy in color.  Scrape down the sides of the bowl and beat for one more minute.
  3. Add the sugar to the butter mixture, ¼ cup at a time, beating 1 minute after each addition.  Mix in the eggs one at a time until incorporated.  Scrape down the sides of the bowl after each addition.  Combine the buttermilk and the vanilla extract in a liquid measuring cup.  With the mixer on low speed, add the dry ingredients alternately with the wet ingredients, beginning and ending with the dry ingredients and mixing just until incorporated.  Scrape down the sides of the bowl and mix for 15 seconds longer.
  4. Divide the batter between the prepared paper liners, filling each about 2/3 of the way full (you will likely have batter left over after filling 24 wells.)  Bake 18-22 minutes, or until a toothpick inserted in the center comes out clean.  Allow to cool in the pans 5-10 minutes, then transfer to a cooling rack to cool completely.  Replace paper liners and bake remaining batter if desired.  Frost cooled cupcakes as desired.

Source: Annies Eats via Confections of a Foodie Bride, who adapted it from The Well-Decorated Cake

S’mores Cake

I’ve made this cake a couple times now. The first time I made it, was when my son had his cub scout banquet. It was a perfect dessert to feed the hungry cub scouts since s’mores and cub scouts go hand in hand. But, I was very heavy handed on the marshmallow fluff in the middle. The top layer of the cake just about slid off while it was setting up in the fridge. I knew the fluff would expand a little but it expanded more than I was expecting. So, when I went to make this for our 4th of July cookout, I knew to go a little easier on the fluff. This time, I went way to easy and none of the fluff peaked through the graham cracker layers. I piped in more fluff so it would look pretty. I feel like Goldilocks, the first one was too much, the second one was too little, but the third one will be just right.

You will LOVE this cake. It’s a hit no matter how much fluff you put on it.

NOTE:

Tomorrow, I will be posting a special post regarding the giveaway, celebrating my 1 year Anniversary here on Gina Marie’s Kitchen. 

S’mores Cake:

The Cake:

  • 2 cups graham cracker crumbs
  • 2 tsp. baking powder
  • 1/4 tsp. salt
  • 3 large eggs, separated
  • 8 tbsp. unsalted butter, at room temperature
  • 1 cup sugar
  • 1 tsp. vanilla extract
  • 1 cup milk

Filling:

  • Marshmallow Fluff
Chocolate Ganache:
  • 8 oz. milk chocolate, finely chopped
  • 1/4 cup heavy cream
  • 2 tbsp. unsalted butter cut into 4 pieces, at room temperature
  • 2 tbsp. light corn syrup
To make the cake:
  1. Preheat the oven to 375° F.  Line the bottom of two 9-inch round cake pans with parchment or wax paper.  Grease and flour the sides of the pans; set aside.  In a medium bowl, combine the graham cracker crumbs, baking powder and salt; stir together and set aside.
  2. In the bowl of an electric mixer fitted with the whisk attachment, beat the egg whites on medium-high speed until soft peaks form.  Transfer to a separate bowl and set aside.  Replace the mixer bowl and fit with the paddle attachment.  Cream together the butter and sugar and beat on medium speed until light and fluffy, about 2 minutes.  Mix in the egg yolks until well combined.  Stir in the vanilla extract.
  3. Add in the dry ingredients alternately with the milk on low speed, beginning and ending with the dry ingredients and mixing just until incorporated.  Using a rubber spatula, fold in about a third of the egg whites to lighten the batter.  Gently fold in the remaining egg whites until completely incorporated.
  4. Divide the batter evenly between the prepared pans.  Bake the cakes for about 20 minutes or until a toothpick inserted in the center comes out clean.  Allow the cakes to cool in the pans for about 5-10 minutes, then invert onto a wire rack, remove the parchment paper and let cool completely.
Adding the Fluff:
  1. Once the cake has cooled completely, transfer one of the cake layers to a cardboard cake circle and place on a serving platter.  Carefully spread (I used a piping bag) a layer of marshmallow fluff over the cake, not quite reaching the edges.  Top with the remaining cake layer and refrigerate for about 1 hour.
Making the ganache:
  1. Combine the chocolate, cream, butter and corn syrup in a heatproof bowl set over simmering water.  Heat until the chocolate has melted, then whisk the ingredients together until completely smooth.  Pour glaze over the top of the chilled cake, allowing it to run down the sides in some places.  Return to the refrigerator to chill until set and ready to serve.