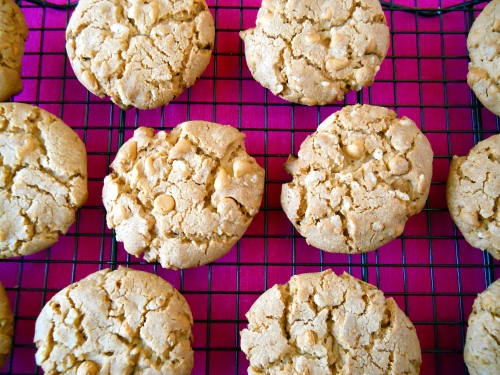
Butterscotch Chip Cookies

I made these cookies for one of my very best friends. She lives in Omaha and has been a smoker for a very long time. She decided it was time to quit and for several months she has been smoke free. I’m extremely proud of Kiki and asked her what kind of cookies she is craving. She gave me a list of cookies but the one that topped her list was Butterscotch Chip.

So, I began my search for the best recipe I could find. I’ve never made them before so it was kinda new territory for me. But I figured it wouldn’t be much different than chocolate chips cookies. I didn’t want to substitute butterscotch chips in a regular chocolate chip cookie, I wanted the butterscotch flavor to come through. One of the other things Kiki mentioned was a cookie from an old family recipe, she remembered it had rice cereal, coconut and whole bunch of other things. As I was searching I found a recipe that included butterscotch instant pudding and rice cereal, score! It did call for chocolate chips, but this time substituting them for butterscotch would work since there is butterscotch pudding to help enhance that flavor. As I was making the cookies, I realized that the brown sugar I had was as hard as a brick, but I did have Splenda brown sugar. Thankfully that worked out really nice and I ended up with a low sugar cookie that tastes amazing!

Kiki says the cookies tasted great and that they shipped well.

Butterscotch Chip Cookies:

  • 1 1/2 c flour
  • 1 c whole wheat flour
  • 1 tsp baking powder
  • 1 tsp baking soda
  • 1/2 tsp salt
  • 3/4 c  sugar
  • 1 1/4 c brown sugar or 1/2 cup plus 2 tbs Splenda brown sugar
  • 2 eggs, room temp
  • 2 tsp vanilla
  • 1 Tbsp milk
  • 1 tsp nutmeg
  • 1 c butter flavored shortening
  • 1 pkg butterscotch-flavored sugar free instant pudding mix
  • 2 Tbsp honey
  • 1 1/2 c rice cereal
  • 1 1/2 – 2 c butterscotch chips
  1. Preheat the oven to 350F and line two baking sheets with parchment paper.
  2. In a large bowl, mix together the flours, baking soda, baking powder and salt. Set aside.
  3. In a small bowl, combine the sugars using a fork to break up any lumps in the brown sugar. Set aside.
  4. In yet another small bowl, beat the eggs, vanilla, milk and nutmeg, on high until light and fluffy.
  5. In the bowl of a stand mixer fitted with paddle attachment, beat the shortening until it’s fluffy. Add half of the sugar and beat until incorporated, then add the second half. Beat on high until grainy, about 3 minutes. Add in the pudding mix and beat until combined.
  6. Pour in half of the egg mixture and beat until incorporated. Repeat with the second half, being sure to scrape the bowl. Drizzle in the honey and beat until fluffy.
  7. Add 1/3 of the dry ingredients and mix on low speed until just incorporated. Scrape the sides of the bowl and repeat, adding the rest of the dry ingredients in two portions. Gently fold in the oats and chocolate chips.
  8. Portion dough into approximately 1/4 c balls (or use a 1 3/4 oz disher) and place on baking sheets about 2 inches apart. Bake for 15-17 minutes, until the edges just begin to brown. Transfer sheets to cooling racks and allow cookies to cool on the sheets for about 5 minutes before transferring to cooling racks.

Source: Slightly adapted from Whisk-Kid
Creamy Chicken and Spinach Casserole

I think I might have a new goal; trying to make as many dishes I can out of the America’s Test Kitchen Healthy Family Cookbook. I have made a handful of recipes so far and they all have been really good. The biggest plus is that they are healthier for you. The newest one I tried was the Creamy Chicken and Spinach Casserole. I ended up doubling the recipe to make sure we had enough for everyone and it doubled nicely. The only thing I didn’t double was the spinach. I felt the one box of frozen chopped spinach I had was just enough for the dish. If I would have added another 10 oz box, it would have overpowered the dish. The kids and hubby really enjoyed it and my son had more than his fair share so I’m glad I doubled it.

Creamy Chicken and Spinach Casserole:

Serves 4

  • 1 1/2 tbs olive oil
  • 12 ounces boneless, skinless chicken breasts, trimmed and sliced thin
  • 1 onion, minced
  • 3 garlic cloves, minced
  • 1/8 tsp red pepper flakes
  • 2 tbs all-purpose flour
  • 4 cups 1% lowfat milk
  • 1 bay leaf
  • 1/2 cup grated Parmesan cheese
  • 2 tsp fresh lemon juice
  • 10 oz frozen spinach, thawed, squeezed dry and chopped coarse. (chopped spinach is also good)
  • Salt and Pepper
  • 8 oz whole-wheat penne
  • 1/2 cup shredded part-skim mozzarella cheese (about 2 oz)
  1. Adjust an oven rack to the middle position and heat the oven to 425 degrees. Lightly coat an 8 inch square baking dish with vegetable oil spray and set aside.
  2. Heat 1 1/2 tsp of the oil in a 12 inch nonstick skillet over high heat until just smoking. Add the chicken, break up any clumps, and cook until lightly browned but not fully cooked, about 3 minutes. Transfer to a bowl.
  3. Add the remaining tablespoon oil to the skillet and return medium heat. Add the onion and cook until softened, about 5 minutes. Stir in the garlic and red pepper flakes and cook until fragrant, about 30 seconds.
  4. Stir in the flour and cook for 1 minute. Slowly whisk in the milk and bay leaf and bring to a simmer. Cook, stirring occasionally, until the sauce has thickened slightly, about 10 minutes.
  5. Return the chicken with any accumulated juice to the skillet. Simmer until the chicken is cooked through, about 1 minute. Off the heat, discard the bay leaf and stir in the Parmesan and lemon juice. Stir in the spinach, breaking up any clumps, until well combined. Season with salt and pepper to taste.
  6. Meanwhile, bring 4 quarts water to a boil in a large pot. Add the pasta and 1 tbs salt and cook, stirring often, until almost al dente but still firm to the bite. Reserve 1/4 cup of the cooking water, then drain the pasta and return it to the pot.
  7. Add the chicken-spinach mixture and reserved cooking water to the pasta and toss to combine. Pour the pasta into prepared baking dish and sprinkle evenly with the mozzarella. Bake until the sauce is bubbling and the cheese is lightly browned, about 15 minutes. let cool for 5 minutes before serving.

Source: America’s Test Kitchen Healthy Family Cookbook

Dark Chocolate Cupcakes with Buttercream Frosting

This winter we were so busy with my daughters cheerleading activities. She was cheering for basketball, wrestling and competing. Competition cheerleading is still going on but basketball and wrestling has wrapped up for the season. The cheerleaders had an end of the year party and I volunteered to make cupcakes for them. I wanted to incorporate their school colors, black, red and white. I figured the perfect way to do that is to make chocolate cupcakes and make the icing red and white. They turned out exactly how I pictured them and they tasted even better!

I’m proud of my cheerleader and all the hard work she’s done. I feel so blessed that my daughter is surrounded by such a great group of girls. They have all done such a fantastic job this year and deserved a decadent treat like these cupcakes.

Dark Chocolate Cupcakes:

Makes 24 cupcakes*

*I doubled this recipe with no problem

  • 16 tbs (2 sticks) unsalted butter, cut into 16 pieces
  • 4 oz bittersweet chocolate, chopped
  • 1 cup Dutch-processed cocoa powder
  • 1 1/2 cups all-purpose flour
  • 1 1/2 tsp baking powder
  • 1 tsp baking soda
  • 1 tsp salt
  • 4 large eggs, at room temperature
  • 2 tsp vanilla extract
  • 1 1/2 cups sugar
  • 1 cup sour cream
  1. Microwave the butter, chocolate, and cocoa together, whisking often, until melted and smooth, 1 to 3 minutes. Set aside to cool until just warm to the touch.
  2. Meanwhile, adjust an oven rack to the middle position and heat the oven to 350 degrees. Line two muffin pans with cupcake liners. Whisk the flour, baking powder, baking soda, and salt together in a large bowl and set aside.
  3. Whisk the eggs and vanilla together in a large bowl. Slowly whisk in the sugar until combined. Whisk in the cooled chocolate mixture.
  4. Sift one-third of the flour mixture over the batter, then whisk it in. Whisk in the sour cream. Sift the remaining flour mixture over the batter and whisk until completely incorporated. (the batter will be thick).
  5. Fill the cupcake liners about two-thirds full. Bake until a wooden skewer inserted into the center of a cupcake comes out with a few crumbs attached, 18-22 minutes, rotating the pans halfway through baking.
  6. Let the cupcakes cool in the pans on wire racks for 5 minutes. Remove from the pans and let cool completely on the racks before frosting, about 1 hour.

Quick and Rich Vanilla Frosting:

Makes enough to cover 24 cupcakes

  • 2 tbs heavy cream
  • 1 tsp vanilla extract
  • Pinch Salt
  • 2 1/2 sticks unsalted butter, softened
  • 2 1/2 cups confectioner sugar

Stir the cream, vanilla and salt together in a small bowl until the salt dissolves. Beat the butter with an electric mixer on medium-high speed until smooth, 30-60 seconds. Reduce the speed to medium-low, slowly add the confectioners sugar, and beat until smooth, 2 to 5 minutes. Beat in the cream mixture. Increase the speed to medium-high and beat until the mixture is light and fluffy, 4-8 minutes.

Source: America’s Test Kitchen Family Cookbook

Spinach Dip

I love spinach and this dip is one of my ultimate favorites. It’s a very popular recipe but I will still post it just in case there are those who have never made it before. One of the things I did change was the amount of mayonnaise used. The original recipe calls for 1 cup but I feel that it gives to much of a mayonnaise taste so I cut it back to 3/4 cup. Other than that, I don’t change up the recipe too much and it’s always a hit. I love to double the recipe so I know I will have leftovers.


Spinach Dip:

  • 1 10 ounce pkg chopped frozen spinach, thawed and liquid squeezed out (place spinach in towel and squeeze)
  • 1 16 ounce container sour cream
  • 3/4 cup Mayonnaise
  • 1 package Knorr® Vegetable Soup recipe mix
  • 1 8 ounce can water chestnuts, chopped fine
  • 3 green onions, chopped fine
  1. Mix together the Mayo, sour cream and vegetable soup mix.
  2. Stir in the rest of the ingredients and mix till all combined. Place in refrigerator and chill at least 2 hours. Serve with pumpernickel bread, crackers and veggies.

Source: slightly adapted from Knorr


Shrimp Mousse


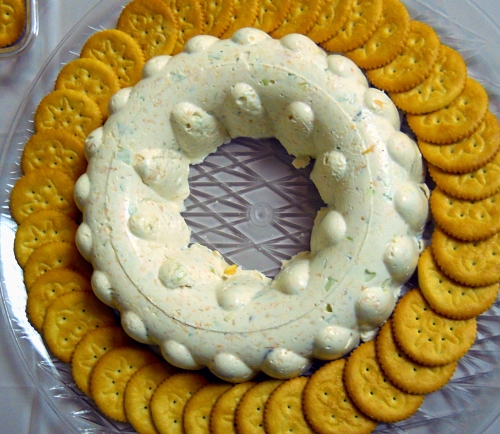
When I first heard shrimp mousse, I will admit I sorta cringed. When I think of mousse I tend to think of a velvety chocolate dessert, something sweet and certainly not savory. But when I tried it, I learned that mousse can be savory and really delicious! We decided to add this to the menu of my sister-in-law’s baby shower. We were wanting food that was a little different than what is typically served at baby shower. We wanted to stay away from lunch meat since that’s become a no-no for pregnant women. The shrimp mousse really added a special something to food table and we didn’t have much leftover.


Shrimp Mousse:

  • 1 envelope unflavored, clear gelatin
  • 2 tbs water
  • 1 can cream of mushroom soup
  • 1 8oz package cream cheese
  • 1 cup mayonnaise
  • 1/4 cup onions, diced small
  • 1 cup celery, diced small
  • 2 4oz cans baby shrimp, drained well


  1. Spray any type of mold, bunt pan, bowl with cooking spray, set aside.
  2. Combine gelatin and water in medium saucepan set over medium heat. When the gelatin is dissolved, add cream of mushroom soup and cream cheese, cook until combined and creamy, about 2-3 minutes.
  3. Take off heat and add the mayo, onion, celery and shrimp, stir till combined. Salt and pepper to taste.
  4. Pour into prepared mold and chill for at least 8 hours or overnight.


Source: Gina Marie’s Kitchen

Chicken Enchilada Wraps

I have had these bookmarked ever since I saw them on Annie’s Eats a year ago. I was waiting for the right time to make them. When I started planning my sister-in-laws baby shower I knew it was time to bring out the chicken enchilada wraps. I decided to triple the recipe to make sure we had enough for our guests. I was a little worried about tripling the spices and ended up cutting back a bit on the Chile powder and Cayenne pepper. When we tasted the chicken filling my daughters and husbands mouth were a tad bit on fire. They are more sensitive to the spicy heat than I am, so I always go by what they tell me when it comes to serving something to others. I sat there trying to figure out what to do. I had already added all the ingredients to the filling and didn’t have anymore cream cheese to add to it. What could I do to take some of the heat away? I looked through the refrigerator and saw sour cream. I added small amounts at a time till it finally worked. I actually think the addition of the sour cream helped round the flavors out even more. I love how things work out just when you think it’s ruined. And thankfully everyone at the shower loved them.

Chicken Enchilada Wraps:

  • 2 chicken breasts, bone-in and skin on
  • Olive Oil
  • Salt and Pepper
  • 1 (8 oz.) pkg. cream cheese, softened
  • 2/3 cup shredded cheese, Mexican blend
  • 1 clove garlic, minced or pressed
  • 2 tsp. chili powder
  • ½ tsp. cumin
  • ¼ tsp. cayenne pepper
  • Salt, to taste
  • Handful of cilantro, chopped
  • 3 green onions, chopped
  • 10 oz. can diced tomatoes with green chiles, drained well
  • 1/4 cup sour cream (optional)
  • 4-6 8-inch tortillas
  1. Preheat oven to 375 degrees.
  2. Place chicken breasts on a baking sheet. Rub each breast with a drizzle of olive oil and sprinkle with salt and pepper. Bake the breasts for 35-45 minutes or until cooked through. Let cool.
  3. Remove the skin and chicken from the bone. Shred the chicken and set aside.
  4. Combine all of the remaining ingredients, except tortillas, in a large mixing bowl.  Mix until well blended. Add the chicken to the filling mixture and stir well to incorporate. Taste and add sour cream, if desired.
  5. Spread a thin layer of the filling mixture over a tortilla, leaving a small border clear around the edge.  Roll the tortilla up tightly into a spiral.  Place the rolled up tortilla on a cutting board and use a sharp knife to cut into 1- to 1½-inch thick segments.  Transfer to a serving platter and serve chilled or at room temperature.

Source: Adapted from Annie’s Eats via Sing for Your Supper, originally from Come On Over Cookbook1 from Gooseberry Patch

Basmati Rice Pilaf

Before I get into this recipe, I want to apologize in advance if I don’t post much next week. My beautiful sister-in-law will be having a baby girl in March and I’m co-hosting her shower. This weekend I’ll be working on making 50-60 onesie sugar cookies. Next week I’ll be prepping all the food. I’m super excited about the shower and will blog about it when it’s all over.

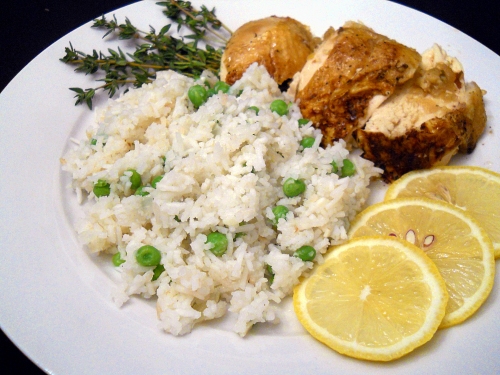
Onto the recipe. I made the Basmati Rice Pilaf when I made the Chicken In A Pot. The sauce from the chicken went perfectly with the rice. The one thing I forgot to add to the rice was the scallions. I don’t think it made a huge difference, but I love scallions and would loved to have had them in it.

Basmati Rice Pilaf:

  • 1 tbs olive oil
  • 1 small onion, minced
  • Salt and Pepper
  • 1 1/2 cups basmati rice, rinsed and drained *See note at bottom
  • 2 1/2 cups water
  • 2 minced garlic cloves
  • 1 tsp grated lemon zest
  • 1/8 tsp red pepper flakes
  • 1/2 cup frozen peas, thawed
  • 2 thinly sliced scallions
  • 1 tbs fresh lemon juice
  1. Heat the oil in a large saucepan over medium heat until shimmering. Add the onion and 1/4 tsp salt and cook, stirring occasionally, until the onion is softened, about 5 minutes.
  2. Stir in the rice, garlic, lemon zest and red pepper flakes and cook, stirring often, until the edges of the grains begin to turn translucent, about 3 minutes. Stir in the water and bring to a simmer. Reduce the heat to low, cover and continue to simmer until the rice is tender and the water is absorbed, 16-18 minutes.
  3. Remove the pot from the heat and sprinkle the peas over the top. Lay a clean folded kitchen towel on the pot and replace the lid over the towel. Let sit for 10 minutes. Add the lemon juice and scallions, fluff the rice with a fork, season with salt and pepper to taste, and serve.

*Note: Rinsing the rice: Rinse the rice in a fine mesh strainer under cold water until the water runs clear, then set the strainer of rinsed rice over a bowl to drain until needed. Rinsing the rice removes excess starch so the rice is light and fluffy, not clumped and sticky.

Source: America’s Test Kitchen Healthy Family Cookbook