Homemade BBQ Sauce

Grilling season is right around the corner. I’m more than ready to be enjoying the warmer weather and grilling on the back porch. We had a beautiful weekend so I decided to smoke a rack of ribs. I’m so glad I had the chance to be outside because this coming weekend we are expecting some snow. Blech!

Normally, I cook my ribs low and slow in the oven and then finish it off on the grill. But this time I wanted to do the entire cooking process in the smoker. I wanted to make a BBQ Sauce that would compliment the long time it takes to smoke ribs. Normally, it takes hours to make a really good BBQ Sauce. I wanted to find something that would be a little easier for everyone who wants homemade but doesn’t have hours to spare. This is it! It’s tangy and sweet, exactly what I was looking for.

Quick and Easy BBQ Sauce:

  • 1 medium onion, peeled and quartered
  • 1/4 cup water
  • 1 cup ketchup
  • 2 tbs cider vinegar
  • 2 tbs Worcestershire sauce
  • 2 tbs Dijon mustard
  • 5 tbs molasses (I forgot to get some used a sugar free syrup)
  • 1 tsp hot pepper sauce
  • 1/4 tsp ground black pepper
  • 1 1/2 tsp liquid smoke (optional)
  • 2 tbs vegetable oil
  • 1 medium garlic clove, minced or pressed through a garlic press
  • 1 tsp chili powder
  • 1/4 tsp cayenne pepper
  1. In a food processor or a blender, process the onion and the water until pureed and the mixture resembles slush, about 30 seconds. Strain the mixture through a fine-mesh strainer into a liquid measuring cup, pressing on the solids with a rubber spatula to obtain 1/2 cup juice. Discard the solids. 
  2. Whisk the onion juice, ketchup, vinegar, Worcestershire, mustard, molasses, hot pepper sauce, black pepper, and liquid smoke (if using) together in a medium bowl. 
  3. Heat the oil in a large nonreactive saucepan over medium heat until shimmering but not smoking. Add the garlic, chili powder, and cayenne; cook until fragrant, about 30 seconds. Whisk in the ketchup mixture and bring to a boil; reduce the heat to medium-low and simmer gently, uncovered, until the flavors meld and the sauce is thickened, about 25 minutes. Cool the sauce to room temperature before using. 
Note – The sauce can be refrigerated in an airtight container for 1 week.
Source: slightly adapted from The New Best Recipe by Cooks Illustrated

Green Jello

In my family, no Easter dinner table would be complete without Green Jello. Everyone seems to have a favorite recipe when it comes to Jello salads. This one is ours. We usually decorate the jello by putting a small glass bowl in the middle and filling it up with black olives. I know my parents will wonder why I didn’t take a picture with the olives in the middle of the Jello, I must admit that I did not have olives. I will fix that on Easter, I promise.

When you ready to un-mold your Jello, make sure you submerge the mold in warm water for a minute or so. I was way to quick with the submerge part that it tore my jello as I begun un-molding it. It still tasted great and that is all that matters sometimes.

Green Jello:

Serves: 8-10

  • 1 lg package (8oz) cream cheese, softened
  • 1 20oz can Crushed Pineapple
  • 1 large box Lime Jello or 2 small boxes Sugar Free Lime Jello
  • 1 cup milk, at room temperature
  1. Using a fine mesh strainer, strain the crushed pineapple into a 4 cup measuring cup. Using the back of a wooden spoon, press down on pineapple to release all the juice. Set pineapple aside. Add enough water to the measuring cup to equal 3 cups of liquid. (this will include the pineapple juice)
  2. In a medium-size sauce pan set over medium-high heat, add the liquid and bring to a boil. Add the jello to the liquid and stir around till Jello is dissolved. Set aside to cool. 
  3. Meanwhile, place cream cheese and milk in a large mixing bowl. Using a hand mixer, mix until creamy. Add the drained crushed pineapple to cream cheese mixture. Stir till combined. 
  4. Once the Jello is cooled down, add to the cream cheese/pineapple mixture and whisk to combine. Pour into desired mold and refrigerate for at least 6 hours, preferably overnight. Un-Mold and serve. 
Note: I use a vintage Tupperware Jello Mold but you can find a similar one here
Source: Gina Marie Family Original

Asparagus and Cheese Tart

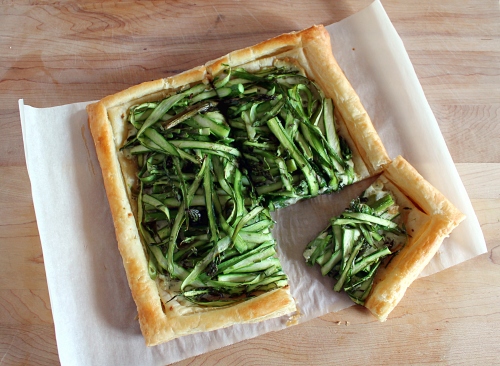
This week I will be posting some recipes that will be great to have on Easter. This recipe would be great for an Easter Brunch. I was brainstorming to come up with something that included shaved asparagus and Boursin Cheese since I had both in my refrigerator. I decided to make a tart using puff pastry. This is really easy to make and has only a few ingredients. I was getting very odd looks from my family, as I was explaining what I was doing. But after they tasted it, they knew that mommy knows what she is doing. I hope you enjoy too!

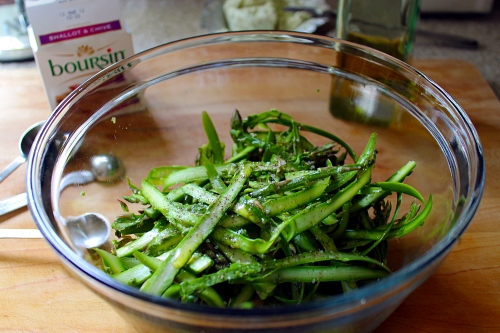
First you will shave the asparagus spears by using a vegetable peeler. Place in a bowl and add the olive oil, salt and pepper to taste. Stir to combine and set aside.

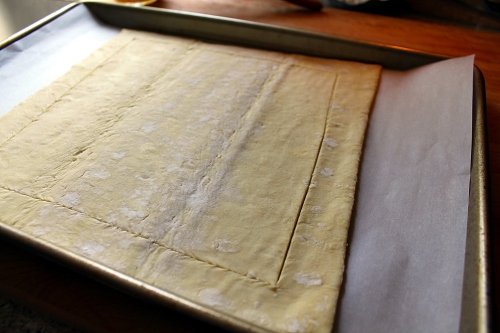
Lay out a sheet of puff pastry dough on a parchment lined baking sheet. With a pairing knife, lightly score the puff pastry about a 1/2 inch in from the edges.

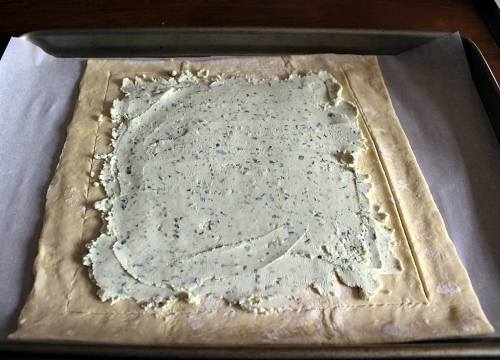
Carefully spread the cheese in the center of the puff pastry dough. Spread to the edges of where you cut the dough. (Do not go to dough edge)

Add the asparagus to the center. Brush the edges of the dough using the egg wash and a pastry brush. Place in oven and bake.

Enjoy!

Asparagus and Cheese Tart:

  • 1 sheet frozen puff pastry dough, thawed in refrigerator
  • 1lb asparagus, shaved
  • 2 tbs olive oil
  • Salt and Pepper
  • 1 5oz Boursin cheese, room temperature (I used shallot and chives)
  • egg wash (whisk one egg with 1tbs of water)
  1. Preheat oven to 375 degrees. Line a baking sheet with parchment paper.
  2. Carefully shave the asparagus spears using a vegetable peeler. Place in a medium bowl. Add the olive oil and salt and pepper to taste. Mix together and set aside.
  3. Lay the puff pastry on the parchment lined baking sheet. Using a sharp paring knife, score a 1/2-inch-wide border around the dough. (make sure to not push the knife all the way through) Spread the cheese from the center of the dough to the edges of where you scored the dough. (it’s ok if you don’t use all the cheese) Lay asparagus on top of cheese.
  4. Brush the edges of the dough using the egg wash and a pastry brush. Bake in the oven for 20-25 minutes, or until dough is light browned and puff and the asparagus is tender. Remove from oven and let cool a couple of minutes before cutting. Slice tart however you would like to serve it and enjoy.

Source: Gina Marie Original

Butterfly Cupcakes

Last weekend we celebrated my nieces 1st birthday. I still can’t believe it’s been a year! Don’t you just want to pinch her cheeks?

Her parents decided to do a butterfly themed party. I got so excited because I’ve been dying to make butterfly cupcakes since I saw them on Annie’s blog. I am going to refer you to her blog on how to make the butterflies. She created a wonderful tutorial. But I will give you a couple of additional tips. I was having a hard time trying to draw out the wing. I finally got one that I really liked and decided to cut it out and trace it on a piece of paper. This worked out great, I was able to have the same looking and same sized wings. Just remember to flip the wing over so you have a right and left wing. The other thing I came up with was after I melted the candy melts in the piping bags. I decided to lay the piping bags on a heating pad. I removed the the fabric cover (glad I did cause it got messy) and set it to a medium temperature. I never had to go back and re-heat the candy melts. It was a huge time saver!

After everything got put together, I was very happy with how it turned out. When trying things for the first time there is a lot of trial and error. I was almost ready to give up but I am glad I didn’t. I did try a new recipe for the vanilla cupcakes. I loved them and will be making those again. I got it from Sweetapolita she makes some of the best looking cakes I have ever seen. This was my first time trying one of her recipes and I can’t wait to try more!

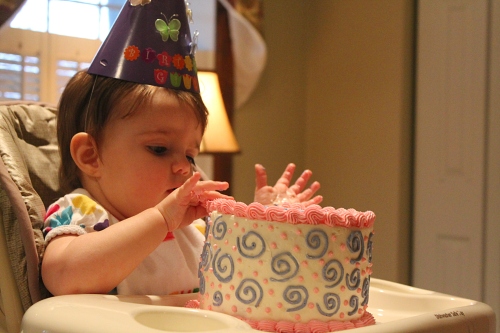
For Tori’s smash cake, I decided to do cake mix from a box. I figured hands and face will be messing it up so need to go crazy on something homemade. Of course the frosting is homemade, it’s my favorite go-to icing. It always gets great reviews!

She liked the frosting! But she ended up being one of the cleanest 1 year old I have ever seen. I’m so glad everything turned out great and Tori had a wonderful time for her first birthday.

Bakery Style Vanilla Cupcakes:

  • 1 1/2 cups self-rising flour
  • 1 1/4 cups all-purpose flour
  • 1 cup unsalted butter, softened
  • 2 cups white sugar
  • 4 large eggs, at room temperature
  • 1 cup milk
  • 1 teaspoon pure vanilla extract
  • 1 batch of favorite icing (sometimes I like to double it so I have a ton of frosting on top of cupcakes)
  1. Preheat oven to 350 degrees F. Line 2 standard muffin tins with cupcake liners of your choice, 24 total.
  2. In a small bowl, combine the flours and set aside.
  3. In a large bowl, on the medium speed of an electric mixer, cream the butter until smooth. Add the sugar gradually and beat until fluffy, about 3 minutes. Add the eggs, 1 at a time, beating well after each addition.
  4. Add the dry ingredients in 3 parts, alternating with the milk and vanilla, ending with the dry ingredients. With each addition, beat until the ingredients are incorporated but do not over beat. Using a rubber spatula, scrape down the batter in the bowl to make sure the ingredients are well blended.
  5. Carefully spoon the batter into the cupcake liners and fill about 2/3 full, and bake in middle of oven until tops turn golden brown and toothpick inserted into center comes out just clean (a few crumbs is okay), about 18 minutes.
  6. Cool the cupcakes in tins for 15 minutes. Remove from the tins and cool completely on a wire rack before icing.

Source: adapted from Sweetoplita

Herb-Crusted Pork Tenderloin

We have been doing really good about eating better and I’m constantly on the lookout for fresh ideas. I have my go-to recipe when it comes to pork tenderloin but there are times I want something different. When I got the new America’s Test Kitchen Light and Healthy 2012 magazine, I saw on the front cover was a fabulous looking pork tenderloin. This is the first recipe I’ve tried out the magazine, and there will be a lot more to follow.

I loved the combination of fennel and artichokes. I left out the olives because my husband despises them, but left them in the recipe so you can choose to put them in or not. I find it’s very important to get the silverskin off the tenderloin. If you don’t, the pork can be chewy and will get into a weird shape while cooking.

The picture above shows what the silverskin looks like. Take your knife and angle it slightly upward and use a gentle sawing motion to cut the silverskin away from the meat. That’s it! Very simple and makes for a better tenderloin.

Herb-Crusted Pork Tenderloin

  • 2 (1lb) Pork Tenderloin, trimmed of all visible fat and silverskin
  • 2 tsp dried herbes de Provence
  • Salt and Pepper
  • 2 large fennel bulbs, stalks discarded, bulbs halved, cored, and cut into 1/2 inch thick slives
  • 12 oz frozen artichoke hearts, thawed and patted dry
  • 1/3 cup pitted nicoise or kalamata olives, chopped coarse
  • 8 tsp extra-virgin olive oil
  • 4 garlic cloves, minced
  • 1 lb cherry tomatoes, halved
  • 1/2 cup low-sodium chicken broth
  • 1 tbs grated lemon zest plus 2 tbs juice
  • 2 tbs minced fresh parsley
  1. Adjust the oven rack to lower-middle position and heat oven to 450 degrees. Pat pork dry with paper towels, then season with herbes de Provence, 1/8 tsp salt and 1/8 tsp pepper. 
  2. Combine the fennel and 2 tbs water in bowl, cover and microwave until softened, about 5 minutes. Drain fennel well and toss with artichokes, olives, 2 tbs oil, garlic, 1/4 tsp salt, and pepper to taste. 
  3. Spread the vegetables in a large roasting pan. Lay pork on top of vegetables. Roast pork and vegetables for 15 minutes. Turn pork over and add tomatoes to roasting pan. Continue to roast pork and vegetables until meat registers 140-145 degrees, 10 to 15 minutes longer. 
  4. Transfer the pork to carving board, tent with foil, and let rest for 10 minutes. Stir broth and lemon zest into vegetables and continue to roast until fennel is tender and tomatoes have softened, about 10 minutes.
  5. Stir remaining 2 tsp oil, lemon juice, and parsley into roasted vegetables and season with salt and pepper to taste. Slice pork 1/2 inch thick and serve with vegetables. 

Blueberry Crumb Cake

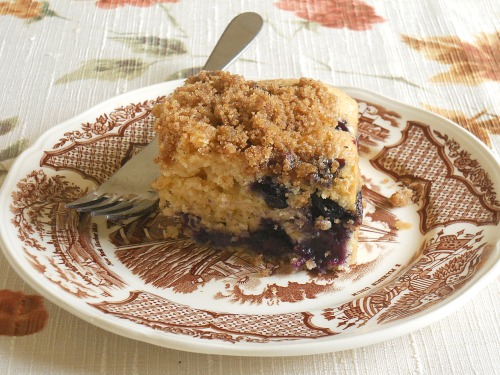
When I see the photos of the blueberry cake, I am very sad. Not because they are some of the last photos I took with my point and shoot camera (I just got a new DSLR camera). But because the cake is all gone and I can’t have another piece. This cake is one of the best I’ve ever had and what makes it even better is that it’s a lightened up recipe.

I must stress to you that when it comes time to check the cake, there must be crumbs on your toothpick. It will continue to bake a bit once it’s removed from the oven. Doing this will ensure that you will have a very moist and delicious cake.

Now, go make your shopping list and be sure to get everything you need to make this cake. That is my plan for the weekend. I must have another piece of the cake, STAT.

Healthier Blueberry Crumb Cake:

  • 1 1/2 cups (7 1/2oz) all-purpose flour
  • 1/2 cup (2 1/4oz) whole-wheat flour
  • 3/4 cup packed (5 1/4oz) light brown sugar
  • 1/2 cup (3 1/2oz) granulated sugar
  • 1/2 tsp salt
  • 1/2 tsp baking powder
  • 1/4 tsp baking soda
  • 6 tbs (3/4 stick) unsalted butter, melted and cooled
  • 1 cup lowfat sour cream
  • 1 large egg
  • 1 tsp vanilla extract
  • 1 cup fresh blueberries
  • 1 tsp ground cinnamon
  1. Adjust an oven rack to the middle position and heat the oven to 350 degrees. Lightly coat an 8-inch square baking pan with baking spray. 
  2. Pulse the all-purpose flour, whole wheat flour, 1/2 cup of the brown sugar, granulated sugar, salt, baking powder, and baking soda together in a food processor to combine. (You should be able to do all this with an electric mixer or stand mixer also but I have not tried it.) With the food processor running, add 5 tbs of the melted butter and process until the flour mixture looks sandy. 
  3. Transfer 1/4 cup of the flour mixture to a medium bowl and set aside for the topping. Add the sour cream, egg, and vanilla to the flour mixture in the food processor and pulse until the mixture just comes together, about 8 pulses. (Do not overmix) If using a stand mixer, stir on low till just combined.
  4. Transfer the batter to a large bowl (or keep in the stand mixer bowl) and gently fold in the blueberries with a rubber spatula. Scrape the batter into the prepared pan and smooth the top. 
  5. Stir the remaining 1/4 cup brown sugar and cinnamon into the reserved flour mixture. Add the remaining 1 tbs melted butter and toss gently with a fork until incorporated and some larger pea-sized crumbs have developed. Sprinkle the crumb mixture evenly over the batter. 
  6. Bake until the topping is golden brown and a toothpick inserted into the center of the cakes comes out with just a few crumbs attached. 30-35 minutes, rotating the pan halfway through baking. 
Serves 12.
Per Serving – Calories: 240 Fat: 7g Sat Fat: 4g Chol: 35mg Carb: 38g Protein: 3g Fiber: 1g Sodium: 170mg
Source: Slightly adapted from Americas Test Kitchen Healthy Family Cookbook

Chicken with Mustard Cream Sauce

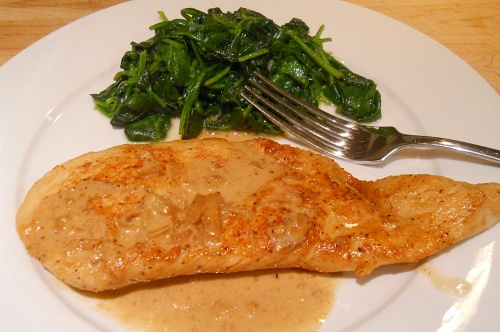
There are times when I see something on my Google Reader and I have to make it right away. This is one of those times. Pioneer Woman posted this recipe and it looked so good, that I knew I had to make it ASAP. What makes it even better is that I already had all the ingredients. It was totally meant to be. I am going to admit something… I am not a huge chicken fan. If given the choice, I won’t ever pick chicken. I will make it and eat it, but I won’t ever get seconds. I loved this dish so much, that I got a second piece of chicken! Even my daughter, who doesn’t like a lot of saucy things, loved it. This says a lot. The only thing I changed from the original recipe was adding shallots. Personally, I love shallots, but my husband said I could leave them out next time. It’ll be up to you and whether you want to add them or not.

You must go make this dish now! It’s fast and easy and you won’t regret it.

Chicken with Mustard Cream Sauce:

*Serves 4-8

  • 4 whole Boneless, Skinless Chicken Breasts or 8 chicken cutlets
  • 2 Tablespoons Olive Oil
  • 2 Tablespoons Butter
  • 3 whole Garlic Cloves, Minced
  • 2 medium shallots sliced thin (optional)
  • 1 cup Brandy (or White Wine If Preferred) *I loved the Brandy*
  • 1 Tablespoon (heaping) Dijon Mustard
  • 1 Tablespoon (heaping) Grainy Mustard
  • 1/4 cup (to 1/2) Heavy Cream
  • 1/4 cup (to 1/2) Chicken Broth
  • Salt And Pepper, to taste
  1. If using chicken breasts and not cutlets, cut the chicken breasts in half lengthwise so that you have eight smaller, thinner chicken cutlets. Salt and pepper both sides.
  2. Heat oil and butter in a large skillet over medium-high heat. Cook cutlets on both sides until nice and golden brown and cooked through. Remove chicken from the skillet and keep on a plate.
  3. Reduce the heat to medium. Add the shallots to the pan and cook for 2 minutes. Next add the garlic to the pan and saute it for a minute, stirring to make sure it won’t burn. Next pour in the brandy (or wine if using) being careful if cooking over an open flame. Then just let the brandy bubble up and cook until it’s reduced by half.
  4. Throw in the mustards and stir to combine, then pour in the cream. Stir in chicken broth, adding more if the sauce seems too thick. Taste sauce and adjust whatever you think it needs. Add chicken breasts back to the pan, nestling them into the sauce. Allow sauce to cook for another few minutes, shaking the pan if needed to move things around.
  5. Serve chicken with the sauce spooned over the top.

Source: slightly adapted from Pioneer Woman