Chipotle Chicken – Copycat Version

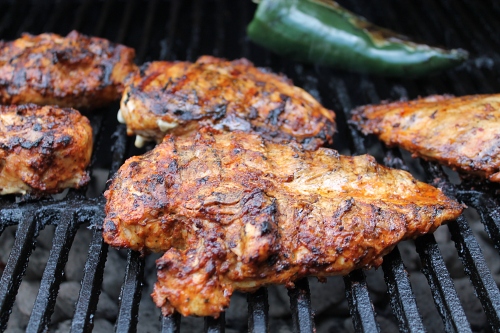
It’s a rare thing for me to make exact copycat recipes. But I’m a huge fan of the popular chain, Chipotle. I’ve already made a cilantro-lime rice that rivals theirs, and a corn salsa. Now it’s time for the main ingredient, the chicken. This chicken is full of strong flavors and you can turn up the heat or turn it down by how many chili’s you put in it. I didn’t put the whole 7oz of chipotle peppers in because I didn’t want it too spicy. I was able to find dried ancho chiles in my local Walmart’s produce department. You should also be able to find the chipotle peppers in adobo in Walmart’s Hispanic section. When you make this, use the leftover peppers in adobo in my hot corn dip. It’s to die for!

I will admit, that while these were really good, nothing can beat the actual burrito’s at Chipotle’s. Maybe it’s the atmosphere. But you can have fun with your family making them at home. I put everything together and then set everything out on a table so people could make their own burrito’s. Make sure you have plenty of lettuce, cheese, sour cream, guacamole, and of course, the cilanto-lime rice and corn salsa. It’ll make your burrito’s shine!

Chipotle Chicken:

  • 5-6 boneless and skinless chicken breasts, pounded flat (about 1/2 inch thickness)
  • 1 (2 ounce) package dried ancho chiles or 4-6 ancho chiles
  • 1 (7 ounce) can chipotle pepper in adobo sauce (discard chipotle pepper, skim out seeds)
  • 1 teaspoon black pepper
  • 2 teaspoons cumin powder
  • 2 tablespoons fresh oregano, chopped
  • 6 cloves garlic
  • 2 teaspoons salt
  • 1 red onion, quartered
  • 1/4 cup oil (canola/vegetable/olive)


  1. Soak the dried chilies overnight in water, until soft. Remove seeds. (If you forget to do this part, like me, pour boiling water over chiles and let soak till soft, about 30 minutes)
  2. Add chilies and rest of the ingredients in blender or food processor. Puree until smooth. Place chicken in a ziploc bag and pour marinade over chicken. Let refrigerate and marinate for at least 2 hours or overnight.
  3. Once chicken is ready, prepare your gas or charcoal grill. Cook over medium-high heat until cooked through, about 8-10 minutes per side. Make sure the chicken is cooked thoroughly. When done, take off heat and chop into small dices. Enjoy!

Source: slightly adapted from Chipotle Fan
Snickerdoodle Muffins

Oh, how I’ve missed all of you. We just recently got back from a much needed vacation. It was great seeing family and old friends. We went to Florida and met our new nephew, and I can’t even begin to explain how lucky all of us are to have this precious boy in our lives. I am missing him like crazy!

Look at this face and try to tell me you wouldn’t miss it.

Along with spending time with family we were able to go to Disney World, Legoland, and best of all, a Tampa Bay Rays game. Here are a few pictures of our trip.

Of course you know these famous faces. Mickey was so much fun and gave us lots of kisses.

My kids at Legoland. We had such a great time here. Of course my son loved it most of all. He’s a big Lego fan and has tubs of them in his room. I think he might end up working here one day.

Here is my grandmother and myself getting ready to go into the Rays game. We had the best time here, even with the game going into 14 innings. Thankfully, my Rays won so it was worth staying till Midnight.

How cool is this Mickey?

No trip to Florida would be complete without seeing the beaches. We went to Siesta Key in my hometown, which by the way, was awarded the best beach in the United States.

Now we are back to the normal grind of everyday. So I should probably let you know all about these awesome muffins. If you like snickerdoodle cookies, you are going to LOVE these muffins. They taste exactly like the cookies, they are moist and you won’t be able to stop at one.

Snickerdoodle Muffins:

  • 1 cup Butter, Softened
  • 1 cup Sugar
  • 2 whole Eggs
  • 2 teaspoons Vanilla
  • 2-1/4 cups Flour
  • 3/4 teaspoons Baking Powder
  • 3/4 teaspoons Baking Soda
  • 3/4 teaspoons Cream Of Tartar
  • 1/2 teaspoons Salt
  • 1 cup Sour Cream
  • 1/4 cups Buttermilk

For the Topping:

  • 2/3 cups Sugar
  • 2 Tablespoons Cinnamon
  1. Preheat the oven to 350ºF. Prepare a muffin tin with 12 liners. (I was able to squeeze out about 14 muffins)
  2. In a mixer, combine the butter and sugar and cream until fluffy. Add the eggs and vanilla and combine.
  3. In a separate bowl, combine the dry ingredients. Add half of the dry ingredients to the mixing bowl and stir to combine. Add the sour cream and buttermilk and mix to combine. Add the rest of the dry ingredients and mix until you have a smooth batter.
  4. In a small bowl, combine the sugar and cinnamon for the topping.
  5. Use an ice cream scooper and put a scoop of batter into the bowl with the sugar and cinnamon. Gently roll the batter in the sugar and cinnamon. Place the ball into the muffin liner.
  6. When you have completed all of the muffins, sprinkle the leftover cinnamon sugar onto the tops of all of the muffins.
  7. Bake the muffins for about 15-18 minutes or until they are golden on top and just baked through.

Source: Slightly adapted by Heather Christo via Tasty Kitchen

Red White and Blue Whoopie Pies

Happy Independence Day! Today is the day we celebrate our nations independence. I’m sure many of you will be out with family and friends celebrating. We are planning to go to my sister-in-laws house for swimming and of course food and fireworks. Earlier in the week I brainstormed on what I could bring that would showcase our nations colors. I started thinking about whoopie pies. I live in Pennsylvania and whoopie pies are a staple here. I decided that I could make a vanilla whoopie pie and dye the batter to make the blue and the red and have the frosting as the white. I was so happy that they turned out exactly like I had imagined.

Here are a few tips to create perfect looking whoopie pies

Start out drawing 2 1/4 inch circles on the parchment paper. I used a glass to trace the circles. Turn the paper over when you put it on your baking sheet. That way you don’t have traces of pencil getting on your batter.

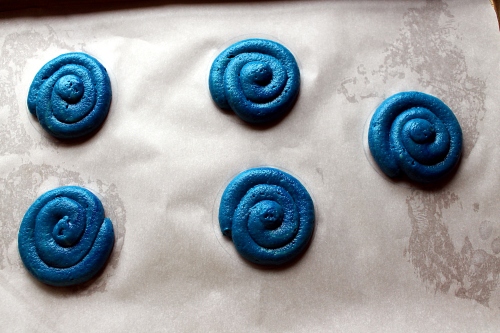
Next you will pipe out the batter within the circles. I used a Wilton 2A tip.

They are now ready to go into the oven and get baked.

Red White and Blue Whoopie Pies

  • 1 cup (2 sticks) unsalted butter
  • 1 1/2 teaspoons salt
  • 2 teaspoons vanilla extract
  • 4 1/2 cups Unbleached All-Purpose Flour
  • 1 tablespoon baking powder
  • 1 1/2 cups sugar
  • 3 large eggs
  • 1 cup milk
  • Red and Blue gel food coloring. (I use Ameri-color and Wilton gel)
  1. Preheat oven to 400 degrees and line baking sheets with parchment paper. Using a pencil, outline 2 1/4 – 2 1/2 inch circles spacing them a few inches apart.
  2. In a large bowl, whisk together the flour, salt and baking powder and set aside.
  3. In a bowl of an electric mixer fitted with the paddle attachment (or hand mixer), cream together the butter and sugar, till light and fluffy. Once combined; add the eggs, one at a time, scraping the bowl after each addition. Add the vanilla and mix till just combined.
  4. Add the flour to the wet ingredients alternately with the milk, beginning and ending with the flour. Be gentle and do not overmix. Divide the batter into two bowls. In one bowl add the blue coloring, till desired color is reached, and mix till combined. Repeat with the red coloring in the other bowl.
  5. Place batter into a large piping bag (I used 16 inches) fitted with a large round tip. (I used Wilton 2A). Pipe the batter within the circles on the parchment paper.
  6. Bake for 6-8 minutes or until the center is just firm. Remove from oven and transfer to cooling rack. Cool completely before frosting.
  7. Once the pies are cooled and ready; match up the pies and spread or pipe the icing on one side then sandwich with the matching piece.
Frosting:
  • 3 sticks unsalted butter, softened
  • 1/4 cup milk
  • 1/4 cup flour
  • 2 TBS vanilla
  • 4 cups Confectioners sugar
  1. In a bowl fitted with paddle attachment (or hand mixer), cream together the butter, milk, flour and vanilla. Add the confectioner sugar and beat together till light and fluffy, about 4-5 minutes.

Source: slightly adapted by King Arthur Flour frosting from the Pumpkin Whoopie Pies

Corn Salsa

This is the time of year for corn and we eat it at least once a week during the summer. Sometimes it’s nice to have corn in different ways other than right off the cob. This salsa tastes like the one from chiptole and you can pair it with the cilantro-lime rice I already posted about. You could also use this salsa to go with any grilled meats. It would be great with steak. I cooked the poblano chile pepper on the grill while I grilled chicken. But if you aren’t making this when you were planning to grill, you could easily put the pepper under the broiler. Just be to sure to turn the pepper every couple minutes and watch it closely so it does not burn.

Corn Salsa:

  • 1/2 small poblano chile pepper, seeded
  • 3 teaspoons extra-virgin olive oil
  • Kosher salt
  • 1 cup fresh corn kernels (from 2 ears), or 1 cup frozen corn, thawed
  • 1 small jalapeno pepper, seeded and chopped
  • 2 tablespoons chopped fresh cilantro
  • 2 tablespoons chopped red onion
  • 2 tablespoons fresh lime juice
  • 1/2 teaspoon sugar
  1. Preheat a grill to medium high. Brush the poblano with 1 teaspoon olive oil and grill, skin-side down, until charred but still firm, about 5 minutes. Cool slightly; peel and finely chop.
  2. If using fresh corn, bring a small pot of salted water to a boil. Add the corn and cook until tender, 2 to 3 minutes; drain. (You can use leftover corn and just cut it off the cob without having to re-heat it)
  3. Mix the corn (if using frozen, add it here), poblano, jalapeno, cilantro and red onion in a bowl. Stir in the remaining 2 teaspoons olive oil, the lime juice, sugar and 1/2 teaspoon salt. Serve and enjoy

Source: Food Network

Homemade Vegetable Fried Rice

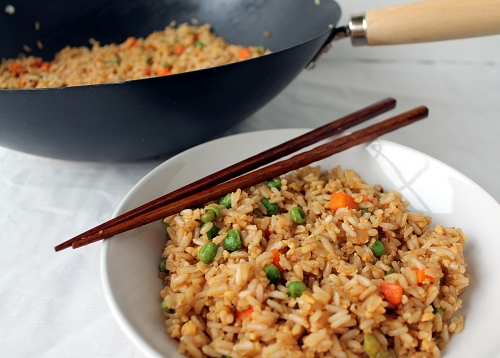
My family loves Chinese food and we do a good amount of take-out. I know we could lessen that and so I decided to begin to make my own version of our favorite things. The first step was fried rice. A long time ago we went to one place that put ginger in their fried rice. I loved it and haven’t found anyone else that does that. I knew that was a must ingredient to my homemade fried rice. I also love hoisin sauce and thought that might work in the rice too. I’m so glad I decided to add these two ingredients into the dish, the rice turned out to be some of the best I’ve ever had.

Making your own fried rice is really easy, but you do have to plan in advance. From what I’ve read, using cold cooked rice is the best way to get the right texture. I made the rice in the morning and put it in the fridge when it was done. If you don’t have time to do it in the morning, make it the night before. Either way, you must make your rice in advance.

Homemade Vegetable Fried Rice:

  • 3 cups cooked long grain rice, white or brown, cold
  • 3 tbs vegetable oil
  • 1 small white onion, diced small
  • 4 garlic cloves, finely minced
  • 3 tsp finely minced fresh ginger or freshly grated ginger (using microplane)
  • 4 green onions, thinly sliced (white and green parts)
  • 2 cups frozen peas and carrots
  • 2 eggs, lightly beaten
  • 3 tbs low-sodium soy sauce (you can add more to taste)
  • 2 tbs Hoisin Sauce
  1. Heat 1 tbs of the oil in a wok or 12 inch skillet set over medium-high heat. Add the onion and cook 2 minutes, until softened. Add the garlic and 2 tbs of the ginger, cook until fragrant. Add half of the green onions, peas and carrots and cook until they are warmed, about 3 minutes. 
  2. Push the vegetables to the side of the pan; making a hole in the center and add the remaining 2 tbs oil. Add the eggs to the center of the pan and whisk constantly till the eggs are just about cooked. Mix into the rest of the vegetables. 
  3. Add the rice and break up the clumps stir everything together then flatten the rice out. Let sit untouched for about 2 minutes. Stir the rice and add the soy sauce, remaining 1 tbs of ginger, and hoisin sauce, continuing to break up any rice clumps. Add the remaining green onions and adjust seasonings, to taste. Enjoy!
Source: Gina Marie Original


Restaurant-Style Queso Blanco Dip

If you are like my family when you go to a Mexican restaurant, you must order cheese dip with your chips. My kids are addicted to it. With Cinco de Mayo just a few days away, you can celebrate it by making a homemade version of the addicting cheese dip.

I’ve been seeing recipes popping up all over the blogosphere and decided to finally try it. The surprising ingredient is white American cheese. It melts wonderfully and gives it the taste that you get in the restaurants. When I went to the deli to get the cheese, I asked for a block of 3/4lb White American, un-sliced You can play around with the jalapenos and tomatoes and put in as little or as much as you would like. The recipe makes a large amount of dip, so this would be great to make with family and friends. Put it in a crock pot to keep it warm and enjoy!

Queso Blanco Dip:

  • 1 Tbs Vegetable or Canola oil
  • 1/4 cup white onion, diced
  • 1 large jalapeno or serrano, seeds and stem removed; diced
  • 12 oz white American cheese (I have the deli give 3/4lb block), shredded
  • 4 oz Monterrey Jack cheese, shredded
  • 1/4 cup-2/3 cup cream, half-and-half, or whole milk
  • 1 roma tomato, seeds removed and diced
  • 1 small bunch cilantro, roughly chopped
  1. Heat the oil in a saute pan. Cook the onion and pepper until softened and reduce heat to medium-low.
  2. Add the shredded cheese and 1/4 cup of the cream. Stir until mostly melted.
  3. Add the tomatoes, cilantro, and additional cream a little at a time until you reach desired consistency. (I needed to add a lot of cream to get it the right consistency, the cheese will thicken as it sits) Serve with chips

Source: Confections of a Foodie Bride

Peanut Butter and Jelly Cookies

To me, peanut butter and jelly is comfort food. It takes me back to being a child and eating them for lunches. Even though my pallet has evolved and grown as I have grown, I still enjoy eating a peanut butter and jelly sandwich for lunch. I love desserts that will incorporate the two ingredients that are meant to always be together. I’ve made peanut butter and jelly bars that everyone loves, so I figured these cookies have to be good. Not only were they good, they were fantastic!

The cookies are easy to make and quick to whip up. I’m not a fan of cooking with shortening and the recipe called for butter flavored shortening. I was able to substitute that with real butter and the results were great. It’s up to you and your preference which one you would like to use. Either way, you are going to have a fantastic cookie that everyone is going to love.

Peanut Butter and Jelly Cookies:

  • 1 1/2 cups all-purpose flour
  • 1 tsp baking soda
  • 1 tsp salt
  • 1/2 cup unsalted butter, softened or 1/2 cup butter-flavored shortening
  • 1 cup creamy peanut butter
  • 1 cup dark brown sugar
  • 1/3 cup granulated sugar
  • 3 tbs milk
  • 1 tsp vanilla extract
  • 1 large egg
  • 1/2 cup grape jelly
  • 1/2 cup creamy peanut butter
  1. Preheat oven to 375 degrees F.
  2. In a medium bowl, combine flour, baking soda and salt; set aside. In a large bowl, combine butter (or shortening if using), peanut butter, both sugars, milk and vanilla.
  3. With a hand-held mixer, beat on medium speed until just combined. Add egg and beat until incorporated. Gradually add flour mixture and mix until combined.
  4. Roll heaping tablespoons of dough into balls with hands. Place on parchment lined baking sheets and press into the centers with thumbs to form divots. In each divot, place 1/2 teaspoon of jelly and 1/2 teaspoon of peanut butter. Bake in the preheated oven for 10-12 minutes. Let cool.

Source: slightly adapted by Pip and Ebby