Chicken Enchilada Wraps

I have had these bookmarked ever since I saw them on Annie’s Eats a year ago. I was waiting for the right time to make them. When I started planning my sister-in-laws baby shower I knew it was time to bring out the chicken enchilada wraps. I decided to triple the recipe to make sure we had enough for our guests. I was a little worried about tripling the spices and ended up cutting back a bit on the Chile powder and Cayenne pepper. When we tasted the chicken filling my daughters and husbands mouth were a tad bit on fire. They are more sensitive to the spicy heat than I am, so I always go by what they tell me when it comes to serving something to others. I sat there trying to figure out what to do. I had already added all the ingredients to the filling and didn’t have anymore cream cheese to add to it. What could I do to take some of the heat away? I looked through the refrigerator and saw sour cream. I added small amounts at a time till it finally worked. I actually think the addition of the sour cream helped round the flavors out even more. I love how things work out just when you think it’s ruined. And thankfully everyone at the shower loved them.

Chicken Enchilada Wraps:

  • 2 chicken breasts, bone-in and skin on
  • Olive Oil
  • Salt and Pepper
  • 1 (8 oz.) pkg. cream cheese, softened
  • 2/3 cup shredded cheese, Mexican blend
  • 1 clove garlic, minced or pressed
  • 2 tsp. chili powder
  • ½ tsp. cumin
  • ¼ tsp. cayenne pepper
  • Salt, to taste
  • Handful of cilantro, chopped
  • 3 green onions, chopped
  • 10 oz. can diced tomatoes with green chiles, drained well
  • 1/4 cup sour cream (optional)
  • 4-6 8-inch tortillas
  1. Preheat oven to 375 degrees.
  2. Place chicken breasts on a baking sheet. Rub each breast with a drizzle of olive oil and sprinkle with salt and pepper. Bake the breasts for 35-45 minutes or until cooked through. Let cool.
  3. Remove the skin and chicken from the bone. Shred the chicken and set aside.
  4. Combine all of the remaining ingredients, except tortillas, in a large mixing bowl.  Mix until well blended. Add the chicken to the filling mixture and stir well to incorporate. Taste and add sour cream, if desired.
  5. Spread a thin layer of the filling mixture over a tortilla, leaving a small border clear around the edge.  Roll the tortilla up tightly into a spiral.  Place the rolled up tortilla on a cutting board and use a sharp knife to cut into 1- to 1½-inch thick segments.  Transfer to a serving platter and serve chilled or at room temperature.

Source: Adapted from Annie’s Eats via Sing for Your Supper, originally from Come On Over Cookbook1 from Gooseberry Patch

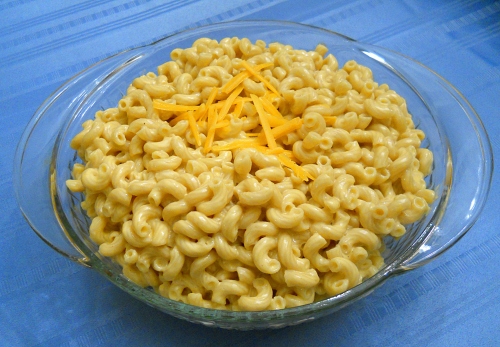
Everyday Mac-N-Cheese

I love homemade macaroni and cheese. I’ve made it countless ways as I try to find my favorite. I hate yet to find the right recipe that my kids and I go WOW over. There are a lot of good ones but none have blown our socks off. I will admit that the kids and I are mac-n-cheese snobs so it’s going to take a lot to impress us. If you notice I have not mentioned my husband, he likes mac-n-cheese, but it’s not one of his favorite dishes. The kids and I always stare at him funny when he says that.

I have always made baked mac-n-cheese so when I saw this recipe in the ATK Healthy Family Cookbook, I knew it was something I had to try. It was a lightened up version of macaroni and cheese but yet sounded like it was something we could like. Instead of making a Béchamel sauce consisting of flour, milk and butter; this is made with evaporated milk, lowfat milk and cornstarch to help thicken. They recommend using Cabot 50% light Vermont Cheddar Cheese but I was unable to find it. So I used regular Cabot Cheddar Cheese and it worked out fine, it just added a little more to the calories. My favorite part of this whole dish is that it didn’t need to be baked and it was fast and easy! The kids and I really liked it and so did my husband. I was hesitant on how the leftovers would taste, and was amazed they tasted just as good as it did the day before, maybe even better!

Everyday Mac-N-Cheese

  • 8 ounces whole-wheat macaroni (I used a little more)
  • Salt and Pepper
  • 1 (12oz) can reduced-fat evaporated milk
  • 3/4 cup 2% lowfat milk
  • 1/8 tsp dry mustard (I could not locate mine so I did a squirt of regular)
  • Pinch cayenne pepper
  • Pinch garlic powder
  • 2 tsp cornstarch
  • 2 cups shredded 50% light cheddar cheese
  1. Bring 2 1/2 quarts water to a boil in a large saucepan. Add the pasta and 2 tsp of salt and cook, stirring often, until completely tender. Reserve 1/2 cup of the cooking water, then drain the pasta and leave it in the colander.
  2. Combine the evaporated milk, 1/2 cup of the lowfat milk, mustard, 1/4 tsp salt, cayenne and garlic powder in the saucepan. Bring the mixture to a boil, then reduce to a simmer. Whisk the cornstarch and remaining 1/4 milk together, then whisk it into the simmering sauce. Continue to simmer, whisking constantly, until the sauce has thickened slightly and is smooth, about 2 minutes.
  3. Off the heat, gradually whisk in the cheddar until melted and smooth. Stir in the cooked pasta and let it sit until the sauce is thickened and the pasta is heated through, 2 to 5 minutes. Season with salt and pepper to taste and add the reserved cooking water as needed to loosen the sauce before serving. (I did not have to add any)

Source: America’s Test Kitchen Healthy Family Cookbook

Basic Pizza Dough

Making pizza at home is something that a lot of people enjoy doing. It’s fun for the whole family to get involved in, especially the kids. My kids love to form the dough into the pizza shape and add whatever toppings they want. It’s really a great way to get little ones interested in cooking. Most grocery stores now have fresh dough you can buy, but they don’t compare to the dough you can make at home. I’ve made this recipe quite a few times now and it’s never let me down. The recipe says it’ll make 3 medium pizzas. Sadly, my pizza stone got broke some time back and I have yet to replace it. I have been making the pizzas in a sheet pan. If you like a very thick crust use the whole dough in one sheet pan. If you like it on the regular/thinner side, cut the dough in half. The dough also freezes very well. You’ll want to wrap it to freeze it once the first rise is done. I would recommend wrapping it saran wrap then put it into a gallon size freezer bag. The dough will expand a little till it’s frozen all the way through. When ready to use, take out of freezer and place in the refrigerator till thawed. Allow to come to room temperature (30 minutes) and it’s ready to be shaped.

One of my favorite pizzas is this white pizza. Heat olive oil in a small saute pan with 2 small cloves of garlic, chopped finely. Once the dough is ready for the toppings I use a pastry brush and spread the garlic infused olive oil all over the dough. I top it with dollops of goat cheese, mozzarella and Italian fontina cheeses. Bake at 450 degrees and it’s amazing! Serve with a spring green salad tossed with a lemon vinaigrette. 2 tbs freshly squeezed lemon juice, 4 tbs olive oil, salt and pepper to taste. Whisk together and serve.

Basic Pizza Dough:

Yields: 2-3 medium pizzas

  • 1/2 cup warm water (about 110 degrees)
  • 1 envelope (about 2 1/4 tsp) instant yeast
  • 1 1/4 cup water, at room temperature
  • 2 tbs olive oil
  • 4 cups (22 ounces) bread flour, plus more for dusting the work surface and hands
  • 1 1/2 tsp salt
  • Olive oil for oiling the bowl
  1. Measure the warm water into a 2-cup liquid measuring cup. Sprinkle in the yeast and let stand until the yeast dissolves and swells, about 5 minutes. Add the room-temperature water and 2tbs olive oil and stir to combine.
  2. Place the flour and salt in the bowl of a standing fitted with the paddle. Briefly combine the dry ingredients. Slowly add the liquid ingredients and continue to mix at low speed until a cohesive mass forms. Stop the  mixer and replace the paddle with the dough hook. Knead until the dough is smooth and elastic, about 5 minutes. Form the dough into a ball, put it in a deep oiled bowl, cover with plastic wrap. Let rise until doubled in size, 1 1/2 to 2 hours. Press the dough to deflate. The dough is now ready to be used. *Note* if you are having problems with forming the dough, let it sit to rest for about 15 minutes and try again.

To make by hand:

  1. Follow the recipe through step 1. Omit step 2 and instead combine the salt and half the flour in a deep bowl. Add the liquid ingredients and use a wooden spoon to combine. Add the remaining flour, stirring until a cohesive mass forms. Turn the dough onto a lightly floured work surface and knead until smooth and elastic, 7 to 8 minutes, using as little dusting flour as possible while kneading. Form the dough into a ball, put it in a deep oiled bowl, cover with plastic wrap. Let rise until doubled in size, 1 1/2 to 2 hours. Press the dough to deflate. The dough is now ready to be used.

Source: The New Best Recipe from Cook’s Illustrated

Stovetop Chicken Fajitas

We love fajitas in our family and the best way to make them is on the grill. I know there are people out there who will continue to use their grill in the snow and freezing cold; but I am not one of them. That’s why when I saw this recipe I knew I had to try it. Making fajitas on the stove is a great to enjoy them on those really cold snowy days. I had been craving fajitas and these hit the spot. The whole dish came together nicely and we had no leftovers. I served these with a fresh tomato salsa. I can’t wait to make them again.


Stovetop Chicken Fajitas:

  • 2 tsp canola oil
  • 2 red bell peppers, stemmed, seeded, and sliced thin
  • 1 red onion, halved and sliced thin
  • Salt and Pepper
  • 4 (6oz) boneless, skinless chicken breasts, trimmed, pounded so the chicken is all the same thickness
  • 1/2 cup orange juice
  • 3/4 cup minced fresh cilantro
  • 1 tbs Worcestershire sauce
  • 4 garlic cloves
  • 2 tsp minced canned chipotle chile in adobo sauce
  • 1 tsp yellow mustard
  • 1 tomato, cored, seeded and chopped medium
  • 3 scallions, sliced thin
  • 8 whole-wheat flour tortillas, warmed
  1. Heat the oil in a 12-inch skillet over medium high heat until just smoking. Add the bell peppers and onion and cook, stirring occasionally, until softened and well-browned, 5-7 minutes. Transfer to a bowl, season with salt and pepper to taste, and cover to keep warm.
  2. Pat the chicken dry with paper towels and season with salt and pepper. Combine the orange juice, 1/2 cup of the cilantro, Worcestershire, garlic, and chipotles in the skillet. Add the chicken and bring to a simmer over medium-low heat, about 5 minutes. When the liquid is simmering, flip the chicken over, cover, and continue to cook until the chicken registers 160-165 on an instant-read thermometer, 10-12 minutes longer.
  3. Transfer the chicken to a plate and shred it into bite-sized pieces when cool enough to handle. Meanwhile, continue to simmer the sauce over medium heat until slightly thickened and reduced to 1/4 cup, about 5 minutes.
  4. Off the heat, stir in the mustard, tomato, scallions, remaining 1/4 cup cilantro and shredded chicken. Season with salt and pepper to taste, and serve with the pepper-onion mixture and warm tortillas.

Source: America’s Test Kitchen Healthy Family Cookbook

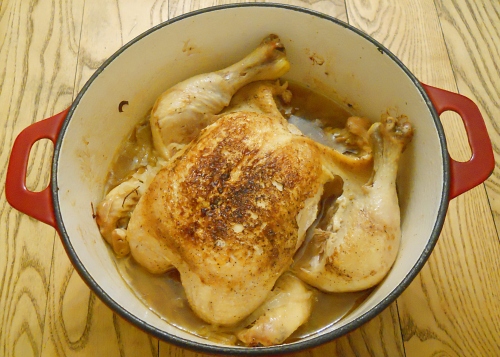
Chicken In A Pot With Thyme and Lemon

The flu bug has officially visited my house. I was the second person to get hit and hopefully the last. I can finally look and think about food again. I was wanting to post this recipe earlier but there was no way I could even think about it. Thankfully I’m on the mend and can start giving you wonderful recipes again.

Cooking a whole chicken in a pot is the classic French way to cook a chicken. I’ve never tried it before and I’m so glad I finally made it. I now have my favorite way to cook chicken. The recipe comes from my new America’s Test Kitchen Healthy Family Cookbook, which is now one of my favorites. I loved that everything is cooked in one pot. You brown the chicken with the onions and then throw it in the oven. After 2 hours of baking, I checked the chicken to find it was not done. I decided to crank the temp on the oven to 350 and let it go for 40 minutes. That did the trick, the chicken was cooked perfectly. The sauce was my favorite part of the meal! We spooned it over the chicken and the basmati rice pilaf I made to go along side it. I could have kept eating the sauce with a spoon. This made a great Sunday night dinner for us, but could easily be made during the week.


Chicken in a pot with Thyme and Lemon:

  • 1 (4lb) whole chicken, neck and giblets removed
  • Salt and Pepper
  • 1 tbs extra-virgin olive oil
  • 1 onion, halved and sliced thin
  • 6 garlic cloves, peeled and crushed
  • 1 bay leaf
  • 2-4 sprigs fresh thyme
  • 1 tsp fresh lemon juice
  1. Adjust oven rack to the lower position and heat the oven to 250 degrees. Pat the chicken dry with paper towels, tuck the wings under the chicken. Season with salt and pepper.
  2. Heat the oil in a large Dutch oven over medium-high heat until just smoking. Add the chicken, breast-side down, and scatter the onion, garlic, bay leaf and thyme around the chicken. Brown the chicken on both sides, 10-12 minutes. Turn the chicken breast-side up.
  3. Off the heat, place a large sheet of aluminium foil over the pot and press to seal, then cover tightly with the lid. Transfer the pot to the oven and cook until the breast registers 160 to 165 degrees and the thighs register 175 degrees on an instant-read thermometer, 1 hour 20 minutes to 1 hour 50 minutes.
  4. Transfer the chicken to a carving board, ten loosely with foil, and let rest for 20 minutes. Strain the juices from the pot into a fat separator (if you don’t have one strain them into a bowl and skim off the fat), reserving the strained vegetables. Let the juices settle for about 5 minutes.
  5. Add the defatted juices, strained vegetables, and any accumulated chicken juice back to the pot and bring to a simmer over medium heat. Off the heat, discard the bay leaf and thyme sprigs, stir in the lemon juice, and season with salt and pepper to taste. Carve the chicken and remove the skin. Serve, passing the sauce separately.

Source: America’s Test Kitchen Healthy Family Cookbook

Pork Roast with Hoppin John Stuffing

It’s officially 2011 and I’m so ready for the start of the new year. My family went through a rough 2010 and I am determined to make 2011 much better. I don’t make resolutions at the beginning of the year because I feel we always need to make changes in our lives throughout the years. But it doesn’t hurt to try and use this time to change something. I’m going to be a lot more positive about our situation and not worry about little things. I know that in a few months things are going to be looking up! I truly hope that everyone has the best year yet!
A great way to kick off the new year is by making some good luck food. It’s not too late to make this. Hoppin John Stuffing is a southern dish that combines food thought to bring you good luck. I took this from Wikipedia as it best describes what the ingredients mean.
The peas, since they swell when cooked, symbolize prosperity; the greens symbolize money; the pork, because pigs root forward when foraging, represents positive motion
We could all use that in our life.
The recipe has a few steps and you don’t have to make the pork in order to have the stuffing. I’ve made the Hoppin John to be served on it’s own. I still recommend using the egg to help bind the stuffing, but make sure to bake it at 350 for at least 40 minutes.
This is what the stuffing looks like after it’s been all mixed together. Yummm
If you are stuffing the pork roast, this is what it’ll look like when you have it butterflied and added the stuffing. Be sure to always season the pork with salt and pepper before you add the stuffing.
Here it is all tied up. There are many methods in which to tie up a roast. Do what you are comfortable with as long as it’s tied, who cares how it looks. It’ll be cut off before serving anyway.
Enjoy!
Pork Roast with Hoppin John Stuffing:
  • 1 small onion, diced small
  • 1/2 medium-size green bell pepper, diced small
  • 2 tbs olive oil
  • 1 1/2 cups cooked long-grain rice
  • 1 1/2 cups frozen chopped collard greens, thawed (I used one 15oz can drained, since I could not find frozen)
  • 1 15oz can Black Eye Peas, rinsed and drained
  • 1/2 cup diced cooked country ham (used leftovers from Christmas)
  • 1/2 tsp sugar
  • 1/2 tsp salt
  • 1 large egg, lightly beaten
  • 1 (2 1/2 – 3-pound) boneless pork loin roast
  1. Preheat oven to 375 degrees
  2. Saute onion and bell pepper in olive oil in a large skillet set over medium-high heat 5-7 minutes or until tender. Remove from heat. Add rice and next 5 ingredients; stir in egg. Set stuffing aside. (If only using stuffing, place in casserole dish and bake at 350 for 40 minutes)
  3. Butterfly pork loin roast by making a lengthwise cut down the center of 1 flat side, cutting to within 1/2 inch of bottom. From bottom of cut, slice horizontally to 1/2 inch from left side; repeat procedure to right side. Open roast, and place between 2 sheets of heavy-duty plastic wrap (or ziplock bag); flatten to 1/2 inch thickness using a meat mallet or rolling pin.
  4. Spoon 1 1/2 cups stuffing evenly over roast, leaving a 1/2 inch border. Roll up; tie with kitchen string at 1 inch intervals. Place seam side down, in a lightly greased 11×7-inch baking dish.
  5. Bake for 55-60 minutes or until a meat thermometer inserted in center reaches 150 degrees. Place the remaining stuffing in small casserole dish and bake for 30 minutes.

Source: Southern Living Magazine, Published around 9 years ago.

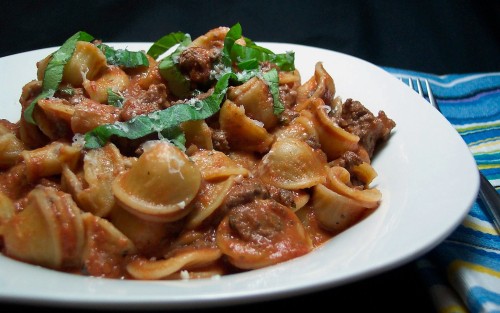
Weeknight Bolognese

I love a good bolognese and in order to achieve that it takes all day to make. The past couple weeks have been down right chilly and snowy. When the weather is like that, I want hot comfort food to warm me up. I wanted something like bolognese but didn’t have time to spend all day in the kitchen. My daughter is keeping me super busy with her cheerleading schedule and finding time in the kitchen has been hard. So, I turned to Ina’s new cookbook to help me out. She has a weeknight bolognese that doesn’t take long to make. This turned out fantastic. If you are like me this time of year, and have to run around like a crazy person. You can take comfort in knowing that you can still put a delicious meal on the table, even in the middle of your busy holiday schedule.

Weeknight Bolognese:

  • 2 tbs good olive oil, plus extra to cook pasta
  • 1 lb lean ground sirloin4 tsp minced garlic (4 cloves)
  • 1 tbs dried oregano
  • 1/4 tsp crushed red pepper flakes
  • 1 1/4 cups dry red wine, divided
  • 1 (28 ounce) can crushed tomatoes, preferably San Marzano
  • 2 tbs tomato paste
  • Kosher salt & black pepper
  • 3/4 pound dried pasta, such as orecchiette or small pasta (I used 1 pound)
  • 1/4 tsp ground nutmeg
  • 1/4 cup chopped fresh basil leaves, lightly packed
  • 1/4 cup heavy cream
  • 1/2 cup freshly grated Parmesan cheese, plus extra for serving
  1. Heat 2 tbs of olive oil in a large (12 inch) skillet over medium-high heat. Add the ground sirloin and cook, crumbling the meat with a wooden spoon, for 5-7 minutes, until the meat has lost its pink color and has started to brown. Stir in the garlic, oregano, and red pepper flakes and cook for 1 more mintue. Pour 1 cup of the wine into the skillet and stir to scrape up any browned bits. Add the tomatoes, tomato paste, 1 tbs salt, and 1 ½ tsp pepper, stirring until combined. Bring to a boil, lower heat, and simmer for 10 minutes.
  2. Meanwhile, bring a large pot of water to a boil, add a tablespoon of salt, a splash of oil, and the pasta, and cook according to the directions on the box.
  3. While the pasta cooks, finish the sauce. Add the nutmeg, basil, cream, and the remaining 1/4 cup wine to the sauce and simmer for 8-10 minutes, stirring occasionally until thickened. When the pasta is cooked, drain and pour into a large serving bowl. Add the sauce and ½ cup Parmesan and toss well. Serve hot with Parmesan on the side.

Source: How Easy is That? by Ina Garten