Shrimp Mousse


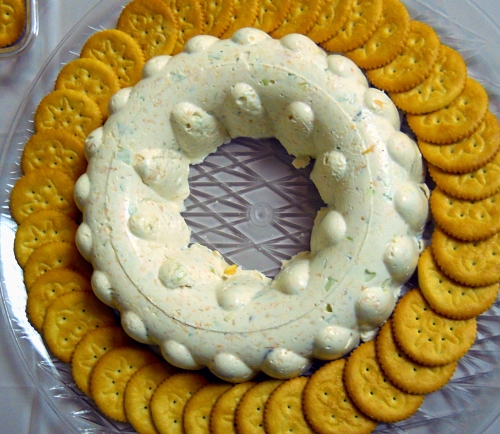
When I first heard shrimp mousse, I will admit I sorta cringed. When I think of mousse I tend to think of a velvety chocolate dessert, something sweet and certainly not savory. But when I tried it, I learned that mousse can be savory and really delicious! We decided to add this to the menu of my sister-in-law’s baby shower. We were wanting food that was a little different than what is typically served at baby shower. We wanted to stay away from lunch meat since that’s become a no-no for pregnant women. The shrimp mousse really added a special something to food table and we didn’t have much leftover.


Shrimp Mousse:

  • 1 envelope unflavored, clear gelatin
  • 2 tbs water
  • 1 can cream of mushroom soup
  • 1 8oz package cream cheese
  • 1 cup mayonnaise
  • 1/4 cup onions, diced small
  • 1 cup celery, diced small
  • 2 4oz cans baby shrimp, drained well


  1. Spray any type of mold, bunt pan, bowl with cooking spray, set aside.
  2. Combine gelatin and water in medium saucepan set over medium heat. When the gelatin is dissolved, add cream of mushroom soup and cream cheese, cook until combined and creamy, about 2-3 minutes.
  3. Take off heat and add the mayo, onion, celery and shrimp, stir till combined. Salt and pepper to taste.
  4. Pour into prepared mold and chill for at least 8 hours or overnight.


Source: Gina Marie’s Kitchen

Chicken Enchilada Wraps

I have had these bookmarked ever since I saw them on Annie’s Eats a year ago. I was waiting for the right time to make them. When I started planning my sister-in-laws baby shower I knew it was time to bring out the chicken enchilada wraps. I decided to triple the recipe to make sure we had enough for our guests. I was a little worried about tripling the spices and ended up cutting back a bit on the Chile powder and Cayenne pepper. When we tasted the chicken filling my daughters and husbands mouth were a tad bit on fire. They are more sensitive to the spicy heat than I am, so I always go by what they tell me when it comes to serving something to others. I sat there trying to figure out what to do. I had already added all the ingredients to the filling and didn’t have anymore cream cheese to add to it. What could I do to take some of the heat away? I looked through the refrigerator and saw sour cream. I added small amounts at a time till it finally worked. I actually think the addition of the sour cream helped round the flavors out even more. I love how things work out just when you think it’s ruined. And thankfully everyone at the shower loved them.

Chicken Enchilada Wraps:

  • 2 chicken breasts, bone-in and skin on
  • Olive Oil
  • Salt and Pepper
  • 1 (8 oz.) pkg. cream cheese, softened
  • 2/3 cup shredded cheese, Mexican blend
  • 1 clove garlic, minced or pressed
  • 2 tsp. chili powder
  • ½ tsp. cumin
  • ¼ tsp. cayenne pepper
  • Salt, to taste
  • Handful of cilantro, chopped
  • 3 green onions, chopped
  • 10 oz. can diced tomatoes with green chiles, drained well
  • 1/4 cup sour cream (optional)
  • 4-6 8-inch tortillas
  1. Preheat oven to 375 degrees.
  2. Place chicken breasts on a baking sheet. Rub each breast with a drizzle of olive oil and sprinkle with salt and pepper. Bake the breasts for 35-45 minutes or until cooked through. Let cool.
  3. Remove the skin and chicken from the bone. Shred the chicken and set aside.
  4. Combine all of the remaining ingredients, except tortillas, in a large mixing bowl.  Mix until well blended. Add the chicken to the filling mixture and stir well to incorporate. Taste and add sour cream, if desired.
  5. Spread a thin layer of the filling mixture over a tortilla, leaving a small border clear around the edge.  Roll the tortilla up tightly into a spiral.  Place the rolled up tortilla on a cutting board and use a sharp knife to cut into 1- to 1½-inch thick segments.  Transfer to a serving platter and serve chilled or at room temperature.

Source: Adapted from Annie’s Eats via Sing for Your Supper, originally from Come On Over Cookbook1 from Gooseberry Patch

Basmati Rice Pilaf

Before I get into this recipe, I want to apologize in advance if I don’t post much next week. My beautiful sister-in-law will be having a baby girl in March and I’m co-hosting her shower. This weekend I’ll be working on making 50-60 onesie sugar cookies. Next week I’ll be prepping all the food. I’m super excited about the shower and will blog about it when it’s all over.

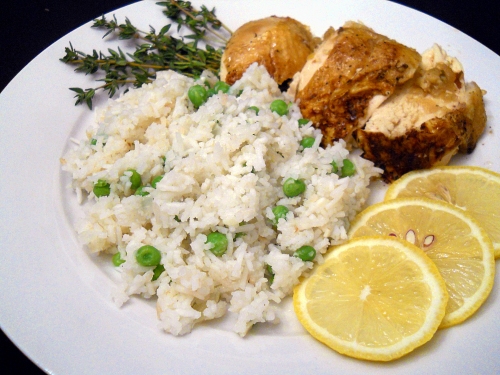
Onto the recipe. I made the Basmati Rice Pilaf when I made the Chicken In A Pot. The sauce from the chicken went perfectly with the rice. The one thing I forgot to add to the rice was the scallions. I don’t think it made a huge difference, but I love scallions and would loved to have had them in it.

Basmati Rice Pilaf:

  • 1 tbs olive oil
  • 1 small onion, minced
  • Salt and Pepper
  • 1 1/2 cups basmati rice, rinsed and drained *See note at bottom
  • 2 1/2 cups water
  • 2 minced garlic cloves
  • 1 tsp grated lemon zest
  • 1/8 tsp red pepper flakes
  • 1/2 cup frozen peas, thawed
  • 2 thinly sliced scallions
  • 1 tbs fresh lemon juice
  1. Heat the oil in a large saucepan over medium heat until shimmering. Add the onion and 1/4 tsp salt and cook, stirring occasionally, until the onion is softened, about 5 minutes.
  2. Stir in the rice, garlic, lemon zest and red pepper flakes and cook, stirring often, until the edges of the grains begin to turn translucent, about 3 minutes. Stir in the water and bring to a simmer. Reduce the heat to low, cover and continue to simmer until the rice is tender and the water is absorbed, 16-18 minutes.
  3. Remove the pot from the heat and sprinkle the peas over the top. Lay a clean folded kitchen towel on the pot and replace the lid over the towel. Let sit for 10 minutes. Add the lemon juice and scallions, fluff the rice with a fork, season with salt and pepper to taste, and serve.

*Note: Rinsing the rice: Rinse the rice in a fine mesh strainer under cold water until the water runs clear, then set the strainer of rinsed rice over a bowl to drain until needed. Rinsing the rice removes excess starch so the rice is light and fluffy, not clumped and sticky.

Source: America’s Test Kitchen Healthy Family Cookbook

Everyday Mac-N-Cheese

I love homemade macaroni and cheese. I’ve made it countless ways as I try to find my favorite. I hate yet to find the right recipe that my kids and I go WOW over. There are a lot of good ones but none have blown our socks off. I will admit that the kids and I are mac-n-cheese snobs so it’s going to take a lot to impress us. If you notice I have not mentioned my husband, he likes mac-n-cheese, but it’s not one of his favorite dishes. The kids and I always stare at him funny when he says that.

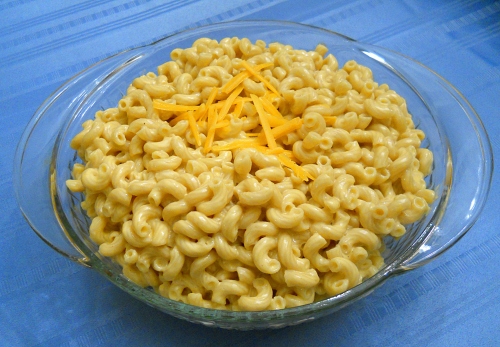
I have always made baked mac-n-cheese so when I saw this recipe in the ATK Healthy Family Cookbook, I knew it was something I had to try. It was a lightened up version of macaroni and cheese but yet sounded like it was something we could like. Instead of making a Béchamel sauce consisting of flour, milk and butter; this is made with evaporated milk, lowfat milk and cornstarch to help thicken. They recommend using Cabot 50% light Vermont Cheddar Cheese but I was unable to find it. So I used regular Cabot Cheddar Cheese and it worked out fine, it just added a little more to the calories. My favorite part of this whole dish is that it didn’t need to be baked and it was fast and easy! The kids and I really liked it and so did my husband. I was hesitant on how the leftovers would taste, and was amazed they tasted just as good as it did the day before, maybe even better!

Everyday Mac-N-Cheese

  • 8 ounces whole-wheat macaroni (I used a little more)
  • Salt and Pepper
  • 1 (12oz) can reduced-fat evaporated milk
  • 3/4 cup 2% lowfat milk
  • 1/8 tsp dry mustard (I could not locate mine so I did a squirt of regular)
  • Pinch cayenne pepper
  • Pinch garlic powder
  • 2 tsp cornstarch
  • 2 cups shredded 50% light cheddar cheese
  1. Bring 2 1/2 quarts water to a boil in a large saucepan. Add the pasta and 2 tsp of salt and cook, stirring often, until completely tender. Reserve 1/2 cup of the cooking water, then drain the pasta and leave it in the colander.
  2. Combine the evaporated milk, 1/2 cup of the lowfat milk, mustard, 1/4 tsp salt, cayenne and garlic powder in the saucepan. Bring the mixture to a boil, then reduce to a simmer. Whisk the cornstarch and remaining 1/4 milk together, then whisk it into the simmering sauce. Continue to simmer, whisking constantly, until the sauce has thickened slightly and is smooth, about 2 minutes.
  3. Off the heat, gradually whisk in the cheddar until melted and smooth. Stir in the cooked pasta and let it sit until the sauce is thickened and the pasta is heated through, 2 to 5 minutes. Season with salt and pepper to taste and add the reserved cooking water as needed to loosen the sauce before serving. (I did not have to add any)

Source: America’s Test Kitchen Healthy Family Cookbook

Football Food Roundup

This week a lot of people are excited about the game, I am not one of those people. My beloved Tampa Bay Buccaneers didn’t even make the playoffs, even though they had a better record than Seattle. But I promise to not go off into a tangent. As much as I love football and hate this time of year when it’s almost done, I just don’t like the two teams playing. I have many loved ones who are huge Steelers fans and being here in PA it’s a bit hard for me. I’m just ready for the weekend to be over and a new season to begin. Till then, people are going to be planning their big parties and they need some food. That’s where I can help. I have a great list of recipes for anyone planning a party to watch the game (or the commercials).

Dips:

Finger Foods/Sides:

Main Dish:

Dessert:

Fresh Tomato Salsa

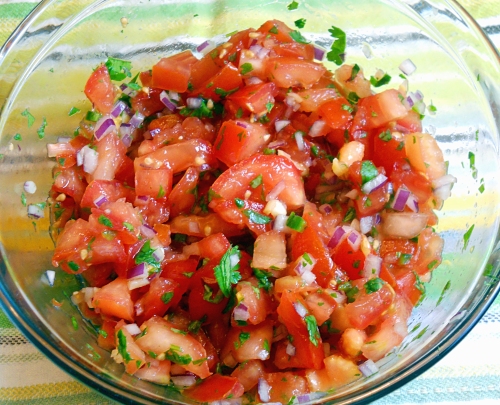
I made this salsa when I made the stovetop chicken fajitas. It was a fantastic condiment to serve with the fajitas and I was sad we had no salsa leftover. My husband is looking forward to me making it again and so am I. I’m not a jar salsa fan and would rather have something fresh and crisp to dip my tortilla chips in. It’s easy to put together and the longest part of the process is letting the tomatoes drain. Once that’s done, throw everything together and let sit for a few minutes so the flavors blend together. Enjoy!

Fresh Tomato Salsa:

  • 12 ounces tomatoes (about 2 medium) cored and chopped small
  • Salt and Pepper
  • 1/4 cup minced red onion
  • 2 tbs minced fresh cilantro
  • 1/2 jalapeño chile, stemmed and seeded and minced finely (whole if you want it very hot)
  • 1 1/2 tsp fresh lime juice, plus extra to taste
  • 1 small garlic clove, minced
  • Sugar
  1. Toss the tomatoes and 1/2 tsp salt in a colander and let drain for 15 minutes.
  2. Transfer the drained tomatoes to a bowl and toss with the onion, cilantro, jalapeño, 1 1/2 tsp of the lime juice and garlic. Season with additional lime juice, salt, pepper and sugar to taste. let the salsa sit for 10 minutes before serving.

Source: America’s Test Kitchen Healthy Family Cookbook

Mediterranean Chopped Salad

As I sit here and watch the snow come down; I think about the summer and all the glorious fresh vegetables that come with it. Someday soon it’ll be summer and the fresh tomatoes will fill my house. Until then, I must find ways to make the icky winter tomatoes taste good. This salad is one of those ways. This recipe is not a throw together kinda salad. There are a few steps that must be done but it’s all worth it in the end. It’s very important to let the tomatoes and cucumbers sit for a good 15-30 minutes with a bit of salt. It helps drain the unnecessary liquid and gives it a great flavor. When I make this again, I will only add half a can of the chickpeas. I felt there were way too many and it sorta drowned out some of the other flavors. My husband on the other hand loved all the chick peas, so it’s up to you on what you want. Make this salad now while it’s bitter cold and snowy. It’ll make you smile knowing that summer is right around the corner. In the meantime, I might have to whip a batch of cinnamon rolls since the kids and I are stuck home.


Mediterranean Chopped Salad:

  • 2 cups cherry tomatoes, stemmed and quartered
  • 1 cucumber (I used English and didn’t peel), peeled, halved lengthwise, seeded, and cut into 1/2 inch pieces
  • Salt and Pepper
  • 3 tbs extra-virgin olive oil
  • 3 tbs red wine vinegar
  • 1 garlic clove, minced
  • 1 (15oz) can chickpeas, rinsed (I’ll use half next time)
  • 1/3 cup kalamata olives, chopped
  • 1/4 cup  minced red onion
  • 1 romaine lettuce heart (about 6oz), cut into 1/2 inch pieces
  • 3/4 cup crumbled feta cheese (about 3oz)
  • 1/2 cup chopped fresh Italian Parsley
  1. Toss the tomatoes, cucumber, and 1/2 tsp salt together in a colander and let drain for 15-30 minutes.
  2. Whisk the oil, vinegar and garlic together in a large bowl until well combined. Add the drained tomatoes and cucumber, chickpeas, olives, and onion and toss to combine. Let sit at room temperature until the flavors blend, about 5 minutes.
  3. Add the lettuce, feta and parsley and toss to combine. Season with salt and pepper to taste and serve.

Source: America’s Test Kitchen Healthy Family Cookbook